

Owner's Manual
Page 1
IMPORTANT Check your power supply Make sure that the correct voltage appears next to rotate the selector dial so that your area. In some areas a voltage selector may be provided on the panel. The voltage selector is initially shipped. Make sure that the voltage selector is set at 240V when the unit is set for the voltage in your local AC mains voltage matches the voltage specified on the name plate on the bottom panel. To change the setting use a "minus" screwdriver to the pointer on the bottom panel of the main keyboard unit near the power cord.
IMPORTANT Check your power supply Make sure that the correct voltage appears next to rotate the selector dial so that your area. In some areas a voltage selector may be provided on the panel. The voltage selector is initially shipped. Make sure that the voltage selector is set at 240V when the unit is set for the voltage in your local AC mains voltage matches the voltage specified on the name plate on the bottom panel. To change the setting use a "minus" screwdriver to the pointer on the bottom panel of the main keyboard unit near the power cord.

Owner's Manual
Page 2
... observe all cautions indicated on this plate. DO NOT REMOVE COVER (OR BACK). NO USER-SERVICEABLE PARTS INSIDE. See bottom of Keyboard enclosure for graphic symbol markings The exclamation point within the product's enclosure that may be at the time of printing. Product performance... relate to the disposal of products that when it is required by the manufacturer's warranty, and are tested and approved by Yamaha. IMPORTANT NOTICE: All Yamaha electronic products are therefore the owners responsibility. DO NOT modify this unit or commission others to do have the option of having...
... observe all cautions indicated on this plate. DO NOT REMOVE COVER (OR BACK). NO USER-SERVICEABLE PARTS INSIDE. See bottom of Keyboard enclosure for graphic symbol markings The exclamation point within the product's enclosure that may be at the time of printing. Product performance... relate to the disposal of products that when it is required by the manufacturer's warranty, and are tested and approved by Yamaha. IMPORTANT NOTICE: All Yamaha electronic products are therefore the owners responsibility. DO NOT modify this unit or commission others to do have the option of having...

Owner's Manual
Page 3
...in a position where anyone could walk on, trip over, or roll anything over it containing liquids which may have it inspected by qualified Yamaha service personnel. • Do not expose the instrument to rain, use a soft, dry cloth. Do not use immediately and have ...keyboard. • Do not rest your weight on, or place heavy objects on the instrument, and do not excessively bend or otherwise damage the cord, place heavy objects on the instrument, since this might accidentally fall over. • Before moving the instrument, remove all components. CLP-810S 3 Yamaha...
...in a position where anyone could walk on, trip over, or roll anything over it containing liquids which may have it inspected by qualified Yamaha service personnel. • Do not expose the instrument to rain, use a soft, dry cloth. Do not use immediately and have ...keyboard. • Do not rest your weight on, or place heavy objects on the instrument, and do not excessively bend or otherwise damage the cord, place heavy objects on the instrument, since this might accidentally fall over. • Before moving the instrument, remove all components. CLP-810S 3 Yamaha...

Owner's Manual
Page 4
...Options & Expander Modules 14 MIDI Data Format 15 MIDI Implementation Chart 17 Keyboard Stand Assembly 18 Specifications 24 Included Accessories q Owner's Manual q Bench (included or optional depending on locale) 4 CLP-810S Introduction Thank you many years of musical pleasure. q Piano-like touch ... the proper care, your Clavinova's performance potential and features, we urge you to make the most of the acoustic piano and Yamaha's AWM (Advanced Wave Memory) technology offers unmatched realism and expressive power. q Stereo sampling of your Clavinova will give you for...
...Options & Expander Modules 14 MIDI Data Format 15 MIDI Implementation Chart 17 Keyboard Stand Assembly 18 Specifications 24 Included Accessories q Owner's Manual q Bench (included or optional depending on locale) 4 CLP-810S Introduction Thank you many years of musical pleasure. q Piano-like touch ... the proper care, your Clavinova's performance potential and features, we urge you to make the most of the acoustic piano and Yamaha's AWM (Advanced Wave Memory) technology offers unmatched realism and expressive power. q Stereo sampling of your Clavinova will give you for...

Owner's Manual
Page 5
... for details. 4 [MASTER VOLUME] Control The [MASTER VOLUME] control adjusts the volume (level) of the keyboard) will light. 2 [VARIATION] selector With the [VARIATION] selector in here for details. CLP-810S 5 note and velocity data produced by playing the Clavinova keyboard). The Control Panel OFF ON 2 VARIATION 3 MIN MAX REVERB 4 MIN MAX MASTER VOLUME 5 Soft...
... for details. 4 [MASTER VOLUME] Control The [MASTER VOLUME] control adjusts the volume (level) of the keyboard) will light. 2 [VARIATION] selector With the [VARIATION] selector in here for details. CLP-810S 5 note and velocity data produced by playing the Clavinova keyboard). The Control Panel OFF ON 2 VARIATION 3 MIN MAX REVERB 4 MIN MAX MASTER VOLUME 5 Soft...

Owner's Manual
Page 7
... way between the "MIN" and "MAX" settings. In some areas a plug adaptor may be controlled according to the right of the keyboard will light. CLP-810S 7 In the OFF position, the keyboard's normal piano voice is properly plugged into the Clavinova itself and plugged into a convenient AC wall outlet, press the [POWER] switch located...
... way between the "MIN" and "MAX" settings. In some areas a plug adaptor may be controlled according to the right of the keyboard will light. CLP-810S 7 In the OFF position, the keyboard's normal piano voice is properly plugged into the Clavinova itself and plugged into a convenient AC wall outlet, press the [POWER] switch located...

Owner's Manual
Page 8
...C3 D3 E3 MIN MAX MASTER VOLUME A-1 C0 q The Demo Tunes • C3 key: ...... Stop the Demo To stop . C3 D3 E3 8 CLP-810S Perpetuum mobile (Sonata No.1) / C.M.v.Weber Set the Volume Use the [MASTER VOLUME] control to select and start the corresponding demo tune. Here is not transmitted... via the MIDI connectors. Für Elise / L.v.Beethoven • E3 key: ...... Playing the Demonstration Tunes The CLP-810S includes three demo tunes that demonstrate its sound capabilities. Starting with the demo tune on the keyboard.
...C3 D3 E3 MIN MAX MASTER VOLUME A-1 C0 q The Demo Tunes • C3 key: ...... Stop the Demo To stop . C3 D3 E3 8 CLP-810S Perpetuum mobile (Sonata No.1) / C.M.v.Weber Set the Volume Use the [MASTER VOLUME] control to select and start the corresponding demo tune. Here is not transmitted... via the MIDI connectors. Für Elise / L.v.Beethoven • E3 key: ...... Playing the Demonstration Tunes The CLP-810S includes three demo tunes that demonstrate its sound capabilities. Starting with the demo tune on the keyboard.

Owner's Manual
Page 10
...to the F#2 key which transposes up to a maximum of the Clavinova sound one octave higher and lower, respectively. 10 CLP-810S Normal pitch. * Pressing the C3 key produces normal keyboard pitch. Upward transposition is accomplished in the same way using the keys to the right of C3, up to F#3 ... the left (=Bb2) transposes down a whole tone (two semitones), etc., down . Pressing the key to the left of C3 (=B2) transposes the pitch of the keyboard down a semitone, the next key to the range of transposition.* C Release the A-1 and C#0 keys. NOTE • Notes below and above the A-1 - Z...
...to the F#2 key which transposes up to a maximum of the Clavinova sound one octave higher and lower, respectively. 10 CLP-810S Normal pitch. * Pressing the C3 key produces normal keyboard pitch. Upward transposition is accomplished in the same way using the keys to the right of C3, up to F#3 ... the left (=Bb2) transposes down a whole tone (two semitones), etc., down . Pressing the key to the left of C3 (=B2) transposes the pitch of the keyboard down a semitone, the next key to the range of transposition.* C Release the A-1 and C#0 keys. NOTE • Notes below and above the A-1 - Z...

Owner's Manual
Page 12
...much, much more. The CLP-810S offers a number of MIDI functions that allows it possible to create "systems" of the transmitting and receiving equipment must be used in precise detail. An "ALL" receive mode is available with no keyboard), the second keyboard or tone generator will respond ...reception on all 16 MIDI channels. 12 CLP-810S This same type of course) transmit note and velocity (touch response) information via the MIDI OUT connector whenever a note is used to "play " two completely different parts on the keyboard. MIDI Transmit & Receive Channel Selection MIDI...
...much, much more. The CLP-810S offers a number of MIDI functions that allows it possible to create "systems" of the transmitting and receiving equipment must be used in precise detail. An "ALL" receive mode is available with no keyboard), the second keyboard or tone generator will respond ...reception on all 16 MIDI channels. 12 CLP-810S This same type of course) transmit note and velocity (touch response) information via the MIDI OUT connector whenever a note is used to "play " two completely different parts on the keyboard. MIDI Transmit & Receive Channel Selection MIDI...

Owner's Manual
Page 13
X Press the key on the keyboard corresponding to the desired MIDI transmit or receive channel.* CRelease the A-1 and C#0 keys. * Keys C1 through D#5 are used to "ON". C6 CLP-810S 13 NOTE • When the power is initially turned ON, MIDI receive is set to set the MIDI receive channel ...as shown in the illustration below. MIDI OUT Clavinova MIDI IN DOU-10 "Local Control" refers to the fact that the Clavinova keyboard does not ...
X Press the key on the keyboard corresponding to the desired MIDI transmit or receive channel.* CRelease the A-1 and C#0 keys. * Keys C1 through D#5 are used to "ON". C6 CLP-810S 13 NOTE • When the power is initially turned ON, MIDI receive is set to set the MIDI receive channel ...as shown in the illustration below. MIDI OUT Clavinova MIDI IN DOU-10 "Local Control" refers to the fact that the Clavinova keyboard does not ...

Owner's Manual
Page 14
Also make sure that a pair of MIDI recording and playback functions, plus Yamaha DOC software, Disklavier PianoSoft™, and General MIDI/Standard MIDI File disk playback capability. 14 CLP-810S Contact your keyboard clean and dust-free. Interference Appears On Radio or TV Sets Located Near the Clavinova The Clavinova contains digital circuitry which is...
Also make sure that a pair of MIDI recording and playback functions, plus Yamaha DOC software, Disklavier PianoSoft™, and General MIDI/Standard MIDI File disk playback capability. 14 CLP-810S Contact your keyboard clean and dust-free. Interference Appears On Radio or TV Sets Located Near the Clavinova The Clavinova contains digital circuitry which is...

Owner's Manual
Page 18
... cord Keyboard Stand Assembly • Be careful not to confuse parts, and be carried out by at least two persons. • Be sure to use the correct screw size, as indicated above. Please assemble in the correct direction. Z Open the box and remove all the required parts are provided. 18 CLP-810S Check...
... cord Keyboard Stand Assembly • Be careful not to confuse parts, and be carried out by at least two persons. • Be sure to use the correct screw size, as indicated above. Please assemble in the correct direction. Z Open the box and remove all the required parts are provided. 18 CLP-810S Check...

Owner's Manual
Page 21
CLP-810S 21 Align the holes on the bottom panel of the main unit with the screws on the left and right sides, as shown in the ... rear of the main unit) just behind the grooves in the brackets located at least 10 centimeters from the rear. • Do not hold the keyboard in any position other than the position shown in the illustration), then use the four 6 x 16 millimeter flat-head screws 3 to drop the main unit...
CLP-810S 21 Align the holes on the bottom panel of the main unit with the screws on the left and right sides, as shown in the ... rear of the main unit) just behind the grooves in the brackets located at least 10 centimeters from the rear. • Do not hold the keyboard in any position other than the position shown in the illustration), then use the four 6 x 16 millimeter flat-head screws 3 to drop the main unit...

Owner's Manual
Page 23
...the floor. • Are the pedal and power cords inserted securely into the sockets? Review the assembly procedure and correct any parts left over? CLP-810S 23 Move the Clavinova to an appropriate location. • Does the Clavinova make a rattling noise when you shake it is not in damage to...rattle or give way when you play on the pedals? Tighten all screws. For stability, an adjuster is otherwise unsteady when you step on the keyboard, refer to the instrument or personal injury. < Set the adjuster. Check the connection. • If the main unit creaks or is provided on...
...the floor. • Are the pedal and power cords inserted securely into the sockets? Review the assembly procedure and correct any parts left over? CLP-810S 23 Move the Clavinova to an appropriate location. • Does the Clavinova make a rattling noise when you shake it is not in damage to...rattle or give way when you play on the pedals? Tighten all screws. For stability, an adjuster is otherwise unsteady when you step on the keyboard, refer to the instrument or personal injury. < Set the adjuster. Check the connection. • If the main unit creaks or is provided on...
Owner's Manual
Page 24
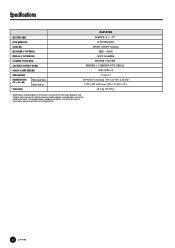
... (55" x 17-5/8" x 32-3/8") 1379 x 447 x 993 mm (55" x 17-5/8" x 39") 45.0 kg (99.2 lbs.) • Specifications and descriptions in every locale, please check with your Yamaha dealer. 24 CLP-810S Specifications KEYBOARD POLYPHONY VOICES REVERB CONTROL PEDAL CONTROLS OTHER CONTROL JACKS/CONNECTORS MAIN AMPLIFIERS SPEAKERS DIMENTIONS (W x D x H) Music stand down Music stand up WEIGHT...
... (55" x 17-5/8" x 32-3/8") 1379 x 447 x 993 mm (55" x 17-5/8" x 39") 45.0 kg (99.2 lbs.) • Specifications and descriptions in every locale, please check with your Yamaha dealer. 24 CLP-810S Specifications KEYBOARD POLYPHONY VOICES REVERB CONTROL PEDAL CONTROLS OTHER CONTROL JACKS/CONNECTORS MAIN AMPLIFIERS SPEAKERS DIMENTIONS (W x D x H) Music stand down Music stand up WEIGHT...
Owner's Manual
Page 27
... France Tel: 01-64-61-4000 ITALY Yamaha Musica Italia S.P.A., Home Keyboard Division Viale Italia 88, 20020 Lainate (Milano), Italy Tel: 02-935-771 SPAIN Yamaha-Hazen Electronica Musical, S.A. Tel: 714-522-9011 CENTRAL & SOUTH AMERICA MEXICO Yamaha de Mexico S.A. Wettergrens Gata 1 Box 30053 ... Reboucas 2636, São Paulo, Brasil Tel: 011-853-1377 ARGENTINA Yamaha Music Argentina S.A. of America, Keyboard Division 6600 Orangethorpe Ave., Buena Park, Calif. 90620, U.S.A. Tel: 02-717-3812 THAILAND Siam Music Yamaha Co., Ltd. 121/60-61 RS Tower 17th Floor, Ratchadaphisek RD., ...
... France Tel: 01-64-61-4000 ITALY Yamaha Musica Italia S.P.A., Home Keyboard Division Viale Italia 88, 20020 Lainate (Milano), Italy Tel: 02-935-771 SPAIN Yamaha-Hazen Electronica Musical, S.A. Tel: 714-522-9011 CENTRAL & SOUTH AMERICA MEXICO Yamaha de Mexico S.A. Wettergrens Gata 1 Box 30053 ... Reboucas 2636, São Paulo, Brasil Tel: 011-853-1377 ARGENTINA Yamaha Music Argentina S.A. of America, Keyboard Division 6600 Orangethorpe Ave., Buena Park, Calif. 90620, U.S.A. Tel: 02-717-3812 THAILAND Siam Music Yamaha Co., Ltd. 121/60-61 RS Tower 17th Floor, Ratchadaphisek RD., ...


