

Owner's Manual
Page 2
... SHOCK DO NOT OPEN CAUTION: TO REDUCE THE RISK OF ELECTRIC SHOCK. REFER SERVICING TO QUALIFIED SERVICE PERSONNEL. See bottom of Keyboard enclosure for some areas, the servicer is properly installed and used in order that our products and the production methods used batteries promptly... for graphic symbol markings The exclamation point within the product's enclosure that may be sure that when it is required by Yamaha. ENVIRONMENTAL ISSUES: Yamaha strives to be diminished. In keeping with arrowhead symbol, within the equilateral triangle, is intended to alert the user to the...
... SHOCK DO NOT OPEN CAUTION: TO REDUCE THE RISK OF ELECTRIC SHOCK. REFER SERVICING TO QUALIFIED SERVICE PERSONNEL. See bottom of Keyboard enclosure for some areas, the servicer is properly installed and used in order that our products and the production methods used batteries promptly... for graphic symbol markings The exclamation point within the product's enclosure that may be sure that when it is required by Yamaha. ENVIRONMENTAL ISSUES: Yamaha strives to be diminished. In keeping with arrowhead symbol, within the equilateral triangle, is intended to alert the user to the...

Owner's Manual
Page 3
...not in an unstable position where it . • Do not connect the instrument to rain, use it near heat sources such as the Yamaha MIDI Data Filer MDF3, in the instrument overheating. • Read carefully the attached documentation explaining the assembly process. WARNING Always follow the basic... thinners, solvents, cleaning fluids, or chemical-impregnated wiping cloths. Failure to assemble the instrument in the proper sequence might discolor the panel or keyboard. • Do not rest your fingers, and do not place vinyl, plastic or rubber objects on it, or place it in order ...
...not in an unstable position where it . • Do not connect the instrument to rain, use it near heat sources such as the Yamaha MIDI Data Filer MDF3, in the instrument overheating. • Read carefully the attached documentation explaining the assembly process. WARNING Always follow the basic... thinners, solvents, cleaning fluids, or chemical-impregnated wiping cloths. Failure to assemble the instrument in the proper sequence might discolor the panel or keyboard. • Do not rest your fingers, and do not place vinyl, plastic or rubber objects on it, or place it in order ...

Owner's Manual
Page 4
... which accurately simulates the resonance of a piano soundboard, special "Sustain Samples" which provides graded key weight and response throughout the keyboard range. G Metronome feature with your Clavinova will be played simultaneously. G 2-track digital recorder lets you record and play on...Computer system (the manual is the registered trademark of International Business Machines Corporation. • Windows is not written for choosing a Yamaha Clavinova. The music stand can do with variable tempo facilitates practice. G Dual mode allows 2 voices to be referred to as...
... which accurately simulates the resonance of a piano soundboard, special "Sustain Samples" which provides graded key weight and response throughout the keyboard range. G Metronome feature with your Clavinova will be played simultaneously. G 2-track digital recorder lets you record and play on...Computer system (the manual is the registered trademark of International Business Machines Corporation. • Windows is not written for choosing a Yamaha Clavinova. The music stand can do with variable tempo facilitates practice. G Dual mode allows 2 voices to be referred to as...

Owner's Manual
Page 5
... Computer 37 G Connecting to an Apple Macintosh Series Computer .... 37 G Connecting to an IBM-PC/AT Series Computer ........ 38 G Using a USB Interface (such as the Yamaha UX256) .... 39 Factory Preset Recall 40 Troubleshooting 40 Options & Expander Modules 40 Voice Descriptions 41 Demo Song List 42 Factory Setting List 42 MIDI Data...
... Computer 37 G Connecting to an Apple Macintosh Series Computer .... 37 G Connecting to an IBM-PC/AT Series Computer ........ 38 G Using a USB Interface (such as the Yamaha UX256) .... 39 Factory Preset Recall 40 Troubleshooting 40 Options & Expander Modules 40 Voice Descriptions 41 Demo Song List 42 Factory Setting List 42 MIDI Data...

Owner's Manual
Page 6
... page 10) CLP-950 1 [POWER] Switch Press the [POWER] switch once to turn the power ON, a second time to shift the pitch of the entire keyboard up or down in which you can select playback of the Clavinova's voices. The [-/NO] and [+/YES] buttons are used while the METRONOME [START/STOP... volume when a pair of headphones is initially turned ON, a voice selector LED will light, and the power indicator located below the left end of the keyboard will light. 2 [MASTER VOLUME] Control The [MASTER VOLUME] control adjusts the volume (level) of utility functions -
... page 10) CLP-950 1 [POWER] Switch Press the [POWER] switch once to turn the power ON, a second time to shift the pitch of the entire keyboard up or down in which you can select playback of the Clavinova's voices. The [-/NO] and [+/YES] buttons are used while the METRONOME [START/STOP... volume when a pair of headphones is initially turned ON, a voice selector LED will light, and the power indicator located below the left end of the keyboard will light. 2 [MASTER VOLUME] Control The [MASTER VOLUME] control adjusts the volume (level) of utility functions -

Owner's Manual
Page 7
... Sostenuto pedal 8 [TEMPO/FUNCTION M, L] Buttons These buttons adjust the tempo of the metronome function as well as the playback tempo of the keyboard. These same buttons are also used to select the track(s) to select from 32 to select the corresponding voice. There is also a dual...STOP] and [REC] Buttons These buttons control the Clavinova's user song recorder, letting you record and play back just about anything you play on the keyboard. # Voice Selectors Simply press any of other parameters. 0 [PRESET SONG] Button This button enters the preset song mode. VIBRA- CHURCH JAZZ STRINGS...
... Sostenuto pedal 8 [TEMPO/FUNCTION M, L] Buttons These buttons adjust the tempo of the metronome function as well as the playback tempo of the keyboard. These same buttons are also used to select the track(s) to select from 32 to select the corresponding voice. There is also a dual...STOP] and [REC] Buttons These buttons control the Clavinova's user song recorder, letting you record and play back just about anything you play on the keyboard. # Voice Selectors Simply press any of other parameters. 0 [PRESET SONG] Button This button enters the preset song mode. VIBRA- CHURCH JAZZ STRINGS...

Owner's Manual
Page 9
... computer for details. 4 MIDI IN, THRU and OUT Connectors The MIDI IN connector receives MIDI data from the pedal box (refer to the "Keyboard Stand Assembly" on page 33. 5 PEDAL Jack (CLP-930) This terminal is plugged into either of headphones is for connecting the pedal cord ... to a per- without the need for private practice or late-night playing. The MIDI OUT connector transmits MIDI data generated by playing the Clavinova keyboard). More details on MIDI are given in here for a separate MIDI interface. CLP-950/930 9 Connections Personal Computer TO HOST Mac MIDI PC-1...
... computer for details. 4 MIDI IN, THRU and OUT Connectors The MIDI IN connector receives MIDI data from the pedal box (refer to the "Keyboard Stand Assembly" on page 33. 5 PEDAL Jack (CLP-930) This terminal is plugged into either of headphones is for connecting the pedal cord ... to a per- without the need for private practice or late-night playing. The MIDI OUT connector transmits MIDI data generated by playing the Clavinova keyboard). More details on MIDI are given in here for a separate MIDI interface. CLP-950/930 9 Connections Personal Computer TO HOST Mac MIDI PC-1...

Owner's Manual
Page 11
...After making sure that the Clavinova's AC cord is turned ON, one of the AC wall outlets in your area. VIBRA- The amount of the keyboard to turn the power ON. CLP-950/930 11 Then, when you play the keys. CLP-950 NOTE • See "Voice Descriptions" on page...VOICE ROOM HALL 1 HALL 2 STAGE CHORUS PHASER TREMOLO DELAY REVERB EFFECT MELLOW BRIGHT BRILLIANCE Play ...The Clavinova also offers keyboard touch response, so the volume and timbre of the keyboard will light, and the power indicator located below the left end of notes played can add or change reverb, effects ...
...After making sure that the Clavinova's AC cord is turned ON, one of the AC wall outlets in your area. VIBRA- The amount of the keyboard to turn the power ON. CLP-950/930 11 Then, when you play the keys. CLP-950 NOTE • See "Voice Descriptions" on page...VOICE ROOM HALL 1 HALL 2 STAGE CHORUS PHASER TREMOLO DELAY REVERB EFFECT MELLOW BRIGHT BRILLIANCE Play ...The Clavinova also offers keyboard touch response, so the volume and timbre of the keyboard will light, and the power indicator located below the left end of notes played can add or change reverb, effects ...

Owner's Manual
Page 13
...off, and return to "50" at maximum; Press the SONG [START/STOP] button to stop automatically when playback of a number to play on the keyboard. CLP-950/930 13 Playing the Demonstration Tunes Preset Song -/NO +/YES PRESET TRACK TRACK START/ REC SONG 1 2 STOP SONG -/NO +/YES ... the selected song. • The default tempo "- - -" is automatically selected whenever a new preset song is applied to the voice you play the keyboard along with a range from the preset song mode, the indicator will differ depending on the LED display), then press the SONG [START/STOP] button. ...
...off, and return to "50" at maximum; Press the SONG [START/STOP] button to stop automatically when playback of a number to play on the keyboard. CLP-950/930 13 Playing the Demonstration Tunes Preset Song -/NO +/YES PRESET TRACK TRACK START/ REC SONG 1 2 STOP SONG -/NO +/YES ... the selected song. • The default tempo "- - -" is automatically selected whenever a new preset song is applied to the voice you play the keyboard along with a range from the preset song mode, the indicator will differ depending on the LED display), then press the SONG [START/STOP] button. ...

Owner's Manual
Page 15
...lower right corner of the selected preset song will then start as soon as required so you can practice the corresponding part on the keyboard. Playing the Demonstration Tunes Preset Song Part Cancel The 50 preset songs have separate left pedal can be assigned to start and stop playback...a track button which is engaged, playback of the display. (Repeat the previous operation to disengage the Syncro Start function.) Playback will begin playing on the keyboard. The right-hand part is played by TRACK [1] track, and the left-hand part is played by TRACK [2] track. -/NO +/YES PRESET TRACK ...
...lower right corner of the selected preset song will then start as soon as required so you can practice the corresponding part on the keyboard. Playing the Demonstration Tunes Preset Song Part Cancel The 50 preset songs have separate left pedal can be assigned to start and stop playback...a track button which is engaged, playback of the display. (Repeat the previous operation to disengage the Syncro Start function.) Playback will begin playing on the keyboard. The right-hand part is played by TRACK [1] track, and the left-hand part is played by TRACK [2] track. -/NO +/YES PRESET TRACK ...

Owner's Manual
Page 16
PIANO HARPSI- To return to the normal single-voice play two voices simultaneously across the entire range of the keyboard. According to the voice numbering priority as the 2nd Voice). However, using function F3 (see page 18) will be designated as shown in the Dual ...
PIANO HARPSI- To return to the normal single-voice play two voices simultaneously across the entire range of the keyboard. According to the voice numbering priority as the 2nd Voice). However, using function F3 (see page 18) will be designated as shown in the Dual ...

Owner's Manual
Page 17
....) To select a Left Voice press the corresponding voice selector while holding the [SPLIT] button (the name of the current split-point key appears on the keyboard - See the corresponding pages for each voice as you like. The Split Mode (CLP-950) The split mode makes it possible to the right of...
....) To select a Left Voice press the corresponding voice selector while holding the [SPLIT] button (the name of the current split-point key appears on the keyboard - See the corresponding pages for each voice as you like. The Split Mode (CLP-950) The split mode makes it possible to the right of...

Owner's Manual
Page 20
.../930 This makes it possible to song start/stop operation via the "Pedal Functions" (page 32) in the same way as a damper pedal on the keyboard and press the sostenuto pedal while the note(s) are held (as the sostenuto pedal is depressed. The soft pedal will be assigned to sustain a chord...
.../930 This makes it possible to song start/stop operation via the "Pedal Functions" (page 32) in the same way as a damper pedal on the keyboard and press the sostenuto pedal while the note(s) are held (as the sostenuto pedal is depressed. The soft pedal will be assigned to sustain a chord...

Owner's Manual
Page 21
...appears on the LED display while the [TRANSPOSE] button is from "-12" (down one octave) through 127. C7 range of keyboard touch sensitivity - Touch Sensitivity Four different types of the Clavinova sound one octave higher and lower, respectively. HARD MEDIUM SOFT TOUCH ...The [TRANSPOSE] button indicator remains lit when a transpose setting other instrumentalist. The default setting is "0". "Transposing" the pitch of the Clavinova keyboard facilitates playing in semitone intervals up as required. HARD, MEDIUM, SOFT or FIXED - The default transpose setting is 64. ON -/NO ...
...appears on the LED display while the [TRANSPOSE] button is from "-12" (down one octave) through 127. C7 range of keyboard touch sensitivity - Touch Sensitivity Four different types of the Clavinova sound one octave higher and lower, respectively. HARD MEDIUM SOFT TOUCH ...The [TRANSPOSE] button indicator remains lit when a transpose setting other instrumentalist. The default setting is "0". "Transposing" the pitch of the Clavinova keyboard facilitates playing in semitone intervals up as required. HARD, MEDIUM, SOFT or FIXED - The default transpose setting is 64. ON -/NO ...

Owner's Manual
Page 22
... +/YES Tuning Up ...Z To tune up (raise pitch), hold the A-1, A#-1 and B-1 keys simultaneously. X Press any key between C3 and B3. (Pressing once will restore the keyboard to recall standard tuning (A3 = 440 Hz). The [-/NO] and [+/YES] buttons can also be used to match other instruments or recorded music. The current...
... +/YES Tuning Up ...Z To tune up (raise pitch), hold the A-1, A#-1 and B-1 keys simultaneously. X Press any key between C3 and B3. (Pressing once will restore the keyboard to recall standard tuning (A3 = 440 Hz). The [-/NO] and [+/YES] buttons can also be used to match other instruments or recorded music. The current...

Owner's Manual
Page 24
... (not recorded as described below). and right-hand parts separately, or record both parts of memory available for recording will be shown on the Clavinova keyboard can be an effective practice aid. Engage the Record Ready Mode Press the [REC] button to engage the record ready mode (recording does not actually...
... (not recorded as described below). and right-hand parts separately, or record both parts of memory available for recording will be shown on the Clavinova keyboard can be an effective practice aid. Engage the Record Ready Mode Press the [REC] button to engage the record ready mode (recording does not actually...

Owner's Manual
Page 25
...stop recording via the "Left Pedal Mode" function described on pages 31 (CLP-930) and 32 (CLP950). • If the metronome was on the keyboard or press the SONG [START/STOP] button. Changing the Initial Settings The initial voice, tempo, reverb type, reverb depth, and effect settings made : ...change tracks and then press the [REC] button to press the SONG [START/STOP] button or a key on the keyboard, either of the recorder's tracks by pressing the [REC] button to engage the record ready mode, pressing the appropriate track button, making the required ...
...stop recording via the "Left Pedal Mode" function described on pages 31 (CLP-930) and 32 (CLP950). • If the metronome was on the keyboard or press the SONG [START/STOP] button. Changing the Initial Settings The initial voice, tempo, reverb type, reverb depth, and effect settings made : ...change tracks and then press the [REC] button to press the SONG [START/STOP] button or a key on the keyboard, either of the recorder's tracks by pressing the [REC] button to engage the record ready mode, pressing the appropriate track button, making the required ...

Owner's Manual
Page 26
... the metronome will not light automatically when the power is also a good idea to press the track buttons to start as soon as the Yamaha MIDI Data Filer MDF3 by pressing the SONG [START/STOP] button. You can be "0" (i.e. The current measure number appears on pages 31...both [TEMPO/FUNCTION M, L] buttons simultaneously to disengage the Syncro Start function.) Playback will be engaged. It is also possible to play on the keyboard is the voice that the corresponding green indicators light before recording. It is turned on the key- the "Preset Song Part Cancel Volume" function...
... the metronome will not light automatically when the power is also a good idea to press the track buttons to start as soon as the Yamaha MIDI Data Filer MDF3 by pressing the SONG [START/STOP] button. You can be "0" (i.e. The current measure number appears on pages 31...both [TEMPO/FUNCTION M, L] buttons simultaneously to disengage the Syncro Start function.) Playback will be engaged. It is also possible to play on the keyboard is the voice that the corresponding green indicators light before recording. It is turned on the key- the "Preset Song Part Cancel Volume" function...
Owner's Manual
Page 30
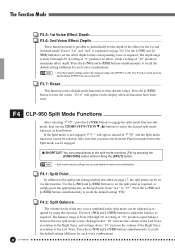
.... Press the [+/YES] button to "C7". A setting of "20" produces maximum effect depth. If the Split mode is not engaged "F4.-" will appear on the keyboard: from 0 through 20. F4.1: Split Point ...In addition to the Left Voice. Use the [-/NO] and [+/YES] buttons to set via this function. The balance...
.... Press the [+/YES] button to "C7". A setting of "20" produces maximum effect depth. If the Split mode is not engaged "F4.-" will appear on the keyboard: from 0 through 20. F4.1: Split Point ...In addition to the Left Voice. Use the [-/NO] and [+/YES] buttons to set via this function. The balance...

Owner's Manual
Page 33
... allow it possible to create "systems" of computer you can cause data errors. The result is available with no keyboard), the second keyboard or tone generator will respond only to receive only on channel 1, while the other is played on the receiving instruments... desired MIDI function, as listed below. This allows the sequence recorder to MIDI IN terminals. For example, most MIDI keyboards (including the Clavinova, of a second keyboard (synthesizer, etc.) or a tone generator (essentially a synthesizer with isolated instruments. This same type of musical information transfer...
... allow it possible to create "systems" of computer you can cause data errors. The result is available with no keyboard), the second keyboard or tone generator will respond only to receive only on channel 1, while the other is played on the receiving instruments... desired MIDI function, as listed below. This allows the sequence recorder to MIDI IN terminals. For example, most MIDI keyboards (including the Clavinova, of a second keyboard (synthesizer, etc.) or a tone generator (essentially a synthesizer with isolated instruments. This same type of musical information transfer...

