Owners Manual
Page 29
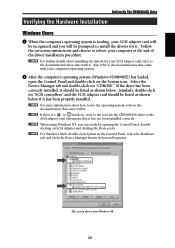
... further details about how to use the operating system, refer to the documentation that it . n For more information about installing the drivers for the CRW8824SX drive or the SCSI adapter card, this means that came with it has not been installed correctly. next to the icon for your SCSI... it . n If there is from Windows 98. 20 Also refer to reboot your computer at the end of the driver installation procedure. Setting Up The CRW8824SX Drive Verifying the Hardware Installation Windows Users 1 When the computer's operating system is loading, your SCSI adapter card will be prompted...
... further details about how to use the operating system, refer to the documentation that it . n For more information about installing the drivers for the CRW8824SX drive or the SCSI adapter card, this means that came with it has not been installed correctly. next to the icon for your SCSI... it . n If there is from Windows 98. 20 Also refer to reboot your computer at the end of the driver installation procedure. Setting Up The CRW8824SX Drive Verifying the Hardware Installation Windows Users 1 When the computer's operating system is loading, your SCSI adapter card will be prompted...
Owners Manual
Page 33
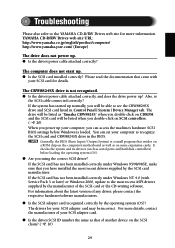
... CRW8824SX drive is the SCSI cable connected correctly? YAMAHA CD-R/RW Drives web site URL: http://www.yamaha.co.jp/english/product/computer/ http://www.yamaha-yste.com/ (Europe) The drive does not power up ? q Is the drive's power cable attached correctly, and does the drive power up . The drive will be listed when you have installed the most recent ASPI drivers supplied...
... CRW8824SX drive is the SCSI cable connected correctly? YAMAHA CD-R/RW Drives web site URL: http://www.yamaha.co.jp/english/product/computer/ http://www.yamaha-yste.com/ (Europe) The drive does not power up ? q Is the drive's power cable attached correctly, and does the drive power up . The drive will be listed when you have installed the most recent ASPI drivers supplied...
Owners Manual
Page 42
...at-Once (DAO 27 E Eject button 8 Ejecting the Disc 22 F firmware 29 Front Panel 8 H Headphone jack 8 Headphone volume control 8 High Speed CD-RW disc 6 L lead-in 27 lead-out 27 LED Indicator 30 LINE OUT connector 9 Loading a Disc 22 M Manual Eject hole 8, 23 Manually Ejecting... 28 paper clip 23 Phillips Screwdriver 7 Power connector 9 Power switch 8 R READ/WRITE LED 8 Rear Panel 9 S SCSI adapter card 15 SCSI driver 24 SCSI ID number 10 SCSI connectors 9 Session-at-Once (SAO 28 Setup Flowchart (Macintosh Users 2 Setup Flowchart (Windows Users 1 static charge 14...
...at-Once (DAO 27 E Eject button 8 Ejecting the Disc 22 F firmware 29 Front Panel 8 H Headphone jack 8 Headphone volume control 8 High Speed CD-RW disc 6 L lead-in 27 lead-out 27 LED Indicator 30 LINE OUT connector 9 Loading a Disc 22 M Manual Eject hole 8, 23 Manually Ejecting... 28 paper clip 23 Phillips Screwdriver 7 Power connector 9 Power switch 8 R READ/WRITE LED 8 Rear Panel 9 S SCSI adapter card 15 SCSI driver 24 SCSI ID number 10 SCSI connectors 9 Session-at-Once (SAO 28 Setup Flowchart (Macintosh Users 2 Setup Flowchart (Windows Users 1 static charge 14...