
Owners Manual
Page 11
... Display Language 17 Adjusting the Contrast of the Display CVP-503 CVP-501 17 Showing the Owner Name in the Opening Display 18 Playing the Demos 18 Display-based Controls 20 The Messages Shown in the Special Website 97 10 Connections - Editing the Volume and Tonal Balance - 88 Basic Procedure 88...
... Display Language 17 Adjusting the Contrast of the Display CVP-503 CVP-501 17 Showing the Owner Name in the Opening Display 18 Playing the Demos 18 Display-based Controls 20 The Messages Shown in the Special Website 97 10 Connections - Editing the Volume and Tonal Balance - 88 Basic Procedure 88...

Owners Manual
Page 12
... the overall volume. 3 MIC [SIGNAL]/[OVER] lamps (CVP-509/505/503 Page 102 These indicate the input level of the connected microphone. 4 [DEMO] button Page 18 Plays the Demos. 5 [METRONOME ON/OFF] button Page 33 Turns the metronome sound on or off. 6 TRANSPOSE buttons Page 42 These transpose the pitch in semitone...
... the overall volume. 3 MIC [SIGNAL]/[OVER] lamps (CVP-509/505/503 Page 102 These indicate the input level of the connected microphone. 4 [DEMO] button Page 18 Plays the Demos. 5 [METRONOME ON/OFF] button Page 33 Turns the metronome sound on or off. 6 TRANSPOSE buttons Page 42 These transpose the pitch in semitone...
Owners Manual
Page 18
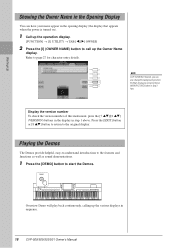
... OWNER 2 Press the [I] (OWNER NAME) button to call up the various displays in sequence. 18 CVP-509/505/503/501 Owner's Manual Playing the Demos The Demos provide helpful, easy-to-understand introductions to the features and functions as well as sound demonstrations. 1 Press the...▲▼] (VERSION) buttons in the display in step 2 here. Press the [EXIT] button or [8 ▲▼] button to return to start the Demos. Overview Demo will play back continuously, calling up the Owner Name display. Refer to page 27 for character-entry details. Starting Up Showing the Owner Name in...
... OWNER 2 Press the [I] (OWNER NAME) button to call up the various displays in sequence. 18 CVP-509/505/503/501 Owner's Manual Playing the Demos The Demos provide helpful, easy-to-understand introductions to the features and functions as well as sound demonstrations. 1 Press the...▲▼] (VERSION) buttons in the display in step 2 here. Press the [EXIT] button or [8 ▲▼] button to return to start the Demos. Overview Demo will play back continuously, calling up the Owner Name display. Refer to page 27 for character-entry details. Starting Up Showing the Owner Name in...
Owners Manual
Page 19
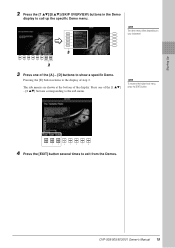
..., press the [EXIT] button. 4 Press the [EXIT] button several times to call up the specific Demo menu. Pressing the [E] button returns to the display of the display. NOTE The demo menu differs depending on your instrument. 3 2 3 Press one of the [A] - [D] buttons to the sub ...menu. CVP-509/505/503/501 Owner's Manual 19 Press one of the [1 ▲▼] - [8 ▲▼] buttons corresponding to show a specific Demo. Starting Up 2 Press ...
..., press the [EXIT] button. 4 Press the [EXIT] button several times to call up the specific Demo menu. Pressing the [E] button returns to the display of the display. NOTE The demo menu differs depending on your instrument. 3 2 3 Press one of the [A] - [D] buttons to the sub ...menu. CVP-509/505/503/501 Owner's Manual 19 Press one of the [1 ▲▼] - [8 ▲▼] buttons corresponding to show a specific Demo. Starting Up 2 Press ...
Owners Manual
Page 38
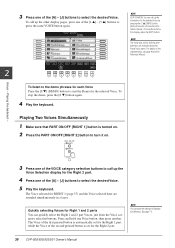
... on. 2 Press the PART ON/OFF [RIGHT 2] button to turn it on the characteristics, see page 40 and the Reference Manual. To stop the demo, press the [8 ▼] button again. 4 Play the keyboard. The Voice selected for RIGHT 1 (page 37) and the Voice selected here are indicated... quickly select the Right 1 and 2 part Voices, just from the Voice category selection buttons. 3 Press one of the [A] - [J] buttons to start the Demo for the selected Voice. NOTE The Voice type and its defining characteristics are sounded simultaneously in a layer. For details on . 3 Press one of...
... on. 2 Press the PART ON/OFF [RIGHT 2] button to turn it on the characteristics, see page 40 and the Reference Manual. To stop the demo, press the [8 ▼] button again. 4 Play the keyboard. The Voice selected for RIGHT 1 (page 37) and the Voice selected here are indicated... quickly select the Right 1 and 2 part Voices, just from the Voice category selection buttons. 3 Press one of the [A] - [J] buttons to start the Demo for the selected Voice. NOTE The Voice type and its defining characteristics are sounded simultaneously in a layer. For details on . 3 Press one of...
Owners Manual
Page 123
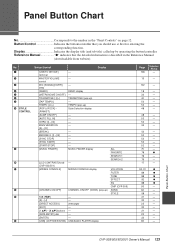
No. 1 2 3 4 5 6 7 8 STYLE CONTROL 9 ) ! @ # $ Button/Control Display [USB TO DEVICE] terminal MASTER VOLUME control MIC [SIGNAL]/[OVER] lamp [DEMO] [METRONOME ON/OFF] TRANSPOSE [-]/[+] [TAP TEMPO] TEMPO [-]/[+] [POP & ROCK] - [PIANIST] [ACMP ON/OFF] [AUTO FILL IN] INTRO [I] - [III] MAIN VARIATION [A] ...you should use at first for entering the corresponding function. TRANSPOSE (pop-up ) Style Selection display - - - - - - - - - DEMO display - MIXING CONSOLE display [CHANNEL ON/OFF] CHANNEL ON/OFF (SONG) (pop-up by operating the button/controller. MUSIC FINDER display [LCD CONTRAST]...
No. 1 2 3 4 5 6 7 8 STYLE CONTROL 9 ) ! @ # $ Button/Control Display [USB TO DEVICE] terminal MASTER VOLUME control MIC [SIGNAL]/[OVER] lamp [DEMO] [METRONOME ON/OFF] TRANSPOSE [-]/[+] [TAP TEMPO] TEMPO [-]/[+] [POP & ROCK] - [PIANIST] [ACMP ON/OFF] [AUTO FILL IN] INTRO [I] - [III] MAIN VARIATION [A] ...you should use at first for entering the corresponding function. TRANSPOSE (pop-up ) Style Selection display - - - - - - - - - DEMO display - MIXING CONSOLE display [CHANNEL ON/OFF] CHANNEL ON/OFF (SONG) (pop-up by operating the button/controller. MUSIC FINDER display [LCD CONTRAST]...

Owners Manual
Page 127
...FC7 Yes - 20W x 2 16cm x 2 * Specifications and descriptions in this owner's manual are for the Piano" Music Book • My Yamaha Product User Registration *The PRODUCT ID on the sheet will be included or optional, depending on /off, Human Voices (5 Languages) 5 - 500, Tap ... Accessories Service Registration Memory Lesson/Guide Number of Buttons Control Lesson/Guide Demo USB Audio Overall Controls Miscellaneous Storage Connectivity Amplifiers Guide Lamp Performance Assistant Demo Playback Recording Metronome Tempo Range Transpose Tuning Scale Type PIANO RESET Button ...
...FC7 Yes - 20W x 2 16cm x 2 * Specifications and descriptions in this owner's manual are for the Piano" Music Book • My Yamaha Product User Registration *The PRODUCT ID on the sheet will be included or optional, depending on /off, Human Voices (5 Languages) 5 - 500, Tap ... Accessories Service Registration Memory Lesson/Guide Number of Buttons Control Lesson/Guide Demo USB Audio Overall Controls Miscellaneous Storage Connectivity Amplifiers Guide Lamp Performance Assistant Demo Playback Recording Metronome Tempo Range Transpose Tuning Scale Type PIANO RESET Button ...
Owners Manual
Page 128
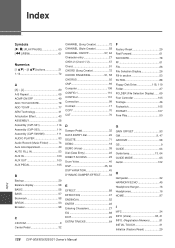
... CMP 93 Computer 108 CONFIG 1 110 CONFIG 2 110 Connection 99 Contrast 17 COPY 70 CUT 70 D Damper Pedal 32 DATA ENTRY dial 22 DELETE 71 DEMO 18 DEMO (Voice 38 Dial (Data Entry 22 DIRECT ACCESS 23 Drum Voice 40 DSP 45, 92 DSP VARIATION 45 DYNAMIC DAMPER EFFECT........... 34 E EFFECT 88...
... CMP 93 Computer 108 CONFIG 1 110 CONFIG 2 110 Connection 99 Contrast 17 COPY 70 CUT 70 D Damper Pedal 32 DATA ENTRY dial 22 DELETE 71 DEMO 18 DEMO (Voice 38 Dial (Data Entry 22 DIRECT ACCESS 23 Drum Voice 40 DSP 45, 92 DSP VARIATION 45 DYNAMIC DAMPER EFFECT........... 34 E EFFECT 88...


