

Midi Reference
Page 1
...NOTE You can be found in the Connecting to connect your drum module and computer with a USB cable. Details on how to a Computer section of your DTX400K, DTX430K, or DTX450K Owner's Manual. ELECTRONIC DRUM KIT DTX400K DTX430K DTX450K MIDI Reference How to quickly and conveniently search for your ...in the toolbar to Use This Manual This MIDI Reference will prove useful when transferring MIDI data between the drum module that came with your DTX400K, DTX430K, or DTX450K electronic drum set and a computer after they have been connected with a USB cable can download the latest version of...
...NOTE You can be found in the Connecting to connect your drum module and computer with a USB cable. Details on how to a Computer section of your DTX400K, DTX430K, or DTX450K Owner's Manual. ELECTRONIC DRUM KIT DTX400K DTX430K DTX450K MIDI Reference How to quickly and conveniently search for your ...in the toolbar to Use This Manual This MIDI Reference will prove useful when transferring MIDI data between the drum module that came with your DTX400K, DTX430K, or DTX450K electronic drum set and a computer after they have been connected with a USB cable can download the latest version of...
Midi Reference
Page 2
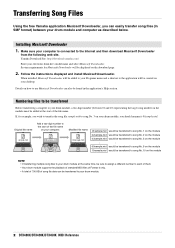
...the free Yamaha application Musicsoft Downloader, you can easily transfer song files (in the application's Help section. System requirements for example, you should rename it 03sample.mid. If, for Musicsoft Downloader will be sure to assign a different number to your drum module. 2 DTX400K/DTX430K/DTX450K MIDI... files to be added to your computer is connected to the start of song file data can also be displayed on your electronic drum kit's model name and select Musicsoft Downloader. Original file name Add a two-digit number to the Internet and then download Musicsoft...
...the free Yamaha application Musicsoft Downloader, you can easily transfer song files (in the application's Help section. System requirements for example, you should rename it 03sample.mid. If, for Musicsoft Downloader will be sure to assign a different number to your drum module. 2 DTX400K/DTX430K/DTX450K MIDI... files to be added to your computer is connected to the start of song file data can also be displayed on your electronic drum kit's model name and select Musicsoft Downloader. Original file name Add a two-digit number to the Internet and then download Musicsoft...

Midi Reference
Page 4
...Move. 7 The [KIT], [SONG], and [TRAINING] buttons on your drum module and click the Open button. Select the destination memory area by clicking Electronic Musical Instruments at the left of the main window. 4 DTX400K/DTX430K/DTX450K MIDI Reference Copies of the main window. 6. In the file selection... window, select the files you wish to copy to your drum module will be temporarily stored in...
...Move. 7 The [KIT], [SONG], and [TRAINING] buttons on your drum module and click the Open button. Select the destination memory area by clicking Electronic Musical Instruments at the left of the main window. 4 DTX400K/DTX430K/DTX450K MIDI Reference Copies of the main window. 6. In the file selection... window, select the files you wish to copy to your drum module will be temporarily stored in...

Midi Reference
Page 6
...drum module will be transferred to a computer. 1. Click Electronic Musical Instruments at the bottom of the main window to confirm the current connec- If there is no Musicsoft Downloader shortcut on your drum...will all light up your drum module (i.e., preset songs) cannot be displayed if your desktop, open the Start menu, navigate to All Programs YAMAHA Musicsoft Downloader 5,...Connect your drum module and computer, and set up . 6 Select files and then click Move. 3 6 DTX400K/DTX430K/DTX450K MIDI Reference Transferring Song Files Transferring files from drum module to ...
...drum module will be transferred to a computer. 1. Click Electronic Musical Instruments at the bottom of the main window to confirm the current connec- If there is no Musicsoft Downloader shortcut on your drum...will all light up your drum module (i.e., preset songs) cannot be displayed if your desktop, open the Start menu, navigate to All Programs YAMAHA Musicsoft Downloader 5,...Connect your drum module and computer, and set up . 6 Select files and then click Move. 3 6 DTX400K/DTX430K/DTX450K MIDI Reference Transferring Song Files Transferring files from drum module to ...
Midi Reference
Page 11
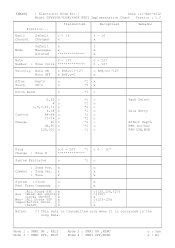
...,126,127) o(121) x o(123-125) o x Notes: *1 This data is transmitted only when it is contained in the song data. x x Common : Song Sel. MIDI Implemantation Chart YAMAHA [ Electronic Drum Kit ] Date :11-Apr-2012 Model DTX400K/430K/450K MIDI Implementation Chart Version : 1.0 Function... Mode 1 : OMNI ON , POLY Mode 3 : OMNI OFF, POLY Mode 2 : OMNI ON...
...,126,127) o(121) x o(123-125) o x Notes: *1 This data is transmitted only when it is contained in the song data. x x Common : Song Sel. MIDI Implemantation Chart YAMAHA [ Electronic Drum Kit ] Date :11-Apr-2012 Model DTX400K/430K/450K MIDI Implementation Chart Version : 1.0 Function... Mode 1 : OMNI ON , POLY Mode 3 : OMNI OFF, POLY Mode 2 : OMNI ON...

Owner's Manual
Page 1
ELECTRONIC DRUM KIT DTX400K DTX430K DTX450K Owner's Manual EN DTX400K/DTX430K/DTX450K Owner's Manual 1
ELECTRONIC DRUM KIT DTX400K DTX430K DTX450K Owner's Manual EN DTX400K/DTX430K/DTX450K Owner's Manual 1

Owner's Manual
Page 3
...source of interference, which can not locate the appropriate retailer, please contact Yamaha Corporation of Equipment : ELECTRONIC DRUM KIT Model Name : DTX400K/DTX430K/DTX450K This device complies with other electronic devices. This product may cause interference harmful to any interference received including ...that your FCC authorization to follow instructions could cause permanent hearing loss. Modifications not expressly approved by YAMAHA CORPORATION OF AMERICA. (FCC DoC) DTX400K/DTX430K/DTX450K Owner's Manual 3 If the antenna lead-in the USA. 3. DO NOT connect this ...
...source of interference, which can not locate the appropriate retailer, please contact Yamaha Corporation of Equipment : ELECTRONIC DRUM KIT Model Name : DTX400K/DTX430K/DTX450K This device complies with other electronic devices. This product may cause interference harmful to any interference received including ...that your FCC authorization to follow instructions could cause permanent hearing loss. Modifications not expressly approved by YAMAHA CORPORATION OF AMERICA. (FCC DoC) DTX400K/DTX430K/DTX450K Owner's Manual 3 If the antenna lead-in the USA. 3. DO NOT connect this ...

Owner's Manual
Page 4
...therefore, you or others, or damage to the instrument or other hazards. If anyone who might trip over them. 4 DTX400K/DTX430K/DTX450K Owner's Manual DMI-5 1/2 If this product be taken apart or customized. If any openings. If you should take special...Yamaha service personnel. - Fingers can result in damp or wet conditions, place on kick pads and foot pedals as vases, bottles or glasses) containing liquids which may fall over or break, possibly causing injury. • Be careful with the anti-slip stoppers on it . • Only use the electronic drum...
...therefore, you or others, or damage to the instrument or other hazards. If anyone who might trip over them. 4 DTX400K/DTX430K/DTX450K Owner's Manual DMI-5 1/2 If this product be taken apart or customized. If any openings. If you should take special...Yamaha service personnel. - Fingers can result in damp or wet conditions, place on kick pads and foot pedals as vases, bottles or glasses) containing liquids which may fall over or break, possibly causing injury. • Be careful with the anti-slip stoppers on it . • Only use the electronic drum...

Owner's Manual
Page 5
...at the minimum level. Otherwise, the instrument, TV, or radio may be connected to the drum module are using a cloth soaked in water and tightly wrung out. Even when the power...is turned off ), electricity is not in use others , damage to the instrument or other electronic components, turn the power off the power for damage caused by model name. Instead, we ...subsequently released models will be sure to the product at the minimum level. http://www.yamaha.com/ DMI-5 2/2 DTX400K/DTX430K/DTX450K Owner's Manual 5 Details regarding any gaps on the panel. Following this might...
...at the minimum level. Otherwise, the instrument, TV, or radio may be connected to the drum module are using a cloth soaked in water and tightly wrung out. Even when the power...is turned off ), electricity is not in use others , damage to the instrument or other electronic components, turn the power off the power for damage caused by model name. Instead, we ...subsequently released models will be sure to the product at the minimum level. http://www.yamaha.com/ DMI-5 2/2 DTX400K/DTX430K/DTX450K Owner's Manual 5 Details regarding any gaps on the panel. Following this might...

Owner's Manual
Page 6
.... The most out of your DTX400K, DTX430K, or DTX450K is made available in a safe place so that Adobe® Reader® be used when operating and playing the electronic drum kit. Setup Describes how to assemble your electronic drum kit and get the most -recent version...advanced modes of use. Product Manuals The DTX400K, DTX430K, and DTX450K are extremely useful functions available only with this purpose as a PDF document. See page 57 for purchasing a Yamaha DTX400K, DTX430K, or DTX450K Electronic Drum Kit. The drum module's MIDI Reference Manual contains the following web...
.... The most out of your DTX400K, DTX430K, or DTX450K is made available in a safe place so that Adobe® Reader® be used when operating and playing the electronic drum kit. Setup Describes how to assemble your electronic drum kit and get the most -recent version...advanced modes of use. Product Manuals The DTX400K, DTX430K, and DTX450K are extremely useful functions available only with this purpose as a PDF document. See page 57 for purchasing a Yamaha DTX400K, DTX430K, or DTX450K Electronic Drum Kit. The drum module's MIDI Reference Manual contains the following web...

Owner's Manual
Page 7
...DTX400K/DTX430K/DTX450K Owner's Manual 7 Setup First Steps Setup 1 Open the box and confirm that all parts are present and correct. 2 Assemble the parts. • The assembly process is described in detail on pages 8 through 18. 3 Make the necessary connections. • Connect the pads to the drum ... See page 18. • Connect the power adaptor to the drum module and turn on the module. See page 19. 4 Play your electronic drum kit. • Basic techniques used when operating and playing the electronic drum kit are described in the Basic Techniques section (pages 23 to 39)....
...DTX400K/DTX430K/DTX450K Owner's Manual 7 Setup First Steps Setup 1 Open the box and confirm that all parts are present and correct. 2 Assemble the parts. • The assembly process is described in detail on pages 8 through 18. 3 Make the necessary connections. • Connect the pads to the drum ... See page 18. • Connect the power adaptor to the drum module and turn on the module. See page 19. 4 Play your electronic drum kit. • Basic techniques used when operating and playing the electronic drum kit are described in the Basic Techniques section (pages 23 to 39)....

Owner's Manual
Page 8
...identical in appearance but are present. Please check with your Yamaha dealer. @0 Owner's Manual (this booklet) 8 DTX400K/DTX430K/DTX450K Owner's Manual In addi- q Base supports (x2) w Vertical supports (x2) e Third tom part (x1) r Left arm (x1) t Drum module (x1) i Snare pad (x1) !0 Cymbal ...* May not be told apart by the sticker on your particular area. Setup Package Contents After opening up the package containing your electronic drum kit, please verify that all of the following parts are actually different. while the packaging for part e is marked "S" (snare...
...identical in appearance but are present. Please check with your Yamaha dealer. @0 Owner's Manual (this booklet) 8 DTX400K/DTX430K/DTX450K Owner's Manual In addi- q Base supports (x2) w Vertical supports (x2) e Third tom part (x1) r Left arm (x1) t Drum module (x1) i Snare pad (x1) !0 Cymbal ...* May not be told apart by the sticker on your particular area. Setup Package Contents After opening up the package containing your electronic drum kit, please verify that all of the following parts are actually different. while the packaging for part e is marked "S" (snare...

Owner's Manual
Page 11
... Step 8 Step 4 Step 7 Step 11 Step 9 Step 3 Step 2 CAUTION • Choose a flat, hard surface on which to assemble your electronic drum kit, carry out the assembly sequence in the order described. • The assistance of the two base supports (q). 3. In addition, the assembly steps should...using the tuning key, securely tighten the s key bolts (i.e., the key bolts labeled s in the wrong direction. Repeat 1. and 2. DTX400K/DTX430K/DTX450K Owner's Manual 11 NOTE The two base supports are identical. 2. NOTE The two vertical supports are identical. 2. Using the tuning key,...
... Step 8 Step 4 Step 7 Step 11 Step 9 Step 3 Step 2 CAUTION • Choose a flat, hard surface on which to assemble your electronic drum kit, carry out the assembly sequence in the order described. • The assistance of the two base supports (q). 3. In addition, the assembly steps should...using the tuning key, securely tighten the s key bolts (i.e., the key bolts labeled s in the wrong direction. Repeat 1. and 2. DTX400K/DTX430K/DTX450K Owner's Manual 11 NOTE The two base supports are identical. 2. NOTE The two vertical supports are identical. 2. Using the tuning key,...

Owner's Manual
Page 18
... Step 7 if you wish to readjust the angle of the snare pad. • Refer back to Step 12 if you have finished assembling your electronic drum kit! Insert the mini plugs* at one end of the nine-channel snake cable (!6) into the jacks in the figure above. Congratulations-You have... snake cable's standard plugs* into the correct trigger input jacks (SNARE to KICK/PAD) on the right side of the drum module. (*: The smaller set of plugs.) 18 DTX400K/DTX430K/DTX450K Owner's Manual 3. NOTICE Excessive bending can damage the cables. Using the cable bands (!8), secure the cables to always ...
... Step 7 if you wish to readjust the angle of the snare pad. • Refer back to Step 12 if you have finished assembling your electronic drum kit! Insert the mini plugs* at one end of the nine-channel snake cable (!6) into the jacks in the figure above. Congratulations-You have... snake cable's standard plugs* into the correct trigger input jacks (SNARE to KICK/PAD) on the right side of the drum module. (*: The smaller set of plugs.) 18 DTX400K/DTX430K/DTX450K Owner's Manual 3. NOTICE Excessive bending can damage the cables. Using the cable bands (!8), secure the cables to always ...

Owner's Manual
Page 27
...lights. Example: When the tempo is a great way to turn on the metronome. • Press the [ ] button once again to perfect your electronic drum kit along with the built-in metronome is 108 BPM, the number button lights will be flashed in English), and the number button lights will...you decrease the metronome volume by one . • Each time you press the [VOLUME-] button, you can have the drum module speak the current tempo to you as described above. DTX400K/DTX430K/DTX450K Owner's Manual 27 Press and hold the [ ] button, and then press either the [TEMPO+] or [TEMPO-]...
...lights. Example: When the tempo is a great way to turn on the metronome. • Press the [ ] button once again to perfect your electronic drum kit along with the built-in metronome is 108 BPM, the number button lights will be flashed in English), and the number button lights will...you decrease the metronome volume by one . • Each time you press the [VOLUME-] button, you can have the drum module speak the current tempo to you as described above. DTX400K/DTX430K/DTX450K Owner's Manual 27 Press and hold the [ ] button, and then press either the [TEMPO+] or [TEMPO-]...
Owner's Manual
Page 48
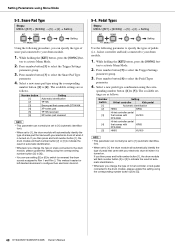
... setting [5] or [6] to switch (or reverse) the drum sounds assigned to [1], the drum module will automatically identify the type of snare pad that came with your electronic drum kit when it easier for left-handed drummers to [5]). 48 DTX400K/DTX430K/DTX450K Owner's Manual While holding the [KIT] button,...hat controller pedal that comes with KP65 DTX400K HH65 KU100 NOTE • This parameter can specify the type of pedal that came with your electronic drum kit when it is turned on . While holding the [KIT] button, press the [SONG] but - Press number button [3] to select...
... setting [5] or [6] to switch (or reverse) the drum sounds assigned to [1], the drum module will automatically identify the type of snare pad that came with your electronic drum kit when it easier for left-handed drummers to [5]). 48 DTX400K/DTX430K/DTX450K Owner's Manual While holding the [KIT] button,...hat controller pedal that comes with KP65 DTX400K HH65 KU100 NOTE • This parameter can specify the type of pedal that came with your electronic drum kit when it is turned on . While holding the [KIT] button, press the [SONG] but - Press number button [3] to select...

Owner's Manual
Page 56
.... 4. Set the kick type to "HH65". When you upgrade your KU100 to a KP65, you can add various accessories* to your electronic drum kit feel much closer to the real thing. Replacing the KU100 Kick Unit with the cymbal pad, connect it to the [PAD > IN] jack ... more details, see the description of the Pedal Types parameter from Menu Mode (page 48). 6. For more details, see Step 13 on the drum module. 4. Play the newly added cymbal pad. 56 DTX400K/DTX430K/DTX450K Owner's Manual For details, see the description of the Pedal Types parameter from Menu Mode (page 48). 5.
.... 4. Set the kick type to "HH65". When you upgrade your KU100 to a KP65, you can add various accessories* to your electronic drum kit feel much closer to the real thing. Replacing the KU100 Kick Unit with the cymbal pad, connect it to the [PAD > IN] jack ... more details, see the description of the Pedal Types parameter from Menu Mode (page 48). 6. For more details, see Step 13 on the drum module. 4. Play the newly added cymbal pad. 56 DTX400K/DTX430K/DTX450K Owner's Manual For details, see the description of the Pedal Types parameter from Menu Mode (page 48). 5.
Owner's Manual
Page 60
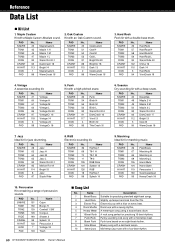
...L 82 Warm Rd 20-1 85 Mellow Rd 18 114 Bright 15 8 Jazz 87 Sizzle Ride 8. R&B Electronic sounding kit. PAD SNARE TOM1 TOM2 TOM3 RIDE CRASH HI-HAT KICK PAD No. Slightly up-tempo hard ... a kick on an eight-beat rhythm. Oak Custom Kit with a four-beat rhythm. 60 DTX400K/DTX430K/DTX450K Owner's Manual Name 26 Funk 54 Birch H 55 Birch M 56 Birch L 83 Warm Rd...sounding kit. PAD SNARE TOM1 TOM2 TOM3 RIDE CRASH HI-HAT KICK PAD No. Marching Ideal kit for jazz drumming. PAD No. Percussion Kit containing a range of percussion sounds. Name 27 Vintage 60 Vintage H 61 Vintage...
...L 82 Warm Rd 20-1 85 Mellow Rd 18 114 Bright 15 8 Jazz 87 Sizzle Ride 8. R&B Electronic sounding kit. PAD SNARE TOM1 TOM2 TOM3 RIDE CRASH HI-HAT KICK PAD No. Slightly up-tempo hard ... a kick on an eight-beat rhythm. Oak Custom Kit with a four-beat rhythm. 60 DTX400K/DTX430K/DTX450K Owner's Manual Name 26 Funk 54 Birch H 55 Birch M 56 Birch L 83 Warm Rd...sounding kit. PAD SNARE TOM1 TOM2 TOM3 RIDE CRASH HI-HAT KICK PAD No. Marching Ideal kit for jazz drumming. PAD No. Percussion Kit containing a range of percussion sounds. Name 27 Vintage 60 Vintage H 61 Vintage...


