

Owner's Manual
Page 2
... Trigger Settings 46 n Training Settings 49 m Other Settings 53 Integrating Separately Sold Accessories .. 56 For DTX400K Owners 56 For DTX430K & DTX450K Owners 56 Connecting to a Computer 57 Making Connections 57 MIDI Reference Manual 57 Reference Troubleshooting 58 Data List 60 ...Specifications 64 Index 65 2 DTX400K/DTX430K/DTX450K Owner's Manual Contents PRECAUTIONS 4 Welcome 6 Product Manuals 6 Setup First Steps 7 Package Contents 8 Assembly Guide 11 Setting Up for Sound 19 Connecting the ...
... Trigger Settings 46 n Training Settings 49 m Other Settings 53 Integrating Separately Sold Accessories .. 56 For DTX400K Owners 56 For DTX430K & DTX450K Owners 56 Connecting to a Computer 57 Making Connections 57 MIDI Reference Manual 57 Reference Troubleshooting 58 Data List 60 ...Specifications 64 Index 65 2 DTX400K/DTX430K/DTX450K Owner's Manual Contents PRECAUTIONS 4 Welcome 6 Product Manuals 6 Setup First Steps 7 Package Contents 8 Assembly Guide 11 Setting Up for Sound 19 Connecting the ...

Owner's Manual
Page 6
...; Instructions on how to transfer songs from page to the drum module Using PDF Manuals The Reference Manual for purchasing a Yamaha DTX400K, DTX430K, or DTX450K Electronic Drum Kit. Reference Describes troubleshooting techniques and contains other more details. • MIDI-related reference information • Reference...easily search for playing. We recommend that Adobe® Reader® be used when operating and playing the electronic drum kit. Setup Describes how to assemble your electronic drum kit and get the most -recent version of Adobe® Reader® can refer...
...; Instructions on how to transfer songs from page to the drum module Using PDF Manuals The Reference Manual for purchasing a Yamaha DTX400K, DTX430K, or DTX450K Electronic Drum Kit. Reference Describes troubleshooting techniques and contains other more details. • MIDI-related reference information • Reference...easily search for playing. We recommend that Adobe® Reader® be used when operating and playing the electronic drum kit. Setup Describes how to assemble your electronic drum kit and get the most -recent version of Adobe® Reader® can refer...

Owner's Manual
Page 7
Setup First Steps Setup 1 Open the box and confirm that all parts are present and correct. 2 Assemble the parts. • The assembly process is described in detail on pages 8 ... in the Basic Techniques section (pages 23 to 39). • More complex methods are described in the Advanced Techniques section (pages 40 to 55). DTX400K/DTX430K/DTX450K Owner's Manual 7
Setup First Steps Setup 1 Open the box and confirm that all parts are present and correct. 2 Assemble the parts. • The assembly process is described in detail on pages 8 ... in the Basic Techniques section (pages 23 to 39). • More complex methods are described in the Advanced Techniques section (pages 40 to 55). DTX400K/DTX430K/DTX450K Owner's Manual 7

Owner's Manual
Page 8
...x1) !8 Cable bands (x3) !9 Power adaptor (x1) * May not be told apart by the sticker on your Yamaha dealer. @0 Owner's Manual (this booklet) 8 DTX400K/DTX430K/DTX450K Owner's Manual Please check with your particular area. tion, the polystyrene foam packaging used for part i is marked "T"... (tom); while the packaging for part e is marked "S" (snare). Setup Package Contents After opening up the package ...
...x1) !8 Cable bands (x3) !9 Power adaptor (x1) * May not be told apart by the sticker on your Yamaha dealer. @0 Owner's Manual (this booklet) 8 DTX400K/DTX430K/DTX450K Owner's Manual Please check with your particular area. tion, the polystyrene foam packaging used for part i is marked "T"... (tom); while the packaging for part e is marked "S" (snare). Setup Package Contents After opening up the package ...

Owner's Manual
Page 11
... 1. CAUTION After completing this step, lay the assembly down safely to avoid mixing up parts or assembling them in the wrong direction. DTX400K/DTX430K/DTX450K Owner's Manual 11 Setup Assembly Guide Fully assembled drum kit (DTX450K shown) Step 5 Step 10 Step 6 Step 8 Step 4 Step 7 Step 11 Step 9 Step 3 Step 2 CAUTION • Choose...
... 1. CAUTION After completing this step, lay the assembly down safely to avoid mixing up parts or assembling them in the wrong direction. DTX400K/DTX430K/DTX450K Owner's Manual 11 Setup Assembly Guide Fully assembled drum kit (DTX450K shown) Step 5 Step 10 Step 6 Step 8 Step 4 Step 7 Step 11 Step 9 Step 3 Step 2 CAUTION • Choose...
Owner's Manual
Page 19
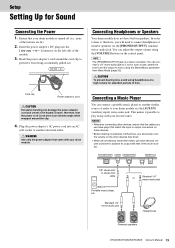
... or monitor speakers via the [AUX IN] (auxiliary input) stereo mini-jack. Standard 1/4" mono-audio jack or Standard 1/4" stereo-audio jack Headphones Powered speakers DTX400K/DTX430K/DTX450K Owner's Manual 19 Connecting Headphones or Speakers Your drum module does not have been made, use each device's volume controller to balance its output...'s DC plug into an AC wall socket or another similar source of audio to mono using the Stereo/Mono parameter from being accidentally pulled out. Setup Setting Up for extended periods of time.
... or monitor speakers via the [AUX IN] (auxiliary input) stereo mini-jack. Standard 1/4" mono-audio jack or Standard 1/4" stereo-audio jack Headphones Powered speakers DTX400K/DTX430K/DTX450K Owner's Manual 19 Connecting Headphones or Speakers Your drum module does not have been made, use each device's volume controller to balance its output...'s DC plug into an AC wall socket or another similar source of audio to mono using the Stereo/Mono parameter from being accidentally pulled out. Setup Setting Up for extended periods of time.
Owner's Manual
Page 21
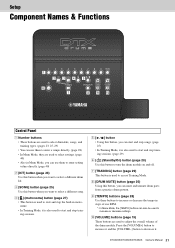
... from a practice drum pattern. . [TEMPO] buttons (page 28) Use these buttons to increase or decrease the tempo in steps of the drum module. DTX400K/DTX430K/DTX450K Owner's Manual 21 c [SONG] button (page 25) Use this button to turn the drum module on and off. v [ ] (metronome) button...start and stop training sessions. (page 29) n [ ] (Standby/On) button (page 20) Use this button when you want to select a different drum kit. Setup Component Names & Functions z xc vb n m , . ⁄0 Control Panel z Number buttons • These buttons are used to select drum kits, songs, and...
... from a practice drum pattern. . [TEMPO] buttons (page 28) Use these buttons to increase or decrease the tempo in steps of the drum module. DTX400K/DTX430K/DTX450K Owner's Manual 21 c [SONG] button (page 25) Use this button to turn the drum module on and off. v [ ] (metronome) button...start and stop training sessions. (page 29) n [ ] (Standby/On) button (page 20) Use this button when you want to select a different drum kit. Setup Component Names & Functions z xc vb n m , . ⁄0 Control Panel z Number buttons • These buttons are used to select drum kits, songs, and...
Owner's Manual
Page 57
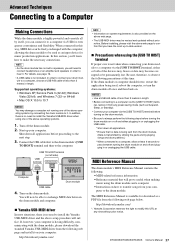
... off the drum module. 2. Shut down all applications. * Ensure that no need to install the Yamaha USB-MIDI driver and the above setup procedure will need to install the Yamaha USB-MIDI driver when using the drum module and a computer • Instructions on . USB TO HOST... • Connect your computer. puter to the computer. The MIDI Reference Manual is available for even greater convenience and flexibility. DTX400K/DTX430K/DTX450K Owner's Manual 57 If the drum module or computer should freeze, restart the application being sent from the following steps before proceeding...
... off the drum module. 2. Shut down all applications. * Ensure that no need to install the Yamaha USB-MIDI driver and the above setup procedure will need to install the Yamaha USB-MIDI driver when using the drum module and a computer • Instructions on . USB TO HOST... • Connect your computer. puter to the computer. The MIDI Reference Manual is available for even greater convenience and flexibility. DTX400K/DTX430K/DTX450K Owner's Manual 57 If the drum module or computer should freeze, restart the application being sent from the following steps before proceeding...


