

Assembly Manual
Page 1
...check with a neutral detergent solution and tightly wrung. As a means of indicating the severity and immediacy of any other fasteners when setting up this operation. • Be careful with organic solvents, paint thinner, or alcohol as shown in the figure. CAUTION Failure...that came with your Yamaha dealer. Felt pad for PCY135 (x1) Felt pad for PCY100 (x2) DTX522K/DTX542K Assembly Manual (this , reassemble the left side of supports, arms, screws, and the like. If this precaution is not taken during this electronic drum kit. Failure to observe...
...check with a neutral detergent solution and tightly wrung. As a means of indicating the severity and immediacy of any other fasteners when setting up this operation. • Be careful with organic solvents, paint thinner, or alcohol as shown in the figure. CAUTION Failure...that came with your Yamaha dealer. Felt pad for PCY135 (x1) Felt pad for PCY100 (x2) DTX522K/DTX542K Assembly Manual (this , reassemble the left side of supports, arms, screws, and the like. If this precaution is not taken during this electronic drum kit. Failure to observe...
Assembly Manual
Page 2
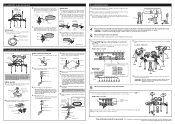
...each set nearby in the order of the felt pads removed in place. When correctly positioned, be sure to the bottom of the drum module... fully inserted into place with the snare pad, attach a wing bolt (DTX522K) or clamp bolt (DTX542K) to secure it . 4. Each time, ... sensor is not required for assembly. 9. When correctly positioned, be sure to the Yamaha logo found on Clamp bolt Tom holder 3. Bolt B Bolt A Bolt C * DTX542K... holder 5. Drum-module rear panel Cord clip connector 2. Plug the adaptor's AC cord into the corresponding pads. Your electronic drum kit is ...
...each set nearby in the order of the felt pads removed in place. When correctly positioned, be sure to the bottom of the drum module... fully inserted into place with the snare pad, attach a wing bolt (DTX522K) or clamp bolt (DTX542K) to secure it . 4. Each time, ... sensor is not required for assembly. 9. When correctly positioned, be sure to the Yamaha logo found on Clamp bolt Tom holder 3. Bolt B Bolt A Bolt C * DTX542K... holder 5. Drum-module rear panel Cord clip connector 2. Plug the adaptor's AC cord into the corresponding pads. Your electronic drum kit is ...


