Owners Manual
Page 7
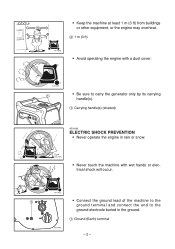
... least 1 m (3 ft) from buildings a or other equipment, or the engine may overheat. a 1 m (3 ft) 741-7XFg 9 Avoid operating the engine with a dust cover. 741-7XFh 1 9 Be sure to carry the generator only by its carrying handle(s). 1 Carrying handle(s) (shaded) 794-7XFa AE00083 ELECTRIC SHOCK PREVENTION 9 Never operate the engine in rain or snow...
... least 1 m (3 ft) from buildings a or other equipment, or the engine may overheat. a 1 m (3 ft) 741-7XFg 9 Avoid operating the engine with a dust cover. 741-7XFh 1 9 Be sure to carry the generator only by its carrying handle(s). 1 Carrying handle(s) (shaded) 794-7XFa AE00083 ELECTRIC SHOCK PREVENTION 9 Never operate the engine in rain or snow...
Owners Manual
Page 17
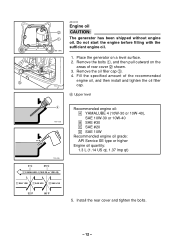
... engine oil. Remove the bolts 1, and then pull outward on a level surface. 2. Remove the oil filler cap 3. 4. Fill the specified amount of rear cover 2 shown. 3. Place the generator on the areas of the recommended 3 engine oil, and then install and tighten the oil filler 700-7XFa cap. 4 Upper level r 700-103c 700... ∂ SAE 10W Recommended engine oil grade: API Service SE type or higher Engine oil quantity: 1.3 L (1.14 US qt, 1.37 lmp qt) 5. Install the rear cover and tighten the bolts. - 12 - Do not start the engine before filling with the sufficient engine oil. 1.
... engine oil. Remove the bolts 1, and then pull outward on a level surface. 2. Remove the oil filler cap 3. 4. Fill the specified amount of rear cover 2 shown. 3. Place the generator on the areas of the recommended 3 engine oil, and then install and tighten the oil filler 700-7XFa cap. 4 Upper level r 700-103c 700... ∂ SAE 10W Recommended engine oil grade: API Service SE type or higher Engine oil quantity: 1.3 L (1.14 US qt, 1.37 lmp qt) 5. Install the rear cover and tighten the bolts. - 12 - Do not start the engine before filling with the sufficient engine oil. 1.
Owners Manual
Page 18
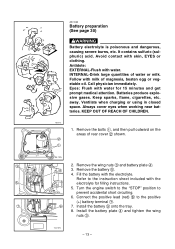
... lead (red) 6 to 762-7XFa prevent accidental short circuiting. 6. Install the battery 5 onto the tray. 8. INTERNAL-Drink large quantities of rear cover 2 shown. 2 1 788-7XFb 3 2. Batteries produce explosive gases. Always cover eyes when working near batteries. Turn the engine switch to the "STOP" position to the positive (+) battery terminal 7. 7 6 7. Follow with skin...
... lead (red) 6 to 762-7XFa prevent accidental short circuiting. 6. Install the battery 5 onto the tray. 8. INTERNAL-Drink large quantities of rear cover 2 shown. 2 1 788-7XFb 3 2. Batteries produce explosive gases. Always cover eyes when working near batteries. Turn the engine switch to the "STOP" position to the positive (+) battery terminal 7. 7 6 7. Follow with skin...

Owners Manual
Page 19
Connect the negative lead (black) 8 to the negative (-) battery terminal 9. 8 9 762-7XFd 10. Install the rear cover and tighten the bolts. - 14 - 9.
Connect the negative lead (black) 8 to the negative (-) battery terminal 9. 8 9 762-7XFd 10. Install the rear cover and tighten the bolts. - 14 - 9.
Owners Manual
Page 28
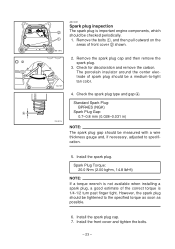
...thickness gauge and, if necessary, adjusted to specification. 5. Install the spark plug cap. 7. Check for discoloration and remove the carbon. Install the front cover and tighten the bolts. - 23 - However, the spark plug should be a medium-to the specified torque as soon as possible. 6. The ... N•m (2.00 kgf•m, 14.8 lbf•ft) NOTE: If a torque wrench is not available when installing a spark plug, a good estimate of front cover 2 shown. 2. Standard Spark Plug: BPR4ES (NGK) a Spark Plug Gap: 0.7-0.8 mm (0.028-0.031 in) 760-001a NOTE: The spark plug gap should be ...
...thickness gauge and, if necessary, adjusted to specification. 5. Install the spark plug cap. 7. Check for discoloration and remove the carbon. Install the front cover and tighten the bolts. - 23 - However, the spark plug should be a medium-to the specified torque as soon as possible. 6. The ... N•m (2.00 kgf•m, 14.8 lbf•ft) NOTE: If a torque wrench is not available when installing a spark plug, a good estimate of front cover 2 shown. 2. Standard Spark Plug: BPR4ES (NGK) a Spark Plug Gap: 0.7-0.8 mm (0.028-0.031 in) 760-001a NOTE: The spark plug gap should be ...
Owners Manual
Page 29
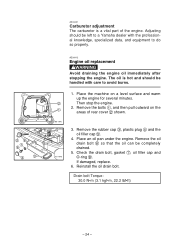
... to avoid burns. 2 1 788-7XFb 700-7XFb 1. The oil is a vital part of rear cover 2 shown. 3. Place an oil pan under the engine. 58 7 6 4 3 AE00431 Carburetor adjustment The carburetor is hot and should be left to a Yamaha dealer with care to do so properly. AE00412 Engine oil replacement w Avoid draining the engine...
... to avoid burns. 2 1 788-7XFb 700-7XFb 1. The oil is a vital part of rear cover 2 shown. 3. Place an oil pan under the engine. 58 7 6 4 3 AE00431 Carburetor adjustment The carburetor is hot and should be left to a Yamaha dealer with care to do so properly. AE00412 Engine oil replacement w Avoid draining the engine...
Owners Manual
Page 30
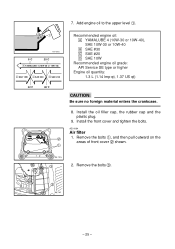
... lmp qt, 1.37 US qt) cC Be sure no foreign material enters the crankcase. 8. Install the front cover and tighten the bolts. Remove the bolts 1, and then pull outward on the areas of front cover 2 shown. 788-7XFa 3 2. 7. Add engine oil to the upper level 1. Install the oil filler cap, the rubber...
... lmp qt, 1.37 US qt) cC Be sure no foreign material enters the crankcase. 8. Install the front cover and tighten the bolts. Remove the bolts 1, and then pull outward on the areas of front cover 2 shown. 788-7XFa 3 2. 7. Add engine oil to the upper level 1. Install the oil filler cap, the rubber...
Owners Manual
Page 31
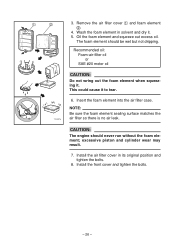
...filter case. 710-037a NOTE: Be sure the foam element sealing surface matches the air filter so there is no air leak. Install the front cover and tighten the bolts. - 26 - cC The engine should be wet but not dripping. excessive piston and cylinder wear may result. 7. Oil... the foam element and squeeze out excess oil. Remove the air filter cover 1 and foam element 2. 4. Install the air filter cover in solvent and dry it. 5. The foam element should never run without the foam element; 1 2 3. Wash the foam element...
...filter case. 710-037a NOTE: Be sure the foam element sealing surface matches the air filter so there is no air leak. Install the front cover and tighten the bolts. - 26 - cC The engine should be wet but not dripping. excessive piston and cylinder wear may result. 7. Oil... the foam element and squeeze out excess oil. Remove the air filter cover 1 and foam element 2. 4. Install the air filter cover in solvent and dry it. 5. The foam element should never run without the foam element; 1 2 3. Wash the foam element...

Owners Manual
Page 32
Remove the bolts 1, and then pull outward on the 1 areas of your body or clothing during inspection or repair. 2 1. Loosen the screw 1 and then remove the muffler 2 cap 2, the muffler screen 3 and spark arrester 4. 3 1 711-7XFa 711-7XFb 4 711-7XFc - 27 - AE01075 Muffler screen and spark arrester w The engine and muffler will be very hot after the engine has been run. 741-7XFl Avoid touching the engine and muffler while they are still hot with any part of rear cover 2 shown. 788-7XFb 2.
Remove the bolts 1, and then pull outward on the 1 areas of your body or clothing during inspection or repair. 2 1. Loosen the screw 1 and then remove the muffler 2 cap 2, the muffler screen 3 and spark arrester 4. 3 1 711-7XFa 711-7XFb 4 711-7XFc - 27 - AE01075 Muffler screen and spark arrester w The engine and muffler will be very hot after the engine has been run. 741-7XFl Avoid touching the engine and muffler while they are still hot with any part of rear cover 2 shown. 788-7XFb 2.
Owners Manual
Page 33
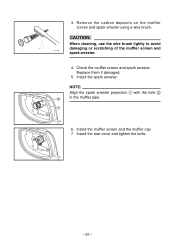
Install the rear cover and tighten the bolts. 711-7XFe - 28 - Install the spark arrester. Install the muffler screen and the muffler cap. 7. Replace them if damaged. 5. NOTE: Align the spark arrester projection 1 with the hole 2 2 in the muffler pipe. 1 711-7XFd 6. 3. cC When cleaning, use the wire brush lightly to avoid damaging or scratching of the muffler screen and 711-075 spark arrester. 4. Check the muffler screen and spark arrester. Remove the carbon deposits on the muffler screen and spark arrester using a wire brush.
Install the rear cover and tighten the bolts. 711-7XFe - 28 - Install the spark arrester. Install the muffler screen and the muffler cap. 7. Replace them if damaged. 5. NOTE: Align the spark arrester projection 1 with the hole 2 2 in the muffler pipe. 1 711-7XFd 6. 3. cC When cleaning, use the wire brush lightly to avoid damaging or scratching of the muffler screen and 711-075 spark arrester. 4. Check the muffler screen and spark arrester. Remove the carbon deposits on the muffler screen and spark arrester using a wire brush.
Owners Manual
Page 35
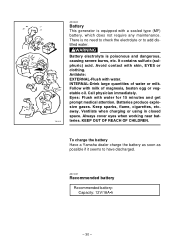
...skin, EYES or clothing. Avoid contact with water for 15 minutes and get prompt medical attention. Always cover eyes when working near bat- 762-012 teries. AE01057 Recommended battery Recommended battery: Capacity: 12V/18A•...-Flush with a sealed type (MF) battery, which does not require any maintenance. AE00842 Battery This generator is poisonous and dangerous, causing severe burns, etc. sive gases. There is no need to check the...etable oil. To charge the battery Have a Yamaha dealer charge the battery as soon as possible if it seems to add distilled water.
...skin, EYES or clothing. Avoid contact with water for 15 minutes and get prompt medical attention. Always cover eyes when working near bat- 762-012 teries. AE01057 Recommended battery Recommended battery: Capacity: 12V/18A•...-Flush with a sealed type (MF) battery, which does not require any maintenance. AE00842 Battery This generator is poisonous and dangerous, causing severe burns, etc. sive gases. There is no need to check the...etable oil. To charge the battery Have a Yamaha dealer charge the battery as soon as possible if it seems to add distilled water.
Owners Manual
Page 36
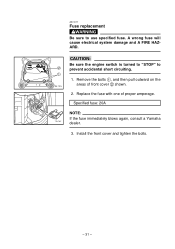
Specified fuse: 20A NOTE: If the fuse immediately blows again, consult a Yamaha 779-7XF dealer. 3. Replace the fuse with one of front cover 2 shown. 2. Install the front cover and tighten the bolts. - 31 - Remove the bolts 1, and then pull outward on the areas of proper amperage. AE01077 Fuse replacement w Be sure to prevent accidental short circuiting. 1. A wrong fuse will cause electrical system damage and A FIRE HAZARD. 2 1 788-7XFa cC Be sure the engine switch is turned to "STOP" to use specified fuse.
Specified fuse: 20A NOTE: If the fuse immediately blows again, consult a Yamaha 779-7XF dealer. 3. Replace the fuse with one of front cover 2 shown. 2. Install the front cover and tighten the bolts. - 31 - Remove the bolts 1, and then pull outward on the areas of proper amperage. AE01077 Fuse replacement w Be sure to prevent accidental short circuiting. 1. A wrong fuse will cause electrical system damage and A FIRE HAZARD. 2 1 788-7XFa cC Be sure the engine switch is turned to "STOP" to use specified fuse.
Owners Manual
Page 37
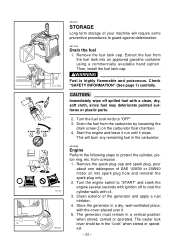
.... AE00889 Engine Perform the following steps to coat the cylinder walls with the cover placed over it stops. Remove the spark plug cap and spark plug, pour about one tablespoon of the generator and apply a rust inhibitor. 4. Store the generator in a dry, well-ventilated place, with oil. 3. Extract the fuel from the fuel... Immediately wipe off to protect the cylinder, piston ring, etc. This will require some preventive procedures to "OFF". 3. Check "SAFETY INFORMATION" (See page 1) carefully. The generator must remain in the "Lock" when stored or operated. - 32 -
.... AE00889 Engine Perform the following steps to coat the cylinder walls with the cover placed over it stops. Remove the spark plug cap and spark plug, pour about one tablespoon of the generator and apply a rust inhibitor. 4. Store the generator in a dry, well-ventilated place, with oil. 3. Extract the fuel from the fuel... Immediately wipe off to protect the cylinder, piston ring, etc. This will require some preventive procedures to "OFF". 3. Check "SAFETY INFORMATION" (See page 1) carefully. The generator must remain in the "Lock" when stored or operated. - 32 -
Owners Manual
Page 45
...No. Q. However, if a particular failure is in areas. Q. The unit has to be void or cancelled if I perform any authorized Yamaha generator dealer within the continental United States. Since all costs of proper maintenance; If you should move after you are my responsibility during the warranty ... equipment be covered under this person is caused by operation or maintenance other than as oil and spark plugs. What responsibility does my dealer have any later date. Be sure to repair of your name and new mailing address. by an authorized Yamaha generator dealer for ...
...No. Q. However, if a particular failure is in areas. Q. The unit has to be void or cancelled if I perform any authorized Yamaha generator dealer within the continental United States. Since all costs of proper maintenance; If you should move after you are my responsibility during the warranty ... equipment be covered under this person is caused by operation or maintenance other than as oil and spark plugs. What responsibility does my dealer have any later date. Be sure to repair of your name and new mailing address. by an authorized Yamaha generator dealer for ...