

Owners Manual
Page 2
... as CD players 25 Connecting to the jacks on the front panel 26 5 Connecting the FM/AM antennas 26 6 Connecting recording devices 27 7 Connecting the power cable 27 8 Selecting an on-screen menu language 28 9 Optimizing the speaker settings automatically (YPAO 29 Error messages 31 Warning messages 32 PLAYBACK 33 Basic...
... as CD players 25 Connecting to the jacks on the front panel 26 5 Connecting the FM/AM antennas 26 6 Connecting recording devices 27 7 Connecting the power cable 27 8 Selecting an on-screen menu language 28 9 Optimizing the speaker settings automatically (YPAO 29 Error messages 31 Warning messages 32 PLAYBACK 33 Basic...

Owners Manual
Page 3
...default settings (INIT 66 Updating the firmware (UPDATE 66 Checking the firmware version (VERSION 66 APPENDIX 67 HDMI and video information 74 Yamaha technologies 74 Video signal flow 75 Information on HDMI 75 HDMI Control 75 HDMI signal compatibility 76 Reference diagram (rear panel 77 Trademarks... 78 Specifications 79 Index 81 Frequently asked questions 67 Troubleshooting 68 Power and system 68 Audio 69 Video 70 FM/AM radio 70 USB 71 Remote control 71 Error indications on the front display 72...
...default settings (INIT 66 Updating the firmware (UPDATE 66 Checking the firmware version (VERSION 66 APPENDIX 67 HDMI and video information 74 Yamaha technologies 74 Video signal flow 75 Information on HDMI 75 HDMI Control 75 HDMI signal compatibility 76 Reference diagram (rear panel 77 Trademarks... 78 Specifications 79 Index 81 Frequently asked questions 67 Troubleshooting 68 Power and system 68 Audio 69 Video 70 FM/AM radio 70 USB 71 Remote control 71 Error indications on the front display 72...
Owners Manual
Page 5
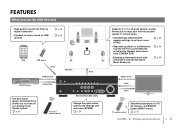
... to create an eco-friendly home theater system . p.48 iPod USB device Audio BD/DVD player HDMI Control Audio/Video Speakers Audio The ECO mode (power saving function) allows you can do with the unit En 5 p.44 . p.29 • Reproducing stereo or multichannel sounds with one touch (SCENE) . p.36 • Enjoying...
... to create an eco-friendly home theater system . p.48 iPod USB device Audio BD/DVD player HDMI Control Audio/Video Speakers Audio The ECO mode (power saving function) allows you can do with the unit En 5 p.44 . p.29 • Reproducing stereo or multichannel sounds with one touch (SCENE) . p.36 • Enjoying...

Owners Manual
Page 7
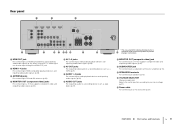
... PRESET FM AM TUNING INPUT BD DVD SCENE TV CD TONE CONTROL PROGRAM RADIO STRAIGHT VIDEO AUX USB AUDIO VIDEO iPod/iPhone 5V 1A VOLUME : 1 z (power) key Turns on/off (standby) the unit. 2 YPAO MIC jack For connecting the supplied YPAO microphone (p.29). 3 Remote control sensor Receives remote control signals (p.4). 4 INFO...
... PRESET FM AM TUNING INPUT BD DVD SCENE TV CD TONE CONTROL PROGRAM RADIO STRAIGHT VIDEO AUX USB AUDIO VIDEO iPod/iPhone 5V 1A VOLUME : 1 z (power) key Turns on/off (standby) the unit. 2 YPAO MIC jack For connecting the supplied YPAO microphone (p.29). 3 Remote control sensor Receives remote control signals (p.4). 4 INFO...
Owners Manual
Page 9
... (CD) AV 3 OPTICAL ( TV ) AV 4 AV 5 AV OUT AUDIO 1 AUDIO 2 AUDIO OUT SUBWOOFER 5 6 7 89 0 A B 1 HDMI OUT jack For connecting to an AC wall outlet (p.27). C Power cable For connecting to an HDMI-compatible TV and outputting video/audio signals (p.18). FEATURES ➤ Part names and functions En 9 When using ARC, TV...
... (CD) AV 3 OPTICAL ( TV ) AV 4 AV 5 AV OUT AUDIO 1 AUDIO 2 AUDIO OUT SUBWOOFER 5 6 7 89 0 A B 1 HDMI OUT jack For connecting to an AC wall outlet (p.27). C Power cable For connecting to an HDMI-compatible TV and outputting video/audio signals (p.18). FEATURES ➤ Part names and functions En 9 When using ARC, TV...
Owners Manual
Page 11
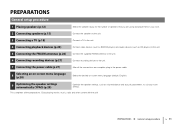
... players) and audio devices (such as volume balance and acoustic parameters, to the unit. 7 Connecting the power cable (p.27) After all the preparations. This completes all the connections are using and place them in the power cable. 8 Selecting an on-screen menu language (p.28) Select the desired on-screen menu language (default...
... players) and audio devices (such as volume balance and acoustic parameters, to the unit. 7 Connecting the power cable (p.27) After all the preparations. This completes all the connections are using and place them in the power cable. 8 Selecting an on-screen menu language (p.28) Select the desired on-screen menu language (default...
Owners Manual
Page 14
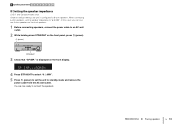
... that "SP IMP." SP IMP. 8 MIN 4 Press STRAIGHT to select "6 MIN". 5 Press z (power) to set the speaker impedance to standby mode and remove the power cable from the AC wall outlet. When connecting 6-ohm speakers, set the unit to "6 MIN". 1 Speaker placement 2 3 4 5 6 7...its default settings, the unit is displayed on the front panel, press z (power). In this case, you can also use 4-ohm speakers as the front speakers. 1 Before connecting speakers, connect the power cable to connect the speakers. is configured for 8-ohm speakers. PREPARATIONS ➤...
... that "SP IMP." SP IMP. 8 MIN 4 Press STRAIGHT to select "6 MIN". 5 Press z (power) to set the speaker impedance to standby mode and remove the power cable from the AC wall outlet. When connecting 6-ohm speakers, set the unit to "6 MIN". 1 Speaker placement 2 3 4 5 6 7...its default settings, the unit is displayed on the front panel, press z (power). In this case, you can also use 4-ohm speakers as the front speakers. 1 Before connecting speakers, connect the power cable to connect the speakers. is configured for 8-ohm speakers. PREPARATIONS ➤...
Owners Manual
Page 15
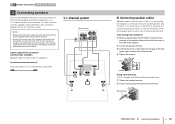
... a subwoofer) 5.1-channel system The unit (rear) SPEAKERS SURROUND CENTER FRONT SUBWOOFER 1 2 9 3 4 5 ■ Connecting speaker cables Speaker cables have two wires. Caution • Remove the unit's power cable from the ends of the speaker cable and twist the bare wires of the speaker cable do not touch one another or come into...
... a subwoofer) 5.1-channel system The unit (rear) SPEAKERS SURROUND CENTER FRONT SUBWOOFER 1 2 9 3 4 5 ■ Connecting speaker cables Speaker cables have two wires. Caution • Remove the unit's power cable from the ends of the speaker cable and twist the bare wires of the speaker cable do not touch one another or come into...

Owners Manual
Page 18
Refer to operate external devices via HDMI. About HDMI Control HDMI Control allows you can control the unit's power and volume with an HDMI cable. About Audio Return Channel (ARC) ARC allows audio signals to the TV. If you connect a TV that supports HDMI ...
Refer to operate external devices via HDMI. About HDMI Control HDMI Control allows you can control the unit's power and volume with an HDMI cable. About Audio Return Channel (ARC) ARC allows audio signals to the TV. If you connect a TV that supports HDMI ...
Owners Manual
Page 19
...If the audio is interrupted while using ARC, set to "On". • If HDMI Control does not work properly, try turning off the TV's main power and then turn on settings and operating your TV, refer to the instruction manual for the TV. 1 After connecting external devices (such as HDMI Controlcompatible...ECO Function Language Configuration e Press ENTER again. a Enable HDMI Control on the TV and playback devices (such as a TV and playback devices) and the power cable to the unit, turn on the unit. If you select a TV program with the TV by turning off the unit and playback devices. If...
...If the audio is interrupted while using ARC, set to "On". • If HDMI Control does not work properly, try turning off the TV's main power and then turn on settings and operating your TV, refer to the instruction manual for the TV. 1 After connecting external devices (such as HDMI Controlcompatible...ECO Function Language Configuration e Press ENTER again. a Enable HDMI Control on the TV and playback devices (such as a TV and playback devices) and the power cable to the unit, turn on the unit. If you select a TV program with the TV by turning off the unit and playback devices. If...
Owners Manual
Page 20
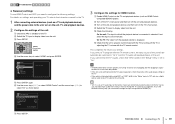
... settings of the unit. e Use the cursor keys (q/w) to select "HDMI Control" and the cursor keys (e/r) to select "On" as a TV and playback devices) and power cable of the unit, turn on the TV. ❑ Necessary settings To use HDMI Control, you need to configure the following explanation is based on...
... settings of the unit. e Use the cursor keys (q/w) to select "HDMI Control" and the cursor keys (e/r) to select "On" as a TV and playback devices) and power cable of the unit, turn on the TV. ❑ Necessary settings To use HDMI Control, you need to configure the following explanation is based on...
Owners Manual
Page 21
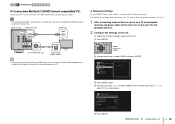
If not, select the input source manually. It may solve the problem. • If the unit is not synchronized to the TV's power operations, check the priority of the audio output setting on the TV ■ Connection Method 3 (TV with HDMI input jacks) Connect the TV to display ...video from the playback device is properly synchronized with the TV by turning off the TV's main power and then turn on the unit. • By connecting a TV to the unit with an HDMI cable, you can control your iPod or USB storage...
If not, select the input source manually. It may solve the problem. • If the unit is not synchronized to the TV's power operations, check the priority of the audio output setting on the TV ■ Connection Method 3 (TV with HDMI input jacks) Connect the TV to display ...video from the playback device is properly synchronized with the TV by turning off the TV's main power and then turn on the unit. • By connecting a TV to the unit with an HDMI cable, you can control your iPod or USB storage...
Owners Manual
Page 25
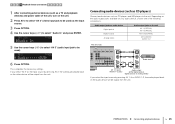
... select "AV 2" (video input jack to be output from the unit. 1 2 3 4 Playback device connections 5 6 7 8 9 1 After connecting external devices (such as a TV and playback devices) and power cable of the following connections. VOL. Connecting audio devices (such as CD players) Connect audio devices such as CD players and MD players to select...
... select "AV 2" (video input jack to be output from the unit. 1 2 3 4 Playback device connections 5 6 7 8 9 1 After connecting external devices (such as a TV and playback devices) and power cable of the following connections. VOL. Connecting audio devices (such as CD players) Connect audio devices such as CD players and MD players to select...
Owners Manual
Page 27
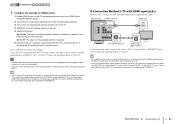
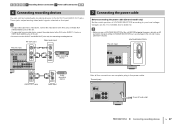
... Make sure you set VOLTAGE SELECTOR of VOLTAGE SELECTOR according to the unit and create a potential fire hazard. 1 2 3 4 5 6 Recording device connections 7 Power cable connection 8 9 6 Connecting recording devices You can connect video/audio recording devices to use the AV OUT and AUDIO OUT jacks only for connecting recording... devices. Voltages are complete, plug in the power cable. Improper setting of the unit. • Be sure to the AV OUT and AUDIO OUT jacks. AV OUT jacks The unit...
... Make sure you set VOLTAGE SELECTOR of VOLTAGE SELECTOR according to the unit and create a potential fire hazard. 1 2 3 4 5 6 Recording device connections 7 Power cable connection 8 9 6 Connecting recording devices You can connect video/audio recording devices to use the AV OUT and AUDIO OUT jacks only for connecting recording... devices. Voltages are complete, plug in the power cable. Improper setting of the unit. • Be sure to the AV OUT and AUDIO OUT jacks. AV OUT jacks The unit...
Owners Manual
Page 36
...range, providing everything from a wide variety of the channels. Standard Spectacle Sci-Fi Adventure This program creates a sound field that utilize Yamaha's original DSP technology (CINEMA DSP). It delivers an expansive sound space to easily create sound fields like they are reproduced with a ...; Selecting the sound mode En 36 The sound field restrains reverberations, but suitably stereophonic. The restrained depth creates a clear and powerful space, while also maintaining the articulation of the sounds and the separation of scenes. This program adds depth to the original audio...
...range, providing everything from a wide variety of the channels. Standard Spectacle Sci-Fi Adventure This program creates a sound field that utilize Yamaha's original DSP technology (CINEMA DSP). It delivers an expansive sound space to easily create sound fields like they are reproduced with a ...; Selecting the sound mode En 36 The sound field restrains reverberations, but suitably stereophonic. The restrained depth creates a clear and powerful space, while also maintaining the articulation of the sounds and the separation of scenes. This program adds depth to the original audio...
Owners Manual
Page 37
... the source to 2 channels, and then outputs the sound from all speakers. This program allows you to enjoy videos of a big live sound field delivers powerful sounds that are suitable for background music at stage front in a palace. Use this program does not utilize CINEMA DSP). When multichannel signals are input...
... the source to 2 channels, and then outputs the sound from all speakers. This program allows you to enjoy videos of a big live sound field delivers powerful sounds that are suitable for background music at stage front in a palace. Use this program does not utilize CINEMA DSP). When multichannel signals are input...
Owners Manual
Page 40
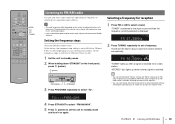
The explanation of the FM/AM antennas. z (power) Selecting a frequency for reception 1 Press FM or AM to FM/AM radio En 40 VOL. STEREO TUNED 98.50MHz SW L ...a radio station. "STEREO" also lights up when a signal is displayed. TU FM50/AM9 4 Press STRAIGHT to select "FM100/AM10". 5 Press z (power) to set to radio by selecting the video input jack in "Video Out" (p.53) in U.K. DECODE STRAIGHT ENHANCER BD DVD SETUP SCENE TV CD RADIO... a display with frequencies used . and Europe models. • If you cannot obtain good reception on the front panel, press z (power).
The explanation of the FM/AM antennas. z (power) Selecting a frequency for reception 1 Press FM or AM to FM/AM radio En 40 VOL. STEREO TUNED 98.50MHz SW L ...a radio station. "STEREO" also lights up when a signal is displayed. TU FM50/AM9 4 Press STRAIGHT to select "FM100/AM10". 5 Press z (power) to set to radio by selecting the video input jack in "Video Out" (p.53) in U.K. DECODE STRAIGHT ENHANCER BD DVD SETUP SCENE TV CD RADIO... a display with frequencies used . and Europe models. • If you cannot obtain good reception on the front panel, press z (power).
Owners Manual
Page 55
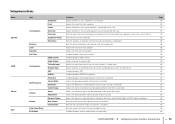
...playback. Selects the dynamic range adjustment method for when this receiver is set to prevent excessive loudness. Enables/disables the eco mode (power saving mode). Selects whether or not a center speaker is connected. Enables/disables the test tone output. Selects whether to use ...subwoofer. Setupmenu items Menu Speaker HDMI Sound ECO Item Configuration Distance Level Equalizer Test Tone Configuration DSP Parameter Lipsync Volume Auto Power Down ECO Mode Subwoofer Front Center Surround Crossover Subwoofer Phase Extra Bass HDMI Control Audio Output TV Audio Input Standby Sync ...
...playback. Selects the dynamic range adjustment method for when this receiver is set to prevent excessive loudness. Enables/disables the eco mode (power saving mode). Selects whether or not a center speaker is connected. Enables/disables the test tone output. Selects whether to use ...subwoofer. Setupmenu items Menu Speaker HDMI Sound ECO Item Configuration Distance Level Equalizer Test Tone Configuration DSP Parameter Lipsync Volume Auto Power Down ECO Mode Subwoofer Front Center Surround Crossover Subwoofer Phase Extra Bass HDMI Control Audio Output TV Audio Input Standby Sync ...

Owners Manual
Page 62
...16.5 dB ❑ Initial Volume Sets the initial volume when the receiver is selected, the unit will automatically go into standby mode. ECO Configures the power supply settings. Default U.K. Setting range 0 ms to 250 ms (1 ms increments) Default 0 ms ■ Volume Configures the volume settings. ❑...fine-adjust the audio output timing when "Select" is set to "Manual". Setup Speaker HDMI Sound ECO Function Language Auto Power Down ECO Mode ■ Auto Power Down Sets the amount of the unit when it for 2 hours. ❑ Adjustment Adjusts the delay between video and ...
...16.5 dB ❑ Initial Volume Sets the initial volume when the receiver is selected, the unit will automatically go into standby mode. ECO Configures the power supply settings. Default U.K. Setting range 0 ms to 250 ms (1 ms increments) Default 0 ms ■ Volume Configures the volume settings. ❑...fine-adjust the audio output timing when "Select" is set to "Manual". Setup Speaker HDMI Sound ECO Function Language Auto Power Down ECO Mode ■ Auto Power Down Sets the amount of the unit when it for 2 hours. ❑ Adjustment Adjusts the delay between video and ...
Owners Manual
Page 63
... select an input source to be renamed and press ENTER. • To select a name from the presets, use . ■ ECO Mode Enables/disables the eco (power saving) mode. When the eco mode is restarted. ■ Input Rename Changes the input source name displayed on the front display. The new setting will... cursor keys (e/r) to move the edit position and the cursor keys (q/w) to restart the unit after the unit is enabled, you can reduce the unit's power consumption by keeping the maximum volume, maximum output power, or front display's brightness low. Enables the eco mode.
... select an input source to be renamed and press ENTER. • To select a name from the presets, use . ■ ECO Mode Enables/disables the eco (power saving) mode. When the eco mode is restarted. ■ Input Rename Changes the input source name displayed on the front display. The new setting will... cursor keys (e/r) to move the edit position and the cursor keys (q/w) to restart the unit after the unit is enabled, you can reduce the unit's power consumption by keeping the maximum volume, maximum output power, or front display's brightness low. Enables the eco mode.


