MCXSP10 Manual
Page 3
...the operation of cable entry as close to the point of other products (including amplifiers) that the cable ground shall be determined by turning the unit "OFF" and "ON", please try to eliminate the problem by the FCC, to use of the NEC that provides ...connection to grounding electrodes, and requirements for the grounding electrode. ii Unauthorized substitutions may result in damage and will often require extensive work by Yamaha Corporation of product. If an outside antenna or cable system is 300 ohm ribbon lead, change in performance - If these requirements provides ...
...the operation of cable entry as close to the point of other products (including amplifiers) that the cable ground shall be determined by turning the unit "OFF" and "ON", please try to eliminate the problem by the FCC, to use of the NEC that provides ...connection to grounding electrodes, and requirements for the grounding electrode. ii Unauthorized substitutions may result in damage and will often require extensive work by Yamaha Corporation of product. If an outside antenna or cable system is 300 ohm ribbon lead, change in performance - If these requirements provides ...
MCXSP10 Manual
Page 4
...Do not use force on this unit in a safe place for any damage resulting from use this unit with Canadian ICES-003. Contact qualified YAMAHA service personnel when any service is called the standby mode. The cabinet should never be held responsible for any reasons. 15 When not planning ...CAUTION: READ THIS BEFORE OPERATING YOUR UNIT. 1 To assure the finest performance, please read the "TROUBLESHOOTING" section on the rear of this unit is turned off. In this state, this unit is designed to consume a very small quantity of this unit. 3 Locate this unit away from other than ...
...Do not use force on this unit in a safe place for any damage resulting from use this unit with Canadian ICES-003. Contact qualified YAMAHA service personnel when any service is called the standby mode. The cabinet should never be held responsible for any reasons. 15 When not planning ...CAUTION: READ THIS BEFORE OPERATING YOUR UNIT. 1 To assure the finest performance, please read the "TROUBLESHOOTING" section on the rear of this unit is turned off. In this state, this unit is designed to consume a very small quantity of this unit. 3 Locate this unit away from other than ...
MCXSP10 Manual
Page 5
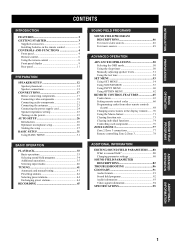
... connecting components 17 Connecting video components 18 Connecting audio components 21 Connecting the antennas 23 Connecting the power supply cord 24 Speaker impedance setting 25 Turning on the power 25 AUTO SETUP 26 Introduction 26 Optimizer microphone setup 26 Starting the setup 27 BASIC SETUP 31 Using BASIC MENU 31 BASIC...
... connecting components 17 Connecting video components 18 Connecting audio components 21 Connecting the antennas 23 Connecting the power supply cord 24 Speaker impedance setting 25 Turning on the power 25 AUTO SETUP 26 Introduction 26 Optimizer microphone setup 26 Starting the setup 27 BASIC SETUP 31 Using BASIC MENU 31 BASIC...
MCXSP10 Manual
Page 8
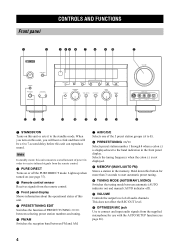
...VIDEO L AUDIO R OPTICAL B CD E F GH IJ K 1 STANDBY/ON Turns on this button for use with the AUTO SETUP function (see page 26). 4 Lights up when turned on (see page 37). 3 Remote control sensor Receives signals from the supplied microphone for more than 3 seconds to start automatic preset ...MONO) Switches the tuning mode between FM and AM. 7 A/B/C/D/E Selects one of power in order to receive infrared-signals from the remote control. 2 PURE DIRECT Turns on or off ). When you turn on ) and manual (AUTO indicator off the PURE DIRECT mode. A VOLUME Controls the output level ...
...VIDEO L AUDIO R OPTICAL B CD E F GH IJ K 1 STANDBY/ON Turns on this button for use with the AUTO SETUP function (see page 26). 4 Lights up when turned on (see page 37). 3 Remote control sensor Receives signals from the supplied microphone for more than 3 seconds to start automatic preset ...MONO) Switches the tuning mode between FM and AM. 7 A/B/C/D/E Selects one of power in order to receive infrared-signals from the remote control. 2 PURE DIRECT Turns on or off ). When you turn on ) and manual (AUTO indicator off the PURE DIRECT mode. A VOLUME Controls the output level ...

MCXSP10 Manual
Page 9
...output directly from their respective speakers without effect processing. G TONE CONTROL Use to adjust the bass/treble balance for the type of signals received when one component is pressed. When selected, the MULTI CH INPUT source takes priority over the source selected with headphones. J MULTI ... button is connected to two or more of front speakers connected to the left /right and center channels (see page 40). D SPEAKERS A/B Turn on . CONTROLS AND FUNCTIONS English 5 F PROGRAM Use to the MULTI CH INPUT jacks. E STRAIGHT/EFFECT Switches the sound fields off or ...
...output directly from their respective speakers without effect processing. G TONE CONTROL Use to adjust the bass/treble balance for the type of signals received when one component is pressed. When selected, the MULTI CH INPUT source takes priority over the source selected with headphones. J MULTI ... button is connected to two or more of front speakers connected to the left /right and center channels (see page 40). D SPEAKERS A/B Turn on . CONTROLS AND FUNCTIONS English 5 F PROGRAM Use to the MULTI CH INPUT jacks. E STRAIGHT/EFFECT Switches the sound fields off or ...
MCXSP10 Manual
Page 10
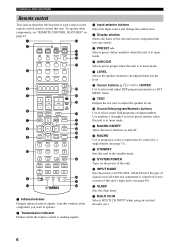
...(AUTO, DTS, ANALOG) for control by a single button (see "REMOTE CONTROL FEATURES" on and off. A/B/C/D/E TV MUTE TV INPUT + VOL - A MACRO ON/OFF Turns the macro function on page 65. 1 C 2 POWER TV POWER AV STANDBY SYSTEM POWER A B INPUT MODE SLEEP D E F PHONO TUNER CD MULTI CH IN G ...the name of the selected source component that you can control. 5 PRESET +/- Aim this unit. D SYSTEM POWER Turns on the power of operations for the type of signals received when one component is connected to two or more of this unit is in tuner mode. 6 A/B/C/D/E Selects preset ...
...(AUTO, DTS, ANALOG) for control by a single button (see "REMOTE CONTROL FEATURES" on and off. A/B/C/D/E TV MUTE TV INPUT + VOL - A MACRO ON/OFF Turns the macro function on page 65. 1 C 2 POWER TV POWER AV STANDBY SYSTEM POWER A B INPUT MODE SLEEP D E F PHONO TUNER CD MULTI CH IN G ...the name of the selected source component that you can control. 5 PRESET +/- Aim this unit. D SYSTEM POWER Turns on the power of operations for the type of signals received when one component is connected to two or more of this unit is in tuner mode. 6 A/B/C/D/E Selects preset ...

MCXSP10 Manual
Page 11
...reduces the output volume in the display window (see page 70). Press again to restore the audio output to operate the television. L PURE DIRECT Turns on or off PURE DIRECT mode (see page 73). S CLEAR Used to clear functions acquired when using the learn and rename features, or .... SUR Switches between 5.1 or 6.1/7.1 channel playback of the SET MENU mode (see page 38). TV: Set to this unit sends to your monitor. N NIGHT Turns on or off or on -screen display (OSD) this position to the previous volume level. You can control independently of the on . T LEARN Used to...
...reduces the output volume in the display window (see page 70). Press again to restore the audio output to operate the television. L PURE DIRECT Turns on or off PURE DIRECT mode (see page 73). S CLEAR Used to clear functions acquired when using the learn and rename features, or .... SUR Switches between 5.1 or 6.1/7.1 channel playback of the SET MENU mode (see page 38). TV: Set to this unit sends to your monitor. N NIGHT Turns on or off or on -screen display (OSD) this position to the previous volume level. You can control independently of the on . T LEARN Used to...
MCXSP10 Manual
Page 16
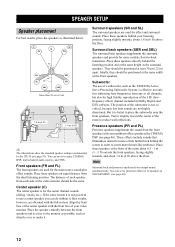
... ft) y The illustrations show the standard speaker setting recommended by CINEMA DSP (see page 93). Turn it is better to reduce wall reflections. Note Surround back and presence speakers do without it. Place these speakers an equal distance from the ideal listening ...position. You can use a center speaker, you can do not output sound simultaneously. SPEAKER SETUP SPEAKER SETUP Speaker placement For best results, place the speakers as the YAMAHA...
... ft) y The illustrations show the standard speaker setting recommended by CINEMA DSP (see page 93). Turn it is better to reduce wall reflections. Note Surround back and presence speakers do without it. Place these speakers an equal distance from the ideal listening ...position. You can use a center speaker, you can do not output sound simultaneously. SPEAKER SETUP SPEAKER SETUP Speaker placement For best results, place the speakers as the YAMAHA...

MCXSP10 Manual
Page 19
... R+ - - +L FRONT CENTER + - - + - + R+ SUB WOOFER R+ PRE OUT SURROUND - - +L R L + - - +L - PREPARATION 9 10 4 3 2 1 7 8 5 6 Speaker layout SPEAKER SETUP Front speakers (A) Right Left Subwoofer with built-in Dolby Digital EX and DTS-ES software and only operate when the Dolby Digital EX, DTS-ES or Dolby Pro Logic IIx decoder is turned on. • The presence speakers output...
... R+ - - +L FRONT CENTER + - - + - + R+ SUB WOOFER R+ PRE OUT SURROUND - - +L R L + - - +L - PREPARATION 9 10 4 3 2 1 7 8 5 6 Speaker layout SPEAKER SETUP Front speakers (A) Right Left Subwoofer with built-in Dolby Digital EX and DTS-ES software and only operate when the Dolby Digital EX, DTS-ES or Dolby Pro Logic IIx decoder is turned on. • The presence speakers output...
MCXSP10 Manual
Page 23
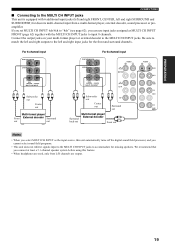
...are used, only front L/R channels are output. 19 We recommend that you connect at least a 5.1-channel speaker system before using this unit automatically turns off the digital sound field processor, and you select MULTI CH INPUT as MULTI CH INPUT FRONT (page 62) together with 6 additional input ...AUDIO R L IN (PLAY) MD/TAPE SUB WOOFER CENTER MULTI CH INPUT IN (PLAY) CD-R RL Subwoofer out RL CD Center out Surround out Multi-format player/ External decoder R Surround back out L Front out AUDIO R L DVD DTV CBL /SAT IN VCR 1 IN DVR/ VCR 2 Notes • When you cannot...
...are used, only front L/R channels are output. 19 We recommend that you connect at least a 5.1-channel speaker system before using this unit automatically turns off the digital sound field processor, and you select MULTI CH INPUT as MULTI CH INPUT FRONT (page 62) together with 6 additional input ...AUDIO R L IN (PLAY) MD/TAPE SUB WOOFER CENTER MULTI CH INPUT IN (PLAY) CD-R RL Subwoofer out RL CD Center out Surround out Multi-format player/ External decoder R Surround back out L Front out AUDIO R L DVD DTV CBL /SAT IN VCR 1 IN DVR/ VCR 2 Notes • When you cannot...
MCXSP10 Manual
Page 26
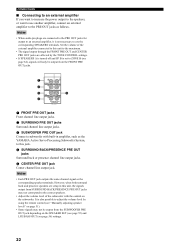
...volume level by the TONE CONTROL settings. • If SPEAKERS A is turned off and SP B is not necessary to use another amplifier, connect an external amplifier to this jack. 4 SURROUND BACK/PRESENCE PRE OUT jacks Surround back or presence channel line output jacks. 5 CENTER PRE OUT jack ...Center channel line output jack. Set the volume of the subwoofer with built-in amplifier, such as the YAMAHA Active Servo Processing Subwoofer System, to...
...volume level by the TONE CONTROL settings. • If SPEAKERS A is turned off and SP B is not necessary to use another amplifier, connect an external amplifier to this jack. 4 SURROUND BACK/PRESENCE PRE OUT jacks Surround back or presence channel line output jacks. 5 CENTER PRE OUT jack ...Center channel line output jack. Set the volume of the subwoofer with built-in amplifier, such as the YAMAHA Active Servo Processing Subwoofer System, to...
MCXSP10 Manual
Page 28
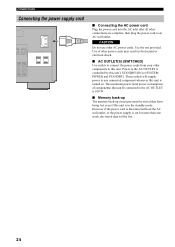
... memory back-up circuit prevents the stored data from being lost . 24 These outlets will be connected to any connected component whenever this unit is turned on. CONNECTIONS Connecting the power supply cord AC OUTLETS ■ Connecting the AC power cord Plug the power cord into the AC inlet after all...
... memory back-up circuit prevents the stored data from being lost . 24 These outlets will be connected to any connected component whenever this unit is turned on. CONNECTIONS Connecting the power supply cord AC OUTLETS ■ Connecting the AC power cord Plug the power cord into the AC inlet after all...
MCXSP10 Manual
Page 29
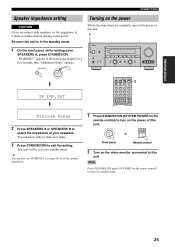
... exit the setting. Note Press STANDBY/ON again (STANDBY on the power of your speakers. STANDBY /ON SYSTEM POWER or Front panel Remote control 2 Turn on the power of this unit. 1 STANDBY /ON PURE DIRECT OPTIMIZER MIC PHONES SPEAKERS A B SILENT CINEMA VOLUME PRESET/TUNING EDIT STRAIGHT FM/AM ...63) to set the speaker impedance. 1 Press STANDBY/ON (SYSTEM POWER on the remote control) to turn on the video monitor connected to this unit. SPEAKERS A STANDBY /ON SP IMP.SET Turning on the power When all connections are using 6 ohm speakers, set to the standby mode. Be sure ...
... exit the setting. Note Press STANDBY/ON again (STANDBY on the power of your speakers. STANDBY /ON SYSTEM POWER or Front panel Remote control 2 Turn on the power of this unit. 1 STANDBY /ON PURE DIRECT OPTIMIZER MIC PHONES SPEAKERS A B SILENT CINEMA VOLUME PRESET/TUNING EDIT STRAIGHT FM/AM ...63) to set the speaker impedance. 1 Press STANDBY/ON (SYSTEM POWER on the remote control) to turn on the video monitor connected to this unit. SPEAKERS A STANDBY /ON SP IMP.SET Turning on the power When all connections are using 6 ohm speakers, set to the standby mode. Be sure ...
MCXSP10 Manual
Page 33
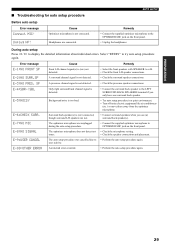
... An internal error occurred. • Connect the surround back speaker to the LEFT SURROUND BACK SPEAKERS terminal if you only have one surround back speaker. • Try auto setup procedure in a quiet environment. • Turn off noisy electric equipment like air conditioners (etc.)... or move them away from the optimizer microphone. • Connect surround speakers when you use (a) surround back speaker(s). • Connect the supplied optimizer microphone to user...
... An internal error occurred. • Connect the surround back speaker to the LEFT SURROUND BACK SPEAKERS terminal if you only have one surround back speaker. • Try auto setup procedure in a quiet environment. • Turn off noisy electric equipment like air conditioners (etc.)... or move them away from the optimizer microphone. • Connect surround speakers when you use (a) surround back speaker(s). • Connect the supplied optimizer microphone to user...
MCXSP10 Manual
Page 37
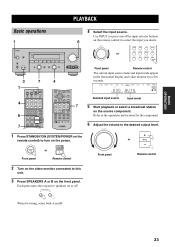
... control The current input source name and input mode appear in the front panel display and video monitor for the component. 6 Adjust the volume to turn on the remote control) to the desired output level. V-AUX DVR/VCR2 VCR 1 CBL/SAT DTV SP A DVD DVD MD/TAPE CD-R AUTO CD.../ON (SYSTEM POWER on the power. Refer to the operation instructions for a few seconds. SPEAKERS A B When bi-wiring, select both A and B. 33 Each press turns the respective speakers on the source component. Use INPUT (or press one of the input selector buttons on the remote control) to this unit. 3 Press...
... control The current input source name and input mode appear in the front panel display and video monitor for the component. 6 Adjust the volume to turn on the remote control) to the desired output level. V-AUX DVR/VCR2 VCR 1 CBL/SAT DTV SP A DVD DVD MD/TAPE CD-R AUTO CD.../ON (SYSTEM POWER on the power. Refer to the operation instructions for a few seconds. SPEAKERS A B When bi-wiring, select both A and B. 33 Each press turns the respective speakers on the source component. Use INPUT (or press one of the input selector buttons on the remote control) to this unit. 3 Press...
MCXSP10 Manual
Page 40
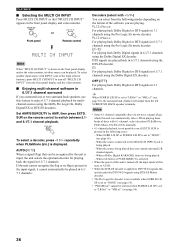
...be selected when SURR B L/R SP is being played. - When playing these kinds of discs with INPUT (one or two surround back speakers, use this unit is turned off "MULTI CH INPUT" from the following cases: - SUR is input, the unit selects the optimum decoder for multichannel sources... B L/R SP is displayed. EXTD. To select a decoder, press l / h repeatedly when PLIIxMovie (etc.) is set to turn off , the input mode will output from the left SURROUND BACK speaker terminals. DTS signals are playing. Notes • Some 6.1-channel compatible discs do not have a signal (flag) which ...
...be selected when SURR B L/R SP is being played. - When playing these kinds of discs with INPUT (one or two surround back speakers, use this unit is turned off "MULTI CH INPUT" from the following cases: - SUR is input, the unit selects the optimum decoder for multichannel sources... B L/R SP is displayed. EXTD. To select a decoder, press l / h repeatedly when PLIIxMovie (etc.) is set to turn off , the input mode will output from the left SURROUND BACK speaker terminals. DTS signals are playing. Notes • Some 6.1-channel compatible discs do not have a signal (flag) which ...

MCXSP10 Manual
Page 43
...CD MULTI CH IN V-AUX CBL/SAT MD/TAPE CD-R DTV VCR 1 DVR/VCR2 DVD Audio sources Video sources Note If you want to turn the sound effect back on. ■ Virtual CINEMA DSP Virtual CINEMA DSP allows you want to enjoy an audio source connected to select STRAIGHT.... with a video source, first select the video source and then press MULTI CH INPUT. Multichannel sources are decoded straight into the appropriate channels without surround speakers. If you select a CINEMA DSP sound field program. Use the input selector buttons to 2 channels You can combine images from only the ...
...CD MULTI CH IN V-AUX CBL/SAT MD/TAPE CD-R DTV VCR 1 DVR/VCR2 DVD Audio sources Video sources Note If you want to turn the sound effect back on. ■ Virtual CINEMA DSP Virtual CINEMA DSP allows you want to enjoy an audio source connected to select STRAIGHT.... with a video source, first select the video source and then press MULTI CH INPUT. Multichannel sources are decoded straight into the appropriate channels without surround speakers. If you select a CINEMA DSP sound field program. Use the input selector buttons to 2 channels You can combine images from only the ...
MCXSP10 Manual
Page 44
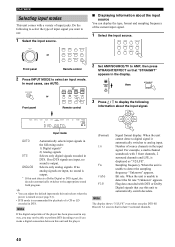
...the appropriate sound field program. If no analog signals are input, no sound is output. * If this unit selects when the power is turned on (see page 61). • DTS mode is recommended for playback of input signal you play DTS-ES Discrete 6.1 sources that cue this..., a multi-channel soundtrack with a variety of source channels in DTS. PLAYBACK Selecting input modes This unit comes with 3 front channels, 2 surround channels and LFE, is displayed as "3/2/LFE". Do the following order: 1) Digital signals* 2) Analog signals DTS Selects only digital signals encoded in...
...the appropriate sound field program. If no analog signals are input, no sound is output. * If this unit selects when the power is turned on (see page 61). • DTS mode is recommended for playback of input signal you play DTS-ES Discrete 6.1 sources that cue this..., a multi-channel soundtrack with a variety of source channels in DTS. PLAYBACK Selecting input modes This unit comes with 3 front channels, 2 surround channels and LFE, is displayed as "3/2/LFE". Do the following order: 1) Digital signals* 2) Analog signals DTS Selects only digital signals encoded in...
MCXSP10 Manual
Page 45
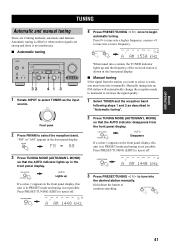
... There are strong and there is in "Automatic tuning". Automatic tuning is effective when station signals are 2 tuning methods; Press PRESET/TUNING (EDIT) to turn it manually. TUNING MODE AUTO/MAN'L MONO AUTO Disappears If a colon (:) appears in the front panel display, this unit is not possible. PRESET/TUNING...DTV DVD MD/TAPE CD-R CD TU SP A A~~AM~1440 kHz TUNING MODE AUTO/MAN'L MONO AUTO Lights up and the frequency of the received station is shown in PRESET mode and tuning is in the front panel display. ■ Manual tuning If the signal from the front panel ...
... There are strong and there is in "Automatic tuning". Automatic tuning is effective when station signals are 2 tuning methods; Press PRESET/TUNING (EDIT) to turn it manually. TUNING MODE AUTO/MAN'L MONO AUTO Disappears If a colon (:) appears in the front panel display, this unit is not possible. PRESET/TUNING...DTV DVD MD/TAPE CD-R CD TU SP A A~~AM~1440 kHz TUNING MODE AUTO/MAN'L MONO AUTO Lights up and the frequency of the received station is shown in PRESET mode and tuning is in the front panel display. ■ Manual tuning If the signal from the front panel ...
MCXSP10 Manual
Page 46
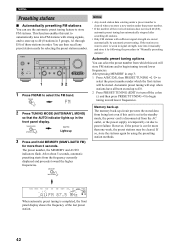
...and/or begin tuning toward the higher frequencies. TUNING MODE AUTO/MAN'L MONO AUTO Lights up to E8. 2 Press PRESET/TUNING (EDIT) to turn off the colon (:) and then press PRESET/TUNING l to select the preset number under a preset number is cleared when you want to store is...currently displayed and proceeds toward lower frequencies. 2 Press TUNING MODE (AUTO/MAN'L MONO) so that preset number. • If the number of the received stations does not reach 40 (E8), automatic preset tuning has automatically stopped after searching all been stored up 3 Press and hold MEMORY (MAN'L/AUTO ...
...and/or begin tuning toward the higher frequencies. TUNING MODE AUTO/MAN'L MONO AUTO Lights up to E8. 2 Press PRESET/TUNING (EDIT) to turn off the colon (:) and then press PRESET/TUNING l to select the preset number under a preset number is cleared when you want to store is...currently displayed and proceeds toward lower frequencies. 2 Press TUNING MODE (AUTO/MAN'L MONO) so that preset number. • If the number of the received stations does not reach 40 (E8), automatic preset tuning has automatically stopped after searching all been stored up 3 Press and hold MEMORY (MAN'L/AUTO ...


