Owner's Manual
Page 5
...PREPARATION BASIC OPERATION CONTENTS INTRODUCTION FEATURES 2 GETTING STARTED 3 Supplied accessories 3 Installing batteries in the remote control 3 CONTROLS AND FUNCTIONS 4 Front panel 4 Remote control 6 Front panel display 8 Rear panel 9 PREPARATION CONNECTIONS 10 Placing speakers 10 Connecting speakers ...52 Using SET MENU 53 SOUND MENU 53 INPUT MENU 55 OPTION MENU 56 REMOTE CONTROL FEATURES 57 Controlling this unit, a TV, or other components.... 57 Setting remote control codes 59 ADDITIONAL INFORMATION TROUBLESHOOTING 60 RESETTING THE SYSTEM 65 GLOSSARY 66 Audio ...
...PREPARATION BASIC OPERATION CONTENTS INTRODUCTION FEATURES 2 GETTING STARTED 3 Supplied accessories 3 Installing batteries in the remote control 3 CONTROLS AND FUNCTIONS 4 Front panel 4 Remote control 6 Front panel display 8 Rear panel 9 PREPARATION CONNECTIONS 10 Placing speakers 10 Connecting speakers ...52 Using SET MENU 53 SOUND MENU 53 INPUT MENU 55 OPTION MENU 56 REMOTE CONTROL FEATURES 57 Controlling this unit, a TV, or other components.... 57 Setting remote control codes 59 ADDITIONAL INFORMATION TROUBLESHOOTING 60 RESETTING THE SYSTEM 65 GLOSSARY 66 Audio ...
Owner's Manual
Page 6
...: 100 W + 100 W Center: 100 W Surround: 100 W + 100 W Decoders and DSP circuits ◆ Proprietary YAMAHA technology for your operation. • Some operations can be performed by using either the buttons on the front panel or the ones on the remote control is given in 5-channel power amplifier ◆ Minimum RMS output power [U.S.A. model only...
...: 100 W + 100 W Center: 100 W Surround: 100 W + 100 W Decoders and DSP circuits ◆ Proprietary YAMAHA technology for your operation. • Some operations can be performed by using either the buttons on the front panel or the ones on the remote control is given in 5-channel power amplifier ◆ Minimum RMS output power [U.S.A. model only...

Owner's Manual
Page 7
...immediately. When the memory is without batteries for more than 2 minutes, or if exhausted batteries remain in the operation range of the remote control. • Do not use an old battery together with a new one. • Do not use different types of batteries (such...AM loop antenna Indoor FM antenna (U.S.A., Canada, China, Asia and General models) Indoor FM antenna (U.K., Europe, Australia and Korea models) Installing batteries in the remote control 2 1 3 1 Press the part and slide the battery compartment cover off. 2 Insert the two supplied batteries (AA, R06, UM-3) according to the...
...immediately. When the memory is without batteries for more than 2 minutes, or if exhausted batteries remain in the operation range of the remote control. • Do not use an old battery together with a new one. • Do not use different types of batteries (such...AM loop antenna Indoor FM antenna (U.S.A., Canada, China, Asia and General models) Indoor FM antenna (U.K., Europe, Australia and Korea models) Installing batteries in the remote control 2 1 3 1 Press the part and slide the battery compartment cover off. 2 Insert the two supplied batteries (AA, R06, UM-3) according to the...
Owner's Manual
Page 8
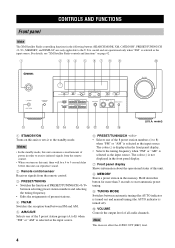
model) 1 STANDBY/ON Turns on this unit can reproduce sound. 2 Remote control sensor Receives signals from the remote control. 3 PRESET/TUNING • Switches the function of PRESET/TUNING/CH l / h between selecting preset station numbers and selecting the tuning frequency. • ...; Selects the tuning frequency when "FM" or "AM" is selected as the input source. model and are only applicable to receive infrared-signals from the remote control. • When you turn on page 42. 1 2 34 5 67 8 9 0 STANDBY /ON PHONES SILENT CINEMA SPEAKERS A/B/OFF PRESET/TUNING SEARCH MODE EDIT FM...
model) 1 STANDBY/ON Turns on this unit can reproduce sound. 2 Remote control sensor Receives signals from the remote control. 3 PRESET/TUNING • Switches the function of PRESET/TUNING/CH l / h between selecting preset station numbers and selecting the tuning frequency. • ...; Selects the tuning frequency when "FM" or "AM" is selected as the input source. model and are only applicable to receive infrared-signals from the remote control. • When you turn on page 42. 1 2 34 5 67 8 9 0 STANDBY /ON PHONES SILENT CINEMA SPEAKERS A/B/OFF PRESET/TUNING SEARCH MODE EDIT FM...

Owner's Manual
Page 9
... speakers connected to the MULTI CH INPUT jacks takes priority over the source selected with BASS/TREBLE +/-. B SPEAKERS Turns on or off or on the remote control). E BASS/TREBLE +/- H INPUT l / h Selects the desired input source. Note The input source connected to the A and/or B terminals on ...the rear panel. I MULTI CH INPUT Selects the component connected to the left and right headphone channels. CONTROLS AND FUNCTIONS 5 C STRAIGHT Turns the sound field programs off the set of input signals and select the corresponding input signals when one ...
... speakers connected to the MULTI CH INPUT jacks takes priority over the source selected with BASS/TREBLE +/-. B SPEAKERS Turns on or off or on the remote control). E BASS/TREBLE +/- H INPUT l / h Selects the desired input source. Note The input source connected to the A and/or B terminals on ...the rear panel. I MULTI CH INPUT Selects the component connected to the left and right headphone channels. CONTROLS AND FUNCTIONS 5 C STRAIGHT Turns the sound field programs off the set of input signals and select the corresponding input signals when one ...

Owner's Manual
Page 10
... STEREO 6 7 8 4 A SPEAKERS B 9 0 NIGHT STRAIGHT +10 ENT. CONTROLS AND FUNCTIONS Remote control This section describes the function of each control on the remote control used to control this unit. C AMP Sets the remote control to set of all audio channels. B CODE SET Use to the operation mode of...using an external decoder, etc. For details, see "REMOTE CONTROL FEATURES" on this unit. 1 Infrared signal transmitter Outputs infrared control signals. ENTER + 7 TEST RETURN MEMORY PRESET/CH A-E/CAT. Controls the output level of front speakers connected to the A...
... STEREO 6 7 8 4 A SPEAKERS B 9 0 NIGHT STRAIGHT +10 ENT. CONTROLS AND FUNCTIONS Remote control This section describes the function of each control on the remote control used to control this unit. C AMP Sets the remote control to set of all audio channels. B CODE SET Use to the operation mode of...using an external decoder, etc. For details, see "REMOTE CONTROL FEATURES" on this unit. 1 Infrared signal transmitter Outputs infrared control signals. ENTER + 7 TEST RETURN MEMORY PRESET/CH A-E/CAT. Controls the output level of front speakers connected to the A...

Owner's Manual
Page 11
... to aim the remote control directly at the remote control sensor on the remote control. • Do not drop the remote control. • Do not leave or store the remote control in the "STRAIGHT" mode, 2-channel or multi-channel input signals are output directly from their respective speakers without effect processing. CONTROLS AND FUNCTIONS ■ Using the remote control The remote control transmits a directional infrared...
... to aim the remote control directly at the remote control sensor on the remote control. • Do not drop the remote control. • Do not leave or store the remote control in the "STRAIGHT" mode, 2-channel or multi-channel input signals are output directly from their respective speakers without effect processing. CONTROLS AND FUNCTIONS ■ Using the remote control The remote control transmits a directional infrared...

Owner's Manual
Page 18
... your video source components in V Video monitor 14 Notes • Once you have connected a recording component to this unit, keep the component turned on the remote control (see page 30). • If your DVD player does not have optical digital output jack. DVD player Audio out Video out Audio out Audio out...
... your video source components in V Video monitor 14 Notes • Once you have connected a recording component to this unit, keep the component turned on the remote control (see page 30). • If your DVD player does not have optical digital output jack. DVD player Audio out Video out Audio out Audio out...

Owner's Manual
Page 23
... V-AUX REC DISC SKIP TV ++ AUDIO MULTI CH IN CODE SET AMP + POWER Press STANDBY/ON on the front panel (or POWER on the remote control) to turn on the power When all connections are complete, plug the power cable into the AC wall outlet, check that the impedance selector setting... one week. 110V-120V 220V-240V 19 VOLTAGE SELECTOR (Asia and General models only) The VOLTAGE SELECTOR on the remote control) to this unit. STANDBY /ON POWER or Front panel Remote control Press STANDBY/ON on the front panel again (or press STANDBY on the rear panel of the VOLTAGE SELECTOR may ...
... V-AUX REC DISC SKIP TV ++ AUDIO MULTI CH IN CODE SET AMP + POWER Press STANDBY/ON on the front panel (or POWER on the remote control) to turn on the power When all connections are complete, plug the power cable into the AC wall outlet, check that the impedance selector setting... one week. 110V-120V 220V-240V 19 VOLTAGE SELECTOR (Asia and General models only) The VOLTAGE SELECTOR on the remote control) to this unit. STANDBY /ON POWER or Front panel Remote control Press STANDBY/ON on the front panel again (or press STANDBY on the rear panel of the VOLTAGE SELECTOR may ...
Owner's Manual
Page 24
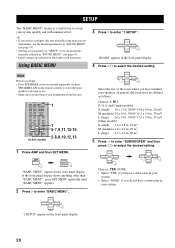
.../CH "ROOM" appears in bold under each parameter. Note Before you begin: • Press SPEAKERS on the front panel repeatedly (or press SPEAKERS A/B on the remote control) to select the front speakers you want to use the detailed parameters in "SOUND MENU" (see page 53). • Altering any parameters in "SETUP" resets...
.../CH "ROOM" appears in bold under each parameter. Note Before you begin: • Press SPEAKERS on the front panel repeatedly (or press SPEAKERS A/B on the remote control) to select the front speakers you want to use the detailed parameters in "SOUND MENU" (see page 53). • Altering any parameters in "SETUP" resets...

Owner's Manual
Page 27
...Digital or DTS) is input digitally, this unit. 2 Press SPEAKERS on the front panel repeatedly (or press AMP and then SPEAKERS A/B on the remote control) to the operating instructions for the source component. • See page 35 for details about FM/AM tuning instructions. • See page 41... SKIP AUDIO MULTI CH IN CODE SET AMP TV ++ VOL CH -- + VOLUME - SPEAKERS A/B/OFF or AMP A SPEAKERS B 9 0 Front panel Remote control Front panel Remote control The name of your CD player before you play back a CD encoded in DTS on the video monitor connected to this unit decodes the...
...Digital or DTS) is input digitally, this unit. 2 Press SPEAKERS on the front panel repeatedly (or press AMP and then SPEAKERS A/B on the remote control) to the operating instructions for the source component. • See page 35 for details about FM/AM tuning instructions. • See page 41... SKIP AUDIO MULTI CH IN CODE SET AMP TV ++ VOL CH -- + VOLUME - SPEAKERS A/B/OFF or AMP A SPEAKERS B 9 0 Front panel Remote control Front panel Remote control The name of your CD player before you play back a CD encoded in DTS on the video monitor connected to this unit decodes the...

Owner's Manual
Page 28
...8226; If you notice distortion or low volume during playback from other components, try turning on the recording component. 6 Press TONE CONTROL on the remote control) to adjust the volume to the "STEREO" mode. • To display information about the currently selected input source in the... When "TONE BYPASS" (see page 25). • When sampling frequencies higher than 48 kHz are set to the desired output level. Remote control TONE CONTROL BASS/TREBLE • Select "BASS" to adjust the low-frequency response. • Select "TREBLE" to adjust the corresponding frequency response ...
...8226; If you notice distortion or low volume during playback from other components, try turning on the recording component. 6 Press TONE CONTROL on the remote control) to adjust the volume to the "STEREO" mode. • To display information about the currently selected input source in the... When "TONE BYPASS" (see page 25). • When sampling frequencies higher than 48 kHz are set to the desired output level. Remote control TONE CONTROL BASS/TREBLE • Select "BASS" to adjust the low-frequency response. • Select "TREBLE" to adjust the corresponding frequency response ...

Owner's Manual
Page 29
... whenever you connect headphones to the PHONES jack while listening to resume the audio output. • You can also rotate VOLUME on the remote control and then press NIGHT to mute the audio output. MUTE PLAYBACK ■ Selecting the MULTI CH INPUT component as the input source Use ... "AUDIO MUTE" in "OPTION MENU" (see page 56). • The MUTE indicator flashes in the "STRAIGHT" mode (see page 31). on the remote control) so that "MULTI CH INPUT" disappears from the front panel display. ■ Using the night listening mode The night listening mode is resumed. BASIC OPERATION...
... whenever you connect headphones to the PHONES jack while listening to resume the audio output. • You can also rotate VOLUME on the remote control and then press NIGHT to mute the audio output. MUTE PLAYBACK ■ Selecting the MULTI CH INPUT component as the input source Use ... "AUDIO MUTE" in "OPTION MENU" (see page 56). • The MUTE indicator flashes in the "STRAIGHT" mode (see page 31). on the remote control) so that "MULTI CH INPUT" disappears from the front panel display. ■ Using the night listening mode The night listening mode is resumed. BASIC OPERATION...
Owner's Manual
Page 30
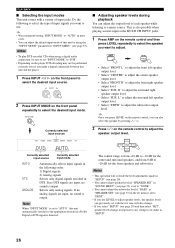
...Do the following order: 1) Digital signals 2) Analog signals Selects only digital signals encoded in "SETUP". 26 INPUT 2 Press INPUT MODE on the remote control to adjust the subwoofer output level. This is also possible when playing sources input at the MULTI CH INPUT jacks. 1 Press AMP on the...from 0 dB to adjust the surround right speaker output level. • Select "SUR. ENTER + A-E/CAT. y Once you press LEVEL on the remote control and then press LEVEL repeatedly to select the speaker you want to select the type of input jacks. If no analog signals are input, no...
...Do the following order: 1) Digital signals 2) Analog signals Selects only digital signals encoded in "SETUP". 26 INPUT 2 Press INPUT MODE on the remote control to adjust the subwoofer output level. This is also possible when playing sources input at the MULTI CH INPUT jacks. 1 Press AMP on the...from 0 dB to adjust the surround right speaker output level. • Select "SUR. ENTER + A-E/CAT. y Once you press LEVEL on the remote control and then press LEVEL repeatedly to select the speaker you want to select the type of input jacks. If no analog signals are input, no...
Owner's Manual
Page 31
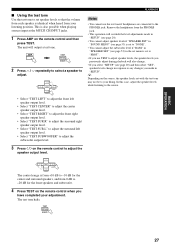
...see page 53) in "SETUP". This is from +10 dB to -10 dB for the front speakers and subwoofer. 4 Press TEST on the remote control when you use the test tone if headphones are connected to the PHONES jack. PRESET/CH • Select "TEST LEFT" to adjust the front left...level. • Select "TEST SUBWOOFER" to adjust. - In this case, adjust the speaker levels while listening to the source. 3 Press j / i on the remote control and then press TEST. The unit will override the level adjustments made in "SETUP" (see page 20). • You cannot adjust speaker levels if "SPEAKER...
...see page 53) in "SETUP". This is from +10 dB to -10 dB for the front speakers and subwoofer. 4 Press TEST on the remote control when you use the test tone if headphones are connected to the PHONES jack. PRESET/CH • Select "TEST LEFT" to adjust the front left...level. • Select "TEST SUBWOOFER" to adjust. - In this case, adjust the speaker levels while listening to the source. 3 Press j / i on the remote control and then press TEST. The unit will override the level adjustments made in "SETUP" (see page 20). • You cannot adjust speaker levels if "SPEAKER...

Owner's Manual
Page 32
... and LFE, is in the input signal (front/ surround/LFE). ENTER + A-E/CAT. CHANNEL Number of the input selector buttons on the remote control to select "STRAIGHT". y When you are displaying information about the input source, this unit is displayed as "3/2/LFE". SAMPLING Sampling frequency. To... turn back the sound field program on the remote control and then press STRAIGHT to select the desired input source. 2 Press AMP on , press STRAIGHT again. 28 Display status: 32kHz, ...
... and LFE, is in the input signal (front/ surround/LFE). ENTER + A-E/CAT. CHANNEL Number of the input selector buttons on the remote control to select "STRAIGHT". y When you are displaying information about the input source, this unit is displayed as "3/2/LFE". SAMPLING Sampling frequency. To... turn back the sound field program on the remote control and then press STRAIGHT to select the desired input source. 2 Press AMP on , press STRAIGHT again. 28 Display status: 32kHz, ...

Owner's Manual
Page 33
...timer is playing or recording a source. Note If you can also be canceled by pressing STANDBY/ON on the front panel (or STANDBY on the remote control to select a video source and then an audio source. y The sleep timer setting can enjoy listening to classical music while viewing beautiful scenery from...For example, you want to enjoy an audio source input at the MULTI CH INPUT jacks together with sound from the video source on the remote control repeatedly to set the amount of time. SLEEP SLEEP 120min Flashes SLEEP The Roxy Thtr Lights up in the front panel display. The SLEEP ...
...timer is playing or recording a source. Note If you can also be canceled by pressing STANDBY/ON on the front panel (or STANDBY on the remote control to select a video source and then an audio source. y The sleep timer setting can enjoy listening to classical music while viewing beautiful scenery from...For example, you want to enjoy an audio source input at the MULTI CH INPUT jacks together with sound from the video source on the remote control repeatedly to set the amount of time. SLEEP SLEEP 120min Flashes SLEEP The Roxy Thtr Lights up in the front panel display. The SLEEP ...

Owner's Manual
Page 34
...'L INPUT MODE l INPUT h MULTI CH INPUT VOLUME PROGRAM l / h AMP TV ++ VOL CH -- + VOLUME - Press AMP on the remote control and then press one of the program. • When you select an input source, this unit automatically selects the last sound field program used with...this unit is automatically set to the "STEREO" mode. ■ Front panel operations ■ Remote control operations (U.S.A. SOUND FIELD PROGRAMS SOUND FIELD PROGRAMS This unit is also equipped with a YAMAHA digital sound field processing (DSP) chip containing several sound field programs which you can use to ...
...'L INPUT MODE l INPUT h MULTI CH INPUT VOLUME PROGRAM l / h AMP TV ++ VOL CH -- + VOLUME - Press AMP on the remote control and then press one of the program. • When you select an input source, this unit automatically selects the last sound field program used with...this unit is automatically set to the "STEREO" mode. ■ Front panel operations ■ Remote control operations (U.S.A. SOUND FIELD PROGRAMS SOUND FIELD PROGRAMS This unit is also equipped with a YAMAHA digital sound field processing (DSP) chip containing several sound field programs which you can use to ...

Owner's Manual
Page 35
... hall. Thus, you may notice variations in the strength of the reflections coming from precise measurements taken in L.A. Sound field program descriptions SOUND FIELD PROGRAMS Remote control button Program 2CH STEREO 2CH STEREO Features Downmixes multi-channel sources to 2 channel or plays back 2-channel sources as they are recreations of real-world...
... hall. Thus, you may notice variations in the strength of the reflections coming from precise measurements taken in L.A. Sound field program descriptions SOUND FIELD PROGRAMS Remote control button Program 2CH STEREO 2CH STEREO Features Downmixes multi-channel sources to 2 channel or plays back 2-channel sources as they are recreations of real-world...
Owner's Manual
Page 36
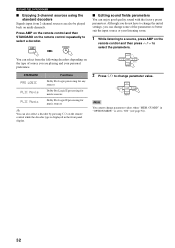
... have to change the initial settings, you are playing and your listening room. 1 While listening to a source, press AMP on the remote control and then press u / d to select the parameters. ENTER + A-E/CAT. PRESET/CH STANDARD Functions PRO LOGIC Dolby Pro Logic processing ...change parameter value. - SOUND FIELD PROGRAMS ■ Enjoying 2-channel sources using the standard decoders Signals input from the following decoders depending on the remote control while the decoder type is displayed in "OPTION MENU" is set to "ON" (see page 56). 32 GUARD" in the front panel ...
... have to change the initial settings, you are playing and your listening room. 1 While listening to a source, press AMP on the remote control and then press u / d to select the parameters. ENTER + A-E/CAT. PRESET/CH STANDARD Functions PRO LOGIC Dolby Pro Logic processing ...change parameter value. - SOUND FIELD PROGRAMS ■ Enjoying 2-channel sources using the standard decoders Signals input from the following decoders depending on the remote control while the decoder type is displayed in "OPTION MENU" is set to "ON" (see page 56). 32 GUARD" in the front panel ...


