
Owner's Manual
Page 5
CONTENTS PART DESCRIPTIONS 4 FRONT PANEL 5 REMOTE CONTROL 6 CONNECTIONS 7 ANALOG CONNECTIONS 7 DIGITAL CONNECTIONS 7 PLAYBACK 8 Skipping Tracks 8 Searching 9 Switching the Display 9 RANDOM PLAY 10 REPEAT PLAY 10 Single Track Repeat 10 ... CHECK 22 TITLING 23 TIMER OPERATIONS 24 Timer Recording 24 Timer Playback 24 MD SYSTEM LIMITATIONS 25 COPY PROTECTION (SCMS 26 NOTES REGARDING THE REMOTE CONTROL 26 Remote Control Operation Range 26 Battery Installation 26 TROUBLESHOOTING 27 DISPLAY MESSAGES 28 SPECIFICATIONS 29 3 US and foreign patents licensed from the radio, etc...
CONTENTS PART DESCRIPTIONS 4 FRONT PANEL 5 REMOTE CONTROL 6 CONNECTIONS 7 ANALOG CONNECTIONS 7 DIGITAL CONNECTIONS 7 PLAYBACK 8 Skipping Tracks 8 Searching 9 Switching the Display 9 RANDOM PLAY 10 REPEAT PLAY 10 Single Track Repeat 10 ... CHECK 22 TITLING 23 TIMER OPERATIONS 24 Timer Recording 24 Timer Playback 24 MD SYSTEM LIMITATIONS 25 COPY PROTECTION (SCMS 26 NOTES REGARDING THE REMOTE CONTROL 26 Remote Control Operation Range 26 Battery Installation 26 TROUBLESHOOTING 27 DISPLAY MESSAGES 28 SPECIFICATIONS 29 3 US and foreign patents licensed from the radio, etc...
Owner's Manual
Page 7
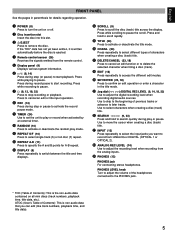
.... Press to cancel an edit or title input operation. ‹ REC (14) Press during record pause to adjust the recording level when recording from the remote control. @ Display panel (9) Displays various system information. ¤ #/* (8, 14) Press during play mode. % REPEAT S/F (10) Press to select single... discs (track numbers, playback time, title data, etc.). Use to skip to the beginning of Contents): This is ejected. ⁄ Remote control sensor (26) Receives the signals emitted from the analog inputs. - PHONES (12) PHONES jack For connecting stereo headphones. PHONES LEVEL...
.... Press to cancel an edit or title input operation. ‹ REC (14) Press during record pause to adjust the recording level when recording from the remote control. @ Display panel (9) Displays various system information. ¤ #/* (8, 14) Press during play mode. % REPEAT S/F (10) Press to select single... discs (track numbers, playback time, title data, etc.). Use to skip to the beginning of Contents): This is ejected. ⁄ Remote control sensor (26) Receives the signals emitted from the analog inputs. - PHONES (12) PHONES jack For connecting stereo headphones. PHONES LEVEL...

Owner's Manual
Page 8
...) Press to select automatic or manual marking of previous tracks or advance to later tracks during play mode. Press to search quickly during play mode. REMOTE CONTROL See the pages in parenthesis for A-B repeat. Press to select single track (S) or full disc (F) repeat. Press while scrolling to specify the A...) Press to skip back to the beginning of tracks during recording. * INPUT (13) Press repeatedly to select the input jacks you want to record from a YAMAHA CD player. ) REC ? (14) Press during stop or pause to activate the record pause mode. , STOP & (8, 13, 18, 23) Press to ...
...) Press to select automatic or manual marking of previous tracks or advance to later tracks during play mode. Press to search quickly during play mode. REMOTE CONTROL See the pages in parenthesis for A-B repeat. Press to select single track (S) or full disc (F) repeat. Press while scrolling to specify the A...) Press to skip back to the beginning of tracks during recording. * INPUT (13) Press repeatedly to select the input jacks you want to record from a YAMAHA CD player. ) REC ? (14) Press during stop or pause to activate the record pause mode. , STOP & (8, 13, 18, 23) Press to ...

Owner's Manual
Page 10
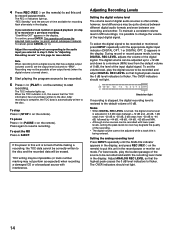
... pointed toward disc insertion slot 2 Press #/* (PLAY # on the remote) to the track you desire. To eject the MD Press ) EJECT. To skip to the last track on the disc Turn the jog dial to MD. 1 ) EJECT 2& NATURAL SOUND MINIDISC RECORDER MDX-595 POWER TIMER OFF REC PLAY )EJECT #˜* & REC RANDOM S/F REPEAT...
... pointed toward disc insertion slot 2 Press #/* (PLAY # on the remote) to the track you desire. To eject the MD Press ) EJECT. To skip to the last track on the disc Turn the jog dial to MD. 1 ) EJECT 2& NATURAL SOUND MINIDISC RECORDER MDX-595 POWER TIMER OFF REC PLAY )EJECT #˜* & REC RANDOM S/F REPEAT...

Owner's Manual
Page 12
... the tracks on a disc in the display while the unit selects a track. NATURAL SOUND MINIDISC RECORDER MDX-595 POWER TIMER OFF REC PLAY )EJECT #˜* & REC RANDOM S/F REPEAT A-B DISPLAY SCROLL TITLE CHARA.... Y Z / 6 7 8 9 0 SPACE +10 To start random playback Press RANDOM (RNDM on the remote). REPEAT repeatedly to repeat. 2 Press S/F - REPEAT repeatedly to another track at random. DELETE EDIT CANCEL DIGITAL $- NATURAL SOUND MINIDISC RECORDER MDX-595 POWER TIMER OFF REC PLAY )EJECT #˜* & REC RANDOM S/F REPEAT A-B DISPLAY SCROLL TITLE CHARA. REPEAT...
... the tracks on a disc in the display while the unit selects a track. NATURAL SOUND MINIDISC RECORDER MDX-595 POWER TIMER OFF REC PLAY )EJECT #˜* & REC RANDOM S/F REPEAT A-B DISPLAY SCROLL TITLE CHARA.... Y Z / 6 7 8 9 0 SPACE +10 To start random playback Press RANDOM (RNDM on the remote). REPEAT repeatedly to repeat. 2 Press S/F - REPEAT repeatedly to another track at random. DELETE EDIT CANCEL DIGITAL $- NATURAL SOUND MINIDISC RECORDER MDX-595 POWER TIMER OFF REC PLAY )EJECT #˜* & REC RANDOM S/F REPEAT A-B DISPLAY SCROLL TITLE CHARA. REPEAT...

Owner's Manual
Page 15
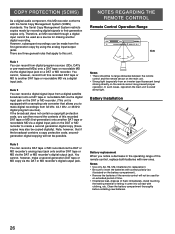
...amplifier or receiver to the program source to be recorded. 1 ) EJECT 6 &4 NATURAL SOUND MINIDISC RECORDER MDX-595 POWER TIMER OFF REC PLAY )EJECT #˜* & REC RANDOM S/F REPEAT A-B DISPLAY SCROLL TITLE CHARA. CD-P s MDX M-MARK 2 4 1 Insert an MD. This unit can record 32, 44.1 and 48 kHz digital ...previous recording Turn the jog dial (or press SKIP $ or › on the remote) to select a track (recording starts from a wide variety of a previous recording Press & to set this unit on the remote) during playback to pause at the point where you want to 44.1 kHz for...
...amplifier or receiver to the program source to be recorded. 1 ) EJECT 6 &4 NATURAL SOUND MINIDISC RECORDER MDX-595 POWER TIMER OFF REC PLAY )EJECT #˜* & REC RANDOM S/F REPEAT A-B DISPLAY SCROLL TITLE CHARA. CD-P s MDX M-MARK 2 4 1 Insert an MD. This unit can record 32, 44.1 and 48 kHz digital ...previous recording Turn the jog dial (or press SKIP $ or › on the remote) to select a track (recording starts from a wide variety of a previous recording Press & to set this unit on the remote) during playback to pause at the point where you want to 44.1 kHz for...
Owner's Manual
Page 16
...Although some sources can be adjusted up to +12 dB and down ). 5 Start playing the program source to be recorded. 6 Press #/* (PLAY # on the remote) to a minimum (MIN) level from a digital source that highest peak causes the 0 dB level indicators to the disc. The TOC indicator lights up . TOC ...will erase the selected track number (or point) and all subsequent material. appears in the display. Refer to "Adjusting Recording Levels" on the remote) to set the volume level, play the loudest passage of time available for more details. If the power to this unit to the default...
...Although some sources can be adjusted up to +12 dB and down ). 5 Start playing the program source to be recorded. 6 Press #/* (PLAY # on the remote) to a minimum (MIN) level from a digital source that highest peak causes the 0 dB level indicators to the disc. The TOC indicator lights up . TOC ...will erase the selected track number (or point) and all subsequent material. appears in the display. Refer to "Adjusting Recording Levels" on the remote) to set the volume level, play the loudest passage of time available for more details. If the power to this unit to the default...

Owner's Manual
Page 17
... desired position while recording. Therefore, you want to start recording. 3 Press REC ‡ to set this unit to record pause mode. CD-P s MDX 4 1 3 1 Press INPUT repeatedly to select the input connected to the sound source you want to record. 2 Locate the point where you can ...are written in continuous repetition, that just started without recording lots of digital or analog input sources, see "Adjusting Recording Levels" on the remote repeatedly to select automatic (MANUAL indicator out) or manual (MANUAL indicator lit) marking. You may find this to be set M-MARK to ...
... desired position while recording. Therefore, you want to start recording. 3 Press REC ‡ to set this unit to record pause mode. CD-P s MDX 4 1 3 1 Press INPUT repeatedly to select the input connected to the sound source you want to record. 2 Locate the point where you can ...are written in continuous repetition, that just started without recording lots of digital or analog input sources, see "Adjusting Recording Levels" on the remote repeatedly to select automatic (MANUAL indicator out) or manual (MANUAL indicator lit) marking. You may find this to be set M-MARK to ...

Owner's Manual
Page 18
...8260; M-MARK MONO/ST INPUT SKIP $› REC TIME SYNC PLAY PAUSE STOP REC ‹ * & ? CD-P s MDX 2 4 5 TITLE CHAR. The REC * indicators light up . When you have finished recording, press & on page 14... the signals at the beginning of sound on one 74 minute MD. (When recording in the display. CD-P s MDX 3 1 4 5 1 Load the sound source into the source component. MONAURAL RECORDING Recording in monaural (mono) allows...Refer to the operation manual supplied with a remote controllable Yamaha CD player, you can record up to 148 minutes of a track are not recorded.
...8260; M-MARK MONO/ST INPUT SKIP $› REC TIME SYNC PLAY PAUSE STOP REC ‹ * & ? CD-P s MDX 2 4 5 TITLE CHAR. The REC * indicators light up . When you have finished recording, press & on page 14... the signals at the beginning of sound on one 74 minute MD. (When recording in the display. CD-P s MDX 3 1 4 5 1 Load the sound source into the source component. MONAURAL RECORDING Recording in monaural (mono) allows...Refer to the operation manual supplied with a remote controllable Yamaha CD player, you can record up to 148 minutes of a track are not recorded.

Owner's Manual
Page 25
... = AB CD) 1 Use SEARCH ! "Undo OK ?" SEARCH DELETE ! ⁄ & NATURAL SOUND MINIDISC RECORDER MDX-595 POWER TIMER OFF REC PLAY )EJECT #˜* & REC RANDOM S/F REPEAT A-B DISPLAY SCROLL TITLE CHARA. CD-P s MDX 4 DELETE 5 STOP & 1 To title a disc Press & (STOP & on the remote) to delete. 2 Press DELETE. To title a track • During stop playback. Note : To...
... = AB CD) 1 Use SEARCH ! "Undo OK ?" SEARCH DELETE ! ⁄ & NATURAL SOUND MINIDISC RECORDER MDX-595 POWER TIMER OFF REC PLAY )EJECT #˜* & REC RANDOM S/F REPEAT A-B DISPLAY SCROLL TITLE CHARA. CD-P s MDX 4 DELETE 5 STOP & 1 To title a disc Press & (STOP & on the remote) to delete. 2 Press DELETE. To title a track • During stop playback. Note : To...
Owner's Manual
Page 28
... an inverter type fluorescent lamp) shining directly on the battery compartment). • Remove the batteries if the remote control will not be used as illustrated on the remote sensor may also be copied digitally). You cannot, however, make digital recordings from 32 kHz, 44.1 kHz...insert the batteries with correct polarity (as a source for an extended period of time. • If batteries leak, dispose of the remote control, replace both batteries with clothing, etc. Clean the battery compartment thoroughly before installing new batteries. 26 There are three general rules that...
... an inverter type fluorescent lamp) shining directly on the battery compartment). • Remove the batteries if the remote control will not be used as illustrated on the remote sensor may also be copied digitally). You cannot, however, make digital recordings from 32 kHz, 44.1 kHz...insert the batteries with correct polarity (as a source for an extended period of time. • If batteries leak, dispose of the remote control, replace both batteries with clothing, etc. Clean the battery compartment thoroughly before installing new batteries. 26 There are three general rules that...

Owner's Manual
Page 29
...carriage lock function has activated. • The unit is too close to the television or other component. • Replace the batteries. • Operate the remote from less than 6 meters (about 20 feet) and within 30° on . • Reload the disc with the label side facing up, and ...• The remote control sensor is located in the display). If it normally without being concerned about 30 seconds have passed, connect the power and try again. • Leave the unit switched ON and wait 20 to 30 minutes for help. English TROUBLESHOOTING If your authorized YAMAHA dealer or service...
...carriage lock function has activated. • The unit is too close to the television or other component. • Replace the batteries. • Operate the remote from less than 6 meters (about 20 feet) and within 30° on . • Reload the disc with the label side facing up, and ...• The remote control sensor is located in the display). If it normally without being concerned about 30 seconds have passed, connect the power and try again. • Leave the unit switched ON and wait 20 to 30 minutes for help. English TROUBLESHOOTING If your authorized YAMAHA dealer or service...

Owner's Manual
Page 31
and Europe models) 120 V, 60 Hz (U.S.A. model) Power Consumption 20 W Dimensions (W x H x D) 435 x 96 x 288 mm (17-1/8" x 3-3/4" x 11-5/16") Weight 4.1 kg (9 lbs. 1 oz.) Accessories Remote Control 1 Audio connecting cord 2 Optical fiber cable 1 Batteries (size AA, R6, UM-3) 2 Specifications subject to -Noise Ratio More than 99 dB during playback Wow and ...
and Europe models) 120 V, 60 Hz (U.S.A. model) Power Consumption 20 W Dimensions (W x H x D) 435 x 96 x 288 mm (17-1/8" x 3-3/4" x 11-5/16") Weight 4.1 kg (9 lbs. 1 oz.) Accessories Remote Control 1 Audio connecting cord 2 Optical fiber cable 1 Batteries (size AA, R6, UM-3) 2 Specifications subject to -Noise Ratio More than 99 dB during playback Wow and ...