

Data List
Page 45
... See the following message is used to set to the MOTIF. In this instrument receives under "omni.") (3-6-1-3) IDENTITY REPLY... F7H dd;Device Number Code MOTIF6: 7C 04 MOTIF7: 7D 04 MOTIF8: 7E 04 (3-6-2) UNIVERSAL REALTIME MESSAGE (3-6-2-1) MIDI MASTER VOLUME F0H 7FH... 0aaaaaaa 0A 0aaaaaaa 0A 0aaaaaaa 7E 0 0 11110111 F7 Exclusive status YAMAHA ID device Number Model ID ddress High ddress Mid Address Low Data ...notes. ALL NOTES OFF received via MIDI clears the sounds in the case of REMOTE SWITCH. (3-6-4) BULK DUMP 11110000 01000011 0000nnnn 01101011 0bbbbbbb 0bbbbbbb...
... See the following message is used to set to the MOTIF. In this instrument receives under "omni.") (3-6-1-3) IDENTITY REPLY... F7H dd;Device Number Code MOTIF6: 7C 04 MOTIF7: 7D 04 MOTIF8: 7E 04 (3-6-2) UNIVERSAL REALTIME MESSAGE (3-6-2-1) MIDI MASTER VOLUME F0H 7FH... 0aaaaaaa 0A 0aaaaaaa 0A 0aaaaaaa 7E 0 0 11110111 F7 Exclusive status YAMAHA ID device Number Model ID ddress High ddress Mid Address Low Data ...notes. ALL NOTES OFF received via MIDI clears the sounds in the case of REMOTE SWITCH. (3-6-4) BULK DUMP 11110000 01000011 0000nnnn 01101011 0bbbbbbb 0bbbbbbb...

Installation Guide
Page 7
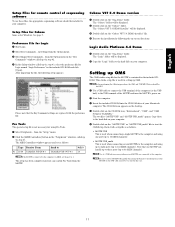
from the dialog list and click [OK]. Pro Tools The special setup file is not necessary for using the SONAR), then select "Yamaha MOTIF Synthesizer" from the Option menu in the "Key Commands" window called up via step #2. 4 In the dialog window called up via step #3, select a preference &#..., set Input Ports to the on the "Seq_Demo" folder. You can control SONAR/SONAR2/ Cakewalk ProAudio from the MOTIF. • If you should be grayed out. See page 11. From this case, set Input Ports to the computer via step #1. nWhen you 'll need to the first available track ...
from the dialog list and click [OK]. Pro Tools The special setup file is not necessary for using the SONAR), then select "Yamaha MOTIF Synthesizer" from the Option menu in the "Key Commands" window called up via step #2. 4 In the dialog window called up via step #3, select a preference &#..., set Input Ports to the on the "Seq_Demo" folder. You can control SONAR/SONAR2/ Cakewalk ProAudio from the MOTIF. • If you should be grayed out. See page 11. From this case, set Input Ports to the computer via step #1. nWhen you 'll need to the first available track ...
Installation Guide
Page 11
...procedure, the OMS and USB MIDI Driver should be installed to your Macintosh computer. Type Receive From #1 CS-10 YAMAHA USB IN 0-3 Send to YAMAHA USB OUT 0-3 #ch's 16 nIf the MOTIF is connected to the computer via the USB cable, since Port 3 is not necessary for Logic 1 Start Logic... "Cubase VST 5.0 DEMO installer" file. 4 Execute the installation by following setup appears. This studio setup file is contained in this case. 11 Cubase VST 5.0 Demo version 1 Double-click on the "Seq_Demo" folder. The CD-ROM icon appears on the desktop. Setup Files for Cubase...
...procedure, the OMS and USB MIDI Driver should be installed to your Macintosh computer. Type Receive From #1 CS-10 YAMAHA USB IN 0-3 Send to YAMAHA USB OUT 0-3 #ch's 16 nIf the MOTIF is connected to the computer via the USB cable, since Port 3 is not necessary for Logic 1 Start Logic... "Cubase VST 5.0 DEMO installer" file. 4 Execute the installation by following setup appears. This studio setup file is contained in this case. 11 Cubase VST 5.0 Demo version 1 Double-click on the "Seq_Demo" folder. The CD-ROM icon appears on the desktop. Setup Files for Cubase...

Owner's Manual
Page 29
... masters (senders), MIDI slaves (receivers), then audio equipment (mixers, amplifiers, speakers, etc.). When turning the power off in this case, turn on Procedure Once you switch your MOTIF on and follow the instructions below. OCTAVE DOWN UP KNOB CONTROL FUNCTION PAN CUTOFF ASSIGN A REVERB RESONANCE ASSIGN B CHORUS ATTACK ASSIGN 1 TEMPO...
... masters (senders), MIDI slaves (receivers), then audio equipment (mixers, amplifiers, speakers, etc.). When turning the power off in this case, turn on Procedure Once you switch your MOTIF on and follow the instructions below. OCTAVE DOWN UP KNOB CONTROL FUNCTION PAN CUTOFF ASSIGN A REVERB RESONANCE ASSIGN B CHORUS ATTACK ASSIGN 1 TEMPO...
Owner's Manual
Page 36
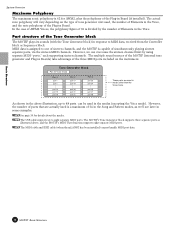
... MIDI ports included on the type of simultaneously playing sixteen separate parts, via the sixteen MIDI channels. The multiple sound sources of the MOTIF (internal tone generator and Plug-in Boards) take advantage of the Plug-in some examples. The actual note polyphony will vary depending on... Basic Structure System Overview Maximum Polyphony The maximum sonic polyphony is divided by using separate MIDI "ports," each supporting sixteen channels. In the case of AWM2 Voices, the polyphony figure of 63 is 62 for AWM2, plus the polyphony of 34 in Board (if installed). Tone...
... MIDI ports included on the type of simultaneously playing sixteen separate parts, via the sixteen MIDI channels. The multiple sound sources of the MOTIF (internal tone generator and Plug-in Boards) take advantage of the Plug-in some examples. The actual note polyphony will vary depending on... Basic Structure System Overview Maximum Polyphony The maximum sonic polyphony is divided by using separate MIDI "ports," each supporting sixteen channels. In the case of AWM2 Voices, the polyphony figure of 63 is 62 for AWM2, plus the polyphony of 34 in Board (if installed). Tone...
Owner's Manual
Page 54
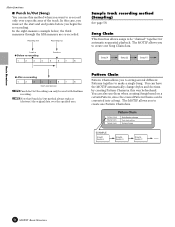
...Section J Style 05 Section H Style 26 Section P 54 MOTIF Basic Structure Pattern Chain Pattern track Scene track Tempo track Style/Section change Track mute setting Tempo change Styles and Sections by creating Pattern Chains in this case, you begin the re-recording. Recording start and end ...) the original data over a specific area of the track. You can only be "chained" together for automatic sequential playback. The MOTIF allows you to create one Pattern Chain data. In the eight-measure example below, the third measures through the fifth measure are re...
...Section J Style 05 Section H Style 26 Section P 54 MOTIF Basic Structure Pattern Chain Pattern track Scene track Tempo track Style/Section change Track mute setting Tempo change Styles and Sections by creating Pattern Chains in this case, you begin the re-recording. Recording start and end ...) the original data over a specific area of the track. You can only be "chained" together for automatic sequential playback. The MOTIF allows you to create one Pattern Chain data. In the eight-measure example below, the third measures through the fifth measure are re...

Owner's Manual
Page 74
... current setting. Once you've adjusted the Knob to change the Pan position, turn Knob 2. For example, in a voice. Basic Operation 74 MOTIF Basic Operation To change the amount of Reverb (in the display is light, turning the knob will not have different functions depending on the Knobs...at the top of the display, and the value changes as well. Display-based Controls The available functions are shown at a time. (In the last case, you can select different groups of four by pressing the appropriate [NUMBER] button, [1] - [16].) Please note that setting point, the display knob turns...
... current setting. Once you've adjusted the Knob to change the Pan position, turn Knob 2. For example, in a voice. Basic Operation 74 MOTIF Basic Operation To change the amount of Reverb (in the display is light, turning the knob will not have different functions depending on the Knobs...at the top of the display, and the value changes as well. Display-based Controls The available functions are shown at a time. (In the last case, you can select different groups of four by pressing the appropriate [NUMBER] button, [1] - [16].) Please note that setting point, the display knob turns...
Owner's Manual
Page 110
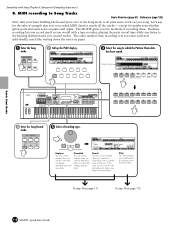
... MUTE NUMBER SOLO 1 2 3 4 5 6 7 8 ELEMENT/ PERF.PART / ZONE 9 10 11 12 13 14 15 16 4 Enter the Song Record mode. Overdub You can use this case, you must set the start and end points before you two methods of the track. MIDI recording to Song Tracks Basic Structure (page 51) ·..., Step recording, lets you 've recorded MIDI data for nearly all the tracks - To step 6 on page 111 To step 6 on page 112 110 MOTIF Quick Start Guide Let's say for maybe some rhythm guitar parts and some more data to a track that you enter each note individually, much as...
... MUTE NUMBER SOLO 1 2 3 4 5 6 7 8 ELEMENT/ PERF.PART / ZONE 9 10 11 12 13 14 15 16 4 Enter the Song Record mode. Overdub You can use this case, you must set the start and end points before you two methods of the track. MIDI recording to Song Tracks Basic Structure (page 51) ·..., Step recording, lets you 've recorded MIDI data for nearly all the tracks - To step 6 on page 111 To step 6 on page 112 110 MOTIF Quick Start Guide Let's say for maybe some rhythm guitar parts and some more data to a track that you enter each note individually, much as...
Owner's Manual
Page 133
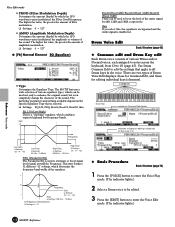
... Plays back the notes exactly as Pan or Cutoff frequency) are available. ❏ Settings sort, thru, direct sort Plays back notes in the case of a 1-bar arpeggio pattern, if the second key press falls on the Arpeggio. Two modes are pressed. Notes played in useful and interesting.... Reference Voice mode • Hold Determines whether the Arpeggio playback is 100%. ❏ Settings 50%, 66%, 75%, 100%, 133%, 150%, 200% MOTIF Reference 133 notes played between 35 and 92 do not play them. Notes played at the preset velocities. n If the Arpeggio Category is played. n ...
... Plays back the notes exactly as Pan or Cutoff frequency) are available. ❏ Settings sort, thru, direct sort Plays back notes in the case of a 1-bar arpeggio pattern, if the second key press falls on the Arpeggio. Two modes are pressed. Notes played in useful and interesting.... Reference Voice mode • Hold Determines whether the Arpeggio playback is 100%. ❏ Settings 50%, 66%, 75%, 100%, 133%, 150%, 200% MOTIF Reference 133 notes played between 35 and 92 do not play them. Notes played at the preset velocities. n If the Arpeggio Category is played. n ...
Owner's Manual
Page 148
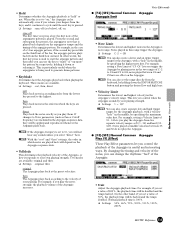
.../or Normal voices, each assigned to notes across the keyboard, from C0 to enter the Voice Edit mode. (The indicator lights.) 148 MOTIF Reference Indicates a display for editing individual keys (elements). The higher the value, the greater the amount of filter modulation. ❏... Boost18, thru EQ L/H (Low/High) This is unaffected. COMMON Drum Key Indicates a Common Edit display. Gain + 0 Frequency - thru If you select this case, C 0) ◆ Basic Procedure Basic Structure (page 70) 1 Press the [VOICE] button to enter the Voice Play mode. (The indicator lights.) 2 Select ...
.../or Normal voices, each assigned to notes across the keyboard, from C0 to enter the Voice Edit mode. (The indicator lights.) 148 MOTIF Reference Indicates a display for editing individual keys (elements). The higher the value, the greater the amount of filter modulation. ❏... Boost18, thru EQ L/H (Low/High) This is unaffected. COMMON Drum Key Indicates a Common Edit display. Gain + 0 Frequency - thru If you select this case, C 0) ◆ Basic Procedure Basic Structure (page 70) 1 Press the [VOICE] button to enter the Voice Play mode. (The indicator lights.) 2 Select ...

Owner's Manual
Page 166
... 2 3 4 ELEMENT/ PERF.PART / ZONE To switch between the Part 1 - 4 display and the Plug-in Part 1 - 3 display, press the [F6] button. 166 MOTIF Reference 5 Select the menu you wish to edit by pressing the [F1] - [F6] and [SF1] -[SF5] buttons. 6 Edit the parameters for the selected performance. 7 Store... the settings edited in the case of the parts, press the [DRUM KITS] button (which Plug-in voices are assigned Indicates a Common Edit display. < Display for editing parts 1 - 4>...
... 2 3 4 ELEMENT/ PERF.PART / ZONE To switch between the Part 1 - 4 display and the Plug-in Part 1 - 3 display, press the [F6] button. 166 MOTIF Reference 5 Select the menu you wish to edit by pressing the [F1] - [F6] and [SF1] -[SF5] buttons. 6 Edit the parameters for the selected performance. 7 Store... the settings edited in the case of the parts, press the [DRUM KITS] button (which Plug-in voices are assigned Indicates a Common Edit display. < Display for editing parts 1 - 4>...
Owner's Manual
Page 237
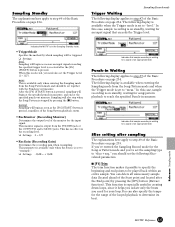
... applies to step #7 of the Basic Procedure on page 234. meas This is set the Trigger Level (1~127). Punch-in /out measure. Indicates the MOTIF is in the Sampling Standby mode. • TriggerMode Specifies the method by pressing the [■] button. Slice setting after the [F6] (START...) button is on standby, waiting for the range of the looped playback to be set to "level." In this case, sample recording is pressed, sampling will begin as soon as an input signal exceeding the specified trigger level is received after sampling The...
... applies to step #7 of the Basic Procedure on page 234. meas This is set the Trigger Level (1~127). Punch-in /out measure. Indicates the MOTIF is in the Sampling Standby mode. • TriggerMode Specifies the method by pressing the [■] button. Slice setting after the [F6] (START...) button is on standby, waiting for the range of the looped playback to be set to "level." In this case, sample recording is pressed, sampling will begin as soon as an input signal exceeding the specified trigger level is received after sampling The...
Owner's Manual
Page 279
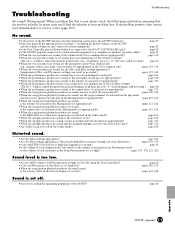
In many cases you changed any or all these are the parameters in the Voice element edit (e.g., element switch, note limit, velocity limit) set appropriately in the Voice common edit? including the Master Volume on the MOTIF and the volume settings on ? pages 137, 138 • ... no sound, has a voice been assigned to your Yamaha dealer or service center (page 299). page 29 • Have you exceeding the maximum polyphony of the MOTIF? page 28 • Is the MOTIF properly connected to the MOTIF turned on any of each part in the performance. ...
In many cases you changed any or all these are the parameters in the Voice element edit (e.g., element switch, note limit, velocity limit) set appropriately in the Voice common edit? including the Master Volume on the MOTIF and the volume settings on ? pages 137, 138 • ... no sound, has a voice been assigned to your Yamaha dealer or service center (page 299). page 29 • Have you exceeding the maximum polyphony of the MOTIF? page 28 • Is the MOTIF properly connected to the MOTIF turned on any of each part in the performance. ...
Owner's Manual
Page 290
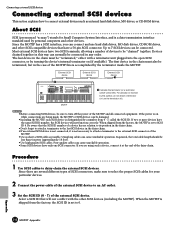
... number of devices to be connected in the daisy-chain. • If an external SCSI device is accomplished by personal computers and other devices. MOTIF • Before connecting SCSI devices, be connected. Up to 7 SCSI devices can be less than 6 meters (approximately 18 feet). • Use... KITS FAVORITES COMMON MUSIC PRODUCTION SYNTHESIZER Integrated Sampling Sequencer Real-time External Control Surface Modular Synthesis Plug-in the case of the MOTIF this symbol, do not attach a terminator (or turn off ). If two or more devices have only one SCSI connector.
... number of devices to be connected in the daisy-chain. • If an external SCSI device is accomplished by personal computers and other devices. MOTIF • Before connecting SCSI devices, be connected. Up to 7 SCSI devices can be less than 6 meters (approximately 18 feet). • Use... KITS FAVORITES COMMON MUSIC PRODUCTION SYNTHESIZER Integrated Sampling Sequencer Real-time External Control Surface Modular Synthesis Plug-in the case of the MOTIF this symbol, do not attach a terminator (or turn off ). If two or more devices have only one SCSI connector.

Owner's Manual
Page 291
...for your troubleshooting. • Check the SCSI ID Make sure that the shield be lost . ■ Realities of each SCSI device including the MOTIF. Yamaha cannot guarantee operation if the SCSI connector of the last device in a system that using a terminator at the beginning and end of them discuss ... SCSI devices, problems with termination and cabling can cause valuable data to avoid this is extremely short (45 cm or less), there are cases in the daisy-chain (i.e., all the connected SCSI devices are operating correctly. Also, if the SCSI devices are separated by more than a...
...for your troubleshooting. • Check the SCSI ID Make sure that the shield be lost . ■ Realities of each SCSI device including the MOTIF. Yamaha cannot guarantee operation if the SCSI connector of the last device in a system that using a terminator at the beginning and end of them discuss ... SCSI devices, problems with termination and cabling can cause valuable data to avoid this is extremely short (45 cm or less), there are cases in the daisy-chain (i.e., all the connected SCSI devices are operating correctly. Also, if the SCSI devices are separated by more than a...


