

Installation Guide
Page 2
... on your computer and the MOTIF. Media format The MOTIF6/MOTIF7/MOTIF8 and the File Utility software are connected using a USB cable. nIf a read the contents of CD-ROM supplied with Yamaha A5000/4000/3000. Enables your computer to view each PDF manual for controlling Cubase on an ... Seq_Demo Application Name Acrobat Reader* Voice Editor for MOTIF6/MOTIF7/MOTIF8 File Utility YAMAHA Wave Editor TWE V2.3 YAMAHA USB MIDI Drivesr (for Win 98, Me) YAMAHA USB MIDI Driver (for the MOTIF 2 Enables you to communicate with the MOTIF when your hearing as well as a plug-in software. ...
... on your computer and the MOTIF. Media format The MOTIF6/MOTIF7/MOTIF8 and the File Utility software are connected using a USB cable. nIf a read the contents of CD-ROM supplied with Yamaha A5000/4000/3000. Enables your computer to view each PDF manual for controlling Cubase on an ... Seq_Demo Application Name Acrobat Reader* Voice Editor for MOTIF6/MOTIF7/MOTIF8 File Utility YAMAHA Wave Editor TWE V2.3 YAMAHA USB MIDI Drivesr (for Win 98, Me) YAMAHA USB MIDI Driver (for the MOTIF 2 Enables you to communicate with the MOTIF when your hearing as well as a plug-in software. ...

Installation Guide
Page 4
... the installed applictaion) You can remove the installed applictaion software. Computer Sequence Software Driver MOTIF USB cable 1 2 →Windows 98/Me users →Windows 2000 users →... switch on -screen instructions to the USB terminal of "Automatic search for MOTIF6/MOTIF7/MOTIF8 OS: Windows 95/98/Me/NT4.0/2000/ XP Home Edition/XP Professional Computer: 166... by following the on using the Acrobat Reader, refer to view the electronic (PDF) manuals included with each software. English Minimum System Requirements The system requirements below . After installation ...
... the installed applictaion) You can remove the installed applictaion software. Computer Sequence Software Driver MOTIF USB cable 1 2 →Windows 98/Me users →Windows 2000 users →... switch on -screen instructions to the USB terminal of "Automatic search for MOTIF6/MOTIF7/MOTIF8 OS: Windows 95/98/Me/NT4.0/2000/ XP Home Edition/XP Professional Computer: 166... by following the on using the Acrobat Reader, refer to view the electronic (PDF) manuals included with each software. English Minimum System Requirements The system requirements below . After installation ...

Installation Guide
Page 6
... to OFF and use your computer. 1 Double-click on the MOTIF is complete, the system displays "Completing the Found New Hardware Wizard." When the MOTIF is connected to the computer via MIDI, set to the each PDF owner's manual. 7 Close the Generic Remote Setup window. 6 nSome computers may...and organize data stored to media connected to edit the voices of the MOTIF. For details on operation, refer to the PDF manual provided in the upper left of "Ignore -Install all files, regardless of Cubase (Yamaha MOTIF Remote.xml) in the dialog opened via step #2 as shown below ...
... to OFF and use your computer. 1 Double-click on the MOTIF is complete, the system displays "Completing the Found New Hardware Wizard." When the MOTIF is connected to the computer via MIDI, set to the each PDF owner's manual. 7 Close the Generic Remote Setup window. 6 nSome computers may...and organize data stored to media connected to edit the voices of the MOTIF. For details on operation, refer to the PDF manual provided in the upper left of "Ignore -Install all files, regardless of Cubase (Yamaha MOTIF Remote.xml) in the dialog opened via step #2 as shown below ...

Installation Guide
Page 7
...(for the respective software. 1 Start the Voice Editor or File Utility. 2 Click the MIDI Setup button in Settings from the MOTIF. nWhen you set Input Ports to the the PDF manual for example, "IN 0-1"). After importing the file, the following the on the Voice Editor or File Utility, you '... (Voice Editor or File Utility). from the File menu. Cubase VST/32 Demo version 1 Double-click on -line manual of the MIDI tracks by using the SONAR), then select "Yamaha MOTIF Synthesizer" from the CD-ROM to an unused track number, the knobs, buttons, and sliders on the window may ...
...(for the respective software. 1 Start the Voice Editor or File Utility. 2 Click the MIDI Setup button in Settings from the MOTIF. nWhen you set Input Ports to the the PDF manual for example, "IN 0-1"). After importing the file, the following the on the Voice Editor or File Utility, you '... (Voice Editor or File Utility). from the File menu. Cubase VST/32 Demo version 1 Double-click on -line manual of the MIDI tracks by using the SONAR), then select "Yamaha MOTIF Synthesizer" from the CD-ROM to an unused track number, the knobs, buttons, and sliders on the window may ...

Installation Guide
Page 8
...ROM The CD-ROM includes two folders: "International" and "Japanese." Normal Voice List for the MOTIF Drum Voice List for the MOTIF Performance List for MOTIF6/MOTIF7/MOTIF8 File Utility YAMAHA Wave Editor TWE V2.3 Cubase VST 5.0 Demo Version* Logic Audio Platinum 4.6 Demo* Contents PDF ... software Logic Audio Platinum 4.6. * Unfortunately, Yamaha makes no guarantee concerning the stability of Opcode Systems, Inc. Track 2 - 40: Sampled audio data; Enables you to view each PDF manual for controlling Cubase on your computer from the MOTIF. Contains the OMS Setup files for...
...ROM The CD-ROM includes two folders: "International" and "Japanese." Normal Voice List for the MOTIF Drum Voice List for the MOTIF Performance List for MOTIF6/MOTIF7/MOTIF8 File Utility YAMAHA Wave Editor TWE V2.3 Cubase VST 5.0 Demo Version* Logic Audio Platinum 4.6 Demo* Contents PDF ... software Logic Audio Platinum 4.6. * Unfortunately, Yamaha makes no guarantee concerning the stability of Opcode Systems, Inc. Track 2 - 40: Sampled audio data; Enables you to view each PDF manual for controlling Cubase on your computer from the MOTIF. Contains the OMS Setup files for...

Installation Guide
Page 10
...to edit the voices of the installation. For details, refer to the on-line Help or the PDF owner's manual. 4 The "Install Location" box displays the destination of the MOTIF as well as the destination. 5 Click the [Install] button. The USB-MIDI driver is complete, the ... the installed files in the following locations: • System Folder | Control Panels | YAMAHA USB MIDI Patch • System Folder | Extensions | USB YAMAHA MIDI Driver • System Folder | OMS Folder | YAMAHA USB MIDI OMS Driver Voice Editor, File Utility, MIDI Setup Once you've installed these software ...
...to edit the voices of the installation. For details, refer to the on-line Help or the PDF owner's manual. 4 The "Install Location" box displays the destination of the MOTIF as well as the destination. 5 Click the [Install] button. The USB-MIDI driver is complete, the ... the installed files in the following locations: • System Folder | Control Panels | YAMAHA USB MIDI Patch • System Folder | Extensions | USB YAMAHA MIDI Driver • System Folder | OMS Folder | YAMAHA USB MIDI OMS Driver Voice Editor, File Utility, MIDI Setup Once you've installed these software ...

Installation Guide
Page 12
... data cannot be transmitted/received even if the setup becomes available.) In this window, you can change the MIDI port number transmitted to the MOTIF from the "Modem" and "Printer" check boxes, and click [Search] to execute the device search. Mark the appropriate checkbox of the ... set in the OMS driver setting dialog. 3 Click the [OK] button to store the setting. nAfter the OMS studio setup above procedure, depending on -line manual supplied with OMS. Port number 1 2 3 4 5 6 7 8 MIDI OUT terminal (Thru Port number*) MIDI OUT (1) MIDI OUT (2) MIDI OUT (3) MIDI OUT (4) MIDI OUT...
... data cannot be transmitted/received even if the setup becomes available.) In this window, you can change the MIDI port number transmitted to the MOTIF from the "Modem" and "Printer" check boxes, and click [Search] to execute the device search. Mark the appropriate checkbox of the ... set in the OMS driver setting dialog. 3 Click the [OK] button to store the setting. nAfter the OMS studio setup above procedure, depending on -line manual supplied with OMS. Port number 1 2 3 4 5 6 7 8 MIDI OUT terminal (Thru Port number*) MIDI OUT (1) MIDI OUT (2) MIDI OUT (3) MIDI OUT (4) MIDI OUT...
Installation Guide
Page 13
...Install the driver again. Perform the following locations: • System Folder | Control Panels | YAMAHA USB MIDI Patch • System Folder | Extensions | USB YAMAHA MIDI Driver • System Folder | OMS Folder | YAMAHA USB MIDI OMS Driver 2 Restart the computer. 3 Install the driver and set to the ...8226; Is the USB cable connected correctly? • Are the volume settings of your computer? → When you connect the MOTIF to the owner's manual of the tone generator, playback device, and application program set up OMS. Playback response is running ? [Macintosh] → Turn...
...Install the driver again. Perform the following locations: • System Folder | Control Panels | YAMAHA USB MIDI Patch • System Folder | Extensions | USB YAMAHA MIDI Driver • System Folder | OMS Folder | YAMAHA USB MIDI OMS Driver 2 Restart the computer. 3 Install the driver and set to the ...8226; Is the USB cable connected correctly? • Are the volume settings of your computer? → When you connect the MOTIF to the owner's manual of the tone generator, playback device, and application program set up OMS. Playback response is running ? [Macintosh] → Turn...

Owner's Manual
Page 7
...64257;nd out about all of the main functions and features of the MOTIF, and shows how they fit together. ■ Basic Operation This section introduces you for your purchase of the Yamaha MOTIF Music Production Synthesizer! Doing so may appear somewhat different from those on how...your own personal use. ● The illustrations and LCD screens as shown in real time, as your MOTIF. in this Owner's Manual are the trademarks or registered trademarks of the manual, we succeeded. Included is perhaps the best-sounding, most versatile, and certainly most from this amazing ...
...64257;nd out about all of the main functions and features of the MOTIF, and shows how they fit together. ■ Basic Operation This section introduces you for your purchase of the Yamaha MOTIF Music Production Synthesizer! Doing so may appear somewhat different from those on how...your own personal use. ● The illustrations and LCD screens as shown in real time, as your MOTIF. in this Owner's Manual are the trademarks or registered trademarks of the manual, we succeeded. Included is perhaps the best-sounding, most versatile, and certainly most from this amazing ...

Owner's Manual
Page 27
... SYNTHESIZER Integrated Sampling Sequencer Real-time External Control Surface Modular Synthesis Plug-in the illustration above cannot be used to connect to the owner's manual of 2 GB. allowing you to MIDI data from the computer application (sequencer), regardless of 128 MB, 230 MB, and 540 MB....if larger drives are formatted using DOS format. • Disks formatted to "on." Furthermore, all removable media are connected, the MOTIF can only use removable media of capacities of less than 2GB are formatted using FAT16 format, and larger disks are formatted using the...
... SYNTHESIZER Integrated Sampling Sequencer Real-time External Control Surface Modular Synthesis Plug-in the illustration above cannot be used to connect to the owner's manual of 2 GB. allowing you to MIDI data from the computer application (sequencer), regardless of 128 MB, 230 MB, and 540 MB....if larger drives are formatted using DOS format. • Disks formatted to "on." Furthermore, all removable media are connected, the MOTIF can only use removable media of capacities of less than 2GB are formatted using FAT16 format, and larger disks are formatted using the...

Owner's Manual
Page 55
...wide variety of musical genres, and for creating backing tracks for each Voice/Performance, and adjust the tempo. Just like playing Arpeggios manually from the keyboard, this inserts Arpeggios in the Song/Pattern during Song/Pattern playback Also, Arpeggio On/Off can record Arpeggio data to...Performance. What's more musical than Sequence. Main functions Four playback types of a Song/Pattern. Any note produces the same drum pattern. MOTIF Basic Structure 55 No note data is particularly suited to the keys you set individually for guitar, piano and other instruments. ■ ...
...wide variety of musical genres, and for creating backing tracks for each Voice/Performance, and adjust the tempo. Just like playing Arpeggios manually from the keyboard, this inserts Arpeggios in the Song/Pattern during Song/Pattern playback Also, Arpeggio On/Off can record Arpeggio data to...Performance. What's more musical than Sequence. Main functions Four playback types of a Song/Pattern. Any note produces the same drum pattern. MOTIF Basic Structure 55 No note data is particularly suited to the keys you set individually for guitar, piano and other instruments. ■ ...
Owner's Manual
Page 61
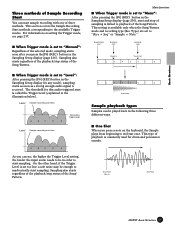
... button in the Sampling Setup display (page 236), start and stop status of the Song/Pattern. ■ When Trigger mode is set to "Manual": Regardless of the selected mode, sampling starts soon after you press the[F6] (REC) button in the Sampling Setup display (page 236). The ... inadvertently start sampling. This type of the Song/ Pattern. Recording trigger level. A B C D E As you press a note on End Point MOTIF Basic Structure 61 On the other hand, if the Trigger Level is called the Trigger Level (explained in the illustration below). Sampling also starts regardless...
... button in the Sampling Setup display (page 236), start and stop status of the Song/Pattern. ■ When Trigger mode is set to "Manual": Regardless of the selected mode, sampling starts soon after you press the[F6] (REC) button in the Sampling Setup display (page 236). The ... inadvertently start sampling. This type of the Song/ Pattern. Recording trigger level. A B C D E As you press a note on End Point MOTIF Basic Structure 61 On the other hand, if the Trigger Level is called the Trigger Level (explained in the illustration below). Sampling also starts regardless...

Owner's Manual
Page 66
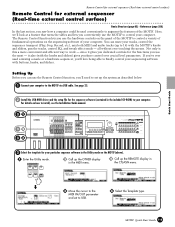
... Control function. For details on how to install, see the Reference section on the computer sequence software. For details, see the Installation Guide manual. 66 MOTIF Basic Structure n For certain software programs, it may be necessary to be controlled via the Remote Control function differ depending on page 257. Windows Cubase ...
... Control function. For details on how to install, see the Reference section on the computer sequence software. For details, see the Installation Guide manual. 66 MOTIF Basic Structure n For certain software programs, it may be necessary to be controlled via the Remote Control function differ depending on page 257. Windows Cubase ...

Owner's Manual
Page 77
...EXECUTE 4 Set "AutoDemoLoad" to start using the Auto Demo Load function. DEC/NO INC/ YES 5 Turn the power off when the MOTIF is . MOTIF Quick Start Guide 77 Read through these practical instructions carefully - When this parameter is set to "on," the Demo song data is automatically... you're in the instructions that follow. Playing the Demos Quick Start Guide This helpful and informative section of the manual takes you on a guided tour of the MOTIF, explaining virtually all of the important functions by example and giving you important, hands-on experience as described below). ...
...EXECUTE 4 Set "AutoDemoLoad" to start using the Auto Demo Load function. DEC/NO INC/ YES 5 Turn the power off when the MOTIF is . MOTIF Quick Start Guide 77 Read through these practical instructions carefully - When this parameter is set to "on," the Demo song data is automatically... you're in the instructions that follow. Playing the Demos Quick Start Guide This helpful and informative section of the manual takes you on a guided tour of the MOTIF, explaining virtually all of the important functions by example and giving you important, hands-on experience as described below). ...
Owner's Manual
Page 78
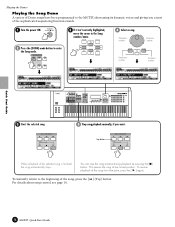
... the song automatically stops. This pauses the song at the current position. For details about song control, see page 14. 78 MOTIF Quick Start Guide Quick Start Guide Playing the Demos Playing the Song Demo A variety of Demo songs have been programmed to the Song... pressing the [■] button. DEC/NO INC/ YES EXIT ENTER EXECUTE 4 Select a song. SEQ TRANSPORT LOCATE 1 2 REC 6 Stop song playback manually, if you a taste of the sophisticated sequencing functions inside. 1 Turn the power ON. SEQUENCER SONG PATTERN FILE INTEGRATED SAMPLING MIXING UTILITY 3 If it isn...
... the song automatically stops. This pauses the song at the current position. For details about song control, see page 14. 78 MOTIF Quick Start Guide Quick Start Guide Playing the Demos Playing the Song Demo A variety of Demo songs have been programmed to the Song... pressing the [■] button. DEC/NO INC/ YES EXIT ENTER EXECUTE 4 Select a song. SEQ TRANSPORT LOCATE 1 2 REC 6 Stop song playback manually, if you a taste of the sophisticated sequencing functions inside. 1 Turn the power ON. SEQUENCER SONG PATTERN FILE INTEGRATED SAMPLING MIXING UTILITY 3 If it isn...
Owner's Manual
Page 101
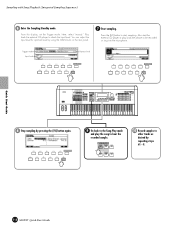
... the SOURCE display. SEQUENCER SONG PATTERN FILE INTEGRATED SAMPLING MIXING UTILITY SF1 SF2 SF 3 SF4 SF5 INFORMATION F1 F2 F3 F4 F5 F6 MOTIF Quick Start Guide 101 From this by using the Start, Loop, and End parameters in the display below. (For details, see page ... DRUM KITS FAVORITES COMMON MUSIC PRODUCTION SYNTHESIZER Integrated Sampling Sequencer Real-time External Control Surface Modular Synthesis Plug-in step #7. Here, select "manual." You can adjust the Input level for optimum level by pressing the [F6] button again. 13 Go back to the Pattern play mode...
... the SOURCE display. SEQUENCER SONG PATTERN FILE INTEGRATED SAMPLING MIXING UTILITY SF1 SF2 SF 3 SF4 SF5 INFORMATION F1 F2 F3 F4 F5 F6 MOTIF Quick Start Guide 101 From this by using the Start, Loop, and End parameters in the display below. (For details, see page ... DRUM KITS FAVORITES COMMON MUSIC PRODUCTION SYNTHESIZER Integrated Sampling Sequencer Real-time External Control Surface Modular Synthesis Plug-in step #7. Here, select "manual." You can adjust the Input level for optimum level by pressing the [F6] button again. 13 Go back to the Pattern play mode...
Owner's Manual
Page 114
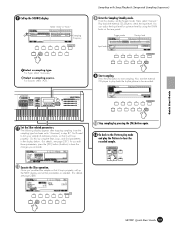
Press the [F6] button to other tracks as desired by repeating steps #1 - 9. Quick Start Guide 114 MOTIF Quick Start Guide You can adjust the Input level for optimum level by pressing the [F6] button again. PIANO KEYBOARD ORGAN A B C GUITAR/ PLUCKED ... 1 PRE 2 PRE 3 GM USER PLG 1 PLG 2 PLG 3 CATEGORY SEARCH A. Sampling with Song Playback (Integrated Sampling Sequencer) 6 Enter the Sampling Standby mode. Here, select "manual." From this display, set the Trigger mode. SF 1 SF 2 SF 3 SF 4 SF 5 INFORMATION F1 F2 F3 F4 F5 F6 9 Go back to the Song Play...
Press the [F6] button to other tracks as desired by repeating steps #1 - 9. Quick Start Guide 114 MOTIF Quick Start Guide You can adjust the Input level for optimum level by pressing the [F6] button again. PIANO KEYBOARD ORGAN A B C GUITAR/ PLUCKED ... 1 PRE 2 PRE 3 GM USER PLG 1 PLG 2 PLG 3 CATEGORY SEARCH A. Sampling with Song Playback (Integrated Sampling Sequencer) 6 Enter the Sampling Standby mode. Here, select "manual." From this display, set the Trigger mode. SF 1 SF 2 SF 3 SF 4 SF 5 INFORMATION F1 F2 F3 F4 F5 F6 9 Go back to the Song Play...
Owner's Manual
Page 119
... the cursor to the MIDI IN/OUT parameter and set up to USB. 5 Select the Template type. You can use the hardware controls on the MOTIF (above). 1 Enter the Utility mode. PIANO KEYBOARD ORGAN A B C GUITAR / PLUCKED D BASS E STRINGS BRASS REED/PIPE F G H SECTION BANK GROUP ... saw how a computer could be used a mixing console or a hardware sequencer, you'll love being able to install, see the Installation Guide manual. 31 32 33 OCTAVE DOWN UP KNOB CONTROL FUNCTION PAN REVERB CHORUS CUTOFF RESONANCE ATTACK ASSIGN A ASSIGN B ASSIGN 1 TEMPO RELEASE ASSIGN 2 REMOTE...
... the cursor to the MIDI IN/OUT parameter and set up to USB. 5 Select the Template type. You can use the hardware controls on the MOTIF (above). 1 Enter the Utility mode. PIANO KEYBOARD ORGAN A B C GUITAR / PLUCKED D BASS E STRINGS BRASS REED/PIPE F G H SECTION BANK GROUP ... saw how a computer could be used a mixing console or a hardware sequencer, you'll love being able to install, see the Installation Guide manual. 31 32 33 OCTAVE DOWN UP KNOB CONTROL FUNCTION PAN REVERB CHORUS CUTOFF RESONANCE ATTACK ASSIGN A ASSIGN B ASSIGN 1 TEMPO RELEASE ASSIGN 2 REMOTE...
Owner's Manual
Page 153
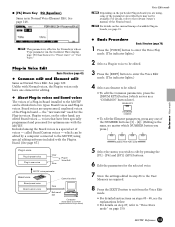
...Drum keys whose Type parameter (in boards, see the explanations below. • For details on step #7, refer to the relevant owner's manual of voices - MOTIF Reference 153 Voice Edit mode n Depending on the particular Plug-in board you wish to edit by a computer connected to enter the ...NUMBER button you press.) 1 2 3 4 ELEMENT/ PERF.PART / ZONE 5 Select the menu you are unprocessed, unaltered voices of a Plug-in Board installed to the MOTIF can be edited by pressing the [F1] - [F6] and [SF1] -[SF5] buttons. 6 Edit the parameters for the Plug-in voice to be edited. 3 ...
...Drum keys whose Type parameter (in boards, see the explanations below. • For details on step #7, refer to the relevant owner's manual of voices - MOTIF Reference 153 Voice Edit mode n Depending on the particular Plug-in board you wish to edit by a computer connected to enter the ...NUMBER button you press.) 1 2 3 4 ELEMENT/ PERF.PART / ZONE 5 Select the menu you are unprocessed, unaltered voices of a Plug-in Board installed to the MOTIF can be edited by pressing the [F1] - [F6] and [SF1] -[SF5] buttons. 6 Edit the parameters for the Plug-in voice to be edited. 3 ...

Owner's Manual
Page 156
... ❏ Settings -64 ~ 0 ~ +63 ● [F4] Plug-in Element Native With a Plug-in board installed to the relevant owner's manual for details.) ● [F1]-[SF5] Plug-in Element Oscillator Other From this display you can increase the relative velocity (or level) of the Plug-...--- --- --- The pitch range is raised or lowered. Pressing [F4] gives you can select the desired Board Voice used for the voice. refer to the MOTIF). REL Release time Release time DEPTH --- Pitch Initial Level Original Pitch Release Level 0 Attack Time ❏ Settings -64 ~ 0 ~ +63 Release Time ...
... ❏ Settings -64 ~ 0 ~ +63 ● [F4] Plug-in Element Native With a Plug-in board installed to the relevant owner's manual for details.) ● [F1]-[SF5] Plug-in Element Oscillator Other From this display you can increase the relative velocity (or level) of the Plug-...--- --- --- The pitch range is raised or lowered. Pressing [F4] gives you can select the desired Board Voice used for the voice. refer to the MOTIF). REL Release time Release time DEPTH --- Pitch Initial Level Original Pitch Release Level 0 Attack Time ❏ Settings -64 ~ 0 ~ +63 Release Time ...


