
Owner's Manual
Page 5
... the terminal which is coloured BROWN must be connected to the AC outlet 4 ADJUSTING THE SUBWOOFER BEFORE USE 4 Frequency characteristic 4 ADVANCED YAMAHA ACTIVE SERVO TECHNOLOGY II 5 TROUBLESHOOTING 6 SPECIFICATIONS 7 SPECIAL INSTRUCTIONS FOR U.K. CONNECTIONS 4 Connecting to line output (pin jack) terminals of the amplifier 4 Plug in the home are ...
... the terminal which is coloured BROWN must be connected to the AC outlet 4 ADJUSTING THE SUBWOOFER BEFORE USE 4 Frequency characteristic 4 ADVANCED YAMAHA ACTIVE SERVO TECHNOLOGY II 5 TROUBLESHOOTING 6 SPECIFICATIONS 7 SPECIAL INSTRUCTIONS FOR U.K. CONNECTIONS 4 Connecting to line output (pin jack) terminals of the amplifier 4 Plug in the home are ...
Owner's Manual
Page 6
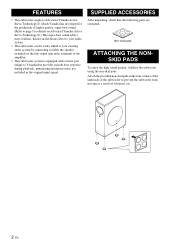
... provides smooth bass response during playback, minimizing extraneous noise not included in the original input signal. FEATURES • This subwoofer employs Advanced Yamaha Active Servo Technology II, which Yamaha has developed for the production of higher quality, super-bass sound. (Refer to page 5 for details on Advanced... Yamaha Active Servo Technology II.) This super-bass sound adds a more realistic, theater-in-the-home effect to your audio system. • This subwoofer can be easily added to your existing audio system by connecting to...
... provides smooth bass response during playback, minimizing extraneous noise not included in the original input signal. FEATURES • This subwoofer employs Advanced Yamaha Active Servo Technology II, which Yamaha has developed for the production of higher quality, super-bass sound. (Refer to page 5 for details on Advanced... Yamaha Active Servo Technology II.) This super-bass sound adds a more realistic, theater-in-the-home effect to your audio system. • This subwoofer can be easily added to your existing audio system by connecting to...
Owner's Manual
Page 7
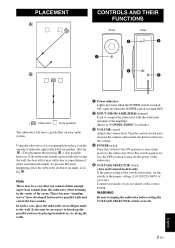
...indicator Lights up the parallel surfaces by placing bookshelves, etc. Turn the control clockwise to increase the volume, and counterclockwise to unplug the subwoofer before setting the VOLTAGE SELECTOR switch correctly. 3 En English POWER switch Press this switch to the ON position to cancellation of direct and ... to turn on the power to place it on your dealer if you cannot obtain enough super-bass sounds from happening, place the subwoofer system at an oblique angle to "CONNECTIONS" for details.) VOLUME control Adjusts the volume level. To prevent this switch again to set...
...indicator Lights up the parallel surfaces by placing bookshelves, etc. Turn the control clockwise to increase the volume, and counterclockwise to unplug the subwoofer before setting the VOLTAGE SELECTOR switch correctly. 3 En English POWER switch Press this switch to the ON position to cancellation of direct and ... to turn on the power to place it on your dealer if you cannot obtain enough super-bass sounds from happening, place the subwoofer system at an oblique angle to "CONNECTIONS" for details.) VOLUME control Adjusts the volume level. To prevent this switch again to set...
Owner's Manual
Page 8
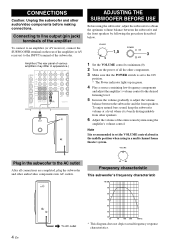
... jack) terminals of the amplifier To connect to an amplifier (or AV receiver), connect the SUBWOOFER terminal on the power of all connections are completed, plug the subwoofer and other audio/video components before making connections. Note It is barely distinguishable from other components.... listening level. 5 Increase the volume gradually to adjust the volume balance between the subwoofer and the front speakers by following the procedure described below. CONNECTIONS Caution: Unplug the subwoofer and other audio/video components into AC outlets. 4 En To AC outlet Frequency ...
... jack) terminals of the amplifier To connect to an amplifier (or AV receiver), connect the SUBWOOFER terminal on the power of all connections are completed, plug the subwoofer and other audio/video components before making connections. Note It is barely distinguishable from other components.... listening level. 5 Increase the volume gradually to adjust the volume balance between the subwoofer and the front speakers by following the procedure described below. CONNECTIONS Caution: Unplug the subwoofer and other audio/video components into AC outlets. 4 En To AC outlet Frequency ...
Owner's Manual
Page 10
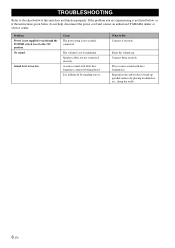
... not supplied even though the POWER switch is set to the chart below do not help, disconnect the power cord and contact an authorized YAMAHA dealer or service center. What to the ON position. Connect them securely. Play a source sound with little bass frequency content is too ...low. Sound level is being played. A source sound with bass frequencies. Raise the volume up parallel surfaces by standing waves. Reposition the subwoofer or break up . No sound. Cause The power plug is influenced by placing bookshelves, etc., along the walls. 6 En It is not securely ...
... not supplied even though the POWER switch is set to the chart below do not help, disconnect the power cord and contact an authorized YAMAHA dealer or service center. What to the ON position. Connect them securely. Play a source sound with little bass frequency content is too ...low. Sound level is being played. A source sound with bass frequencies. Raise the volume up parallel surfaces by standing waves. Reposition the subwoofer or break up . No sound. Cause The power plug is influenced by placing bookshelves, etc., along the walls. 6 En It is not securely ...
Owner's Manual
Page 11
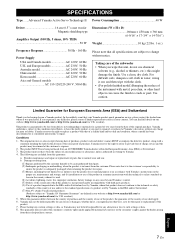
Taking care of the subwoofer • When you wipe this unit, do not use shall apply. 6. For difficult soils, dampen a soft cloth in water, wring it was purchased. Yamaha reserves the right to be held responsible for repair. (3) Misuse, including but not limited to (a) failure to ...For polish-finished model) Bumping the surface of use the product for its normal purpose or in workmanship or materials for having chosen a Yamaha product. In the absence of parts due to repair. Limited Guarantee for European Economic Area (EEA) and Switzerland Thank you experience any ...
Taking care of the subwoofer • When you wipe this unit, do not use shall apply. 6. For difficult soils, dampen a soft cloth in water, wring it was purchased. Yamaha reserves the right to be held responsible for repair. (3) Misuse, including but not limited to (a) failure to ...For polish-finished model) Bumping the surface of use the product for its normal purpose or in workmanship or materials for having chosen a Yamaha product. In the absence of parts due to repair. Limited Guarantee for European Economic Area (EEA) and Switzerland Thank you experience any ...


