
Owner's Manual
Page 4
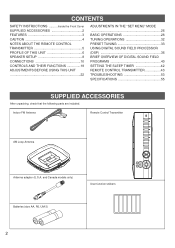
... SAFETY INSTRUCTIONS ..........Inside the Front Cover SUPPLIED ACCESSORIES 2 FEATURES 3 CAUTION 4 NOTES ABOUT THE REMOTE CONTROL TRANSMITTER 5 PROFILE OF THIS UNIT 6 SPEAKER SETUP 8 CONNECTIONS 10 CONTROLS AND THEIR FUNCTIONS 19 ADJUSTMENTS BEFORE USING THIS UNIT 22 ADJUSTMENTS IN THE "SET MENU" MODE... DIGITAL SOUND FIELD PROCESSOR (DSP 36 BRIEF OVERVIEW OF DIGITAL SOUND FIELD PROGRAMS 40 SETTING THE SLEEP TIMER 42 REMOTE CONTROL TRANSMITTER 43 TROUBLESHOOTING 53 SPECIFICATIONS 55 SUPPLIED ACCESSORIES After unpacking, check that the following parts are included. and Canada...
... SAFETY INSTRUCTIONS ..........Inside the Front Cover SUPPLIED ACCESSORIES 2 FEATURES 3 CAUTION 4 NOTES ABOUT THE REMOTE CONTROL TRANSMITTER 5 PROFILE OF THIS UNIT 6 SPEAKER SETUP 8 CONNECTIONS 10 CONTROLS AND THEIR FUNCTIONS 19 ADJUSTMENTS BEFORE USING THIS UNIT 22 ADJUSTMENTS IN THE "SET MENU" MODE... DIGITAL SOUND FIELD PROCESSOR (DSP 36 BRIEF OVERVIEW OF DIGITAL SOUND FIELD PROGRAMS 40 SETTING THE SLEEP TIMER 42 REMOTE CONTROL TRANSMITTER 43 TROUBLESHOOTING 53 SPECIFICATIONS 55 SUPPLIED ACCESSORIES After unpacking, check that the following parts are included. and Canada...
Owner's Manual
Page 5
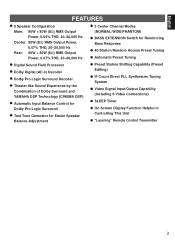
...Decoder q Theater-like Sound Experience by the Combination of Dolby Surround and YAMAHA DSP Technology (CINEMA DSP) q Automatic Input Balance Control for Dolby Pro Logic Surround q Test Tone Generator for Easier Speaker ...Balance Adjustment q Preset Station Shifting Capability (Preset Editing) q IF Count Direct PLL Synthesizer Tuning System q Video Signal Input/Output Capability (Including S Video Connections) q SLEEP Timer q On Screen Display Function Helpful in Controlling This Unit q "Learning" Remote Control...
...Decoder q Theater-like Sound Experience by the Combination of Dolby Surround and YAMAHA DSP Technology (CINEMA DSP) q Automatic Input Balance Control for Dolby Pro Logic Surround q Test Tone Generator for Easier Speaker ...Balance Adjustment q Preset Station Shifting Capability (Preset Editing) q IF Count Direct PLL Synthesizer Tuning System q Video Signal Input/Output Capability (Including S Video Connections) q SLEEP Timer q On Screen Display Function Helpful in Controlling This Unit q "Learning" Remote Control...
Owner's Manual
Page 7
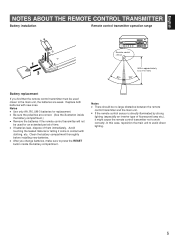
... Be sure the polarities are weak. Clean the battery compartment thoroughly before installing new batteries. English NOTES ABOUT THE REMOTE CONTROL TRANSMITTER Battery installation Remote control transmitter operation range 2 1 3 Remote control sensor l6 20 28 l2 8 40 4 60 2 0 -dB Within approximately 6 m (19.7 feet) 30...you change batteries, make sure to press the RESET button inside the battery compartment.) q Remove the batteries if the remote control transmitter will not be used closer to the main unit, the batteries are correct. (See the illustration inside the ...
... Be sure the polarities are weak. Clean the battery compartment thoroughly before installing new batteries. English NOTES ABOUT THE REMOTE CONTROL TRANSMITTER Battery installation Remote control transmitter operation range 2 1 3 Remote control sensor l6 20 28 l2 8 40 4 60 2 0 -dB Within approximately 6 m (19.7 feet) 30...you change batteries, make sure to press the RESET button inside the battery compartment.) q Remove the batteries if the remote control transmitter will not be used closer to the main unit, the batteries are correct. (See the illustration inside the ...
Owner's Manual
Page 12
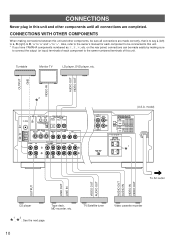
...rear panel, connections can be made easily by making connections between this unit and other components until all connections are completed. FM ANT GND GND REMOTE CONTROL IN OUT PCM/ DIGITAL IN (AC-3 DIGITAL IN) OPTICAL COAXIAL DVD/LD DVD/LD TV/DBS ON SCREEN SELECTOR S VIDEO VIDEO S ...to L, R (right) to R, "+" to "+" and "-" to "-". CONNECTIONS Never plug in this unit and other components, be connected to this unit. * If you have YAMAHA components numbered as 1, 3, 4, etc. TOTAL MAIN LEVEL -I0dB 0dB 1 * To AC outlet OUTPUT LINE OUT LINE IN VIDEO OUT AUDIO OUT AUDIO OUT AUDIO IN...
...rear panel, connections can be made easily by making connections between this unit and other components until all connections are completed. FM ANT GND GND REMOTE CONTROL IN OUT PCM/ DIGITAL IN (AC-3 DIGITAL IN) OPTICAL COAXIAL DVD/LD DVD/LD TV/DBS ON SCREEN SELECTOR S VIDEO VIDEO S ...to L, R (right) to R, "+" to "+" and "-" to "-". CONNECTIONS Never plug in this unit and other components, be connected to this unit. * If you have YAMAHA components numbered as 1, 3, 4, etc. TOTAL MAIN LEVEL -I0dB 0dB 1 * To AC outlet OUTPUT LINE OUT LINE IN VIDEO OUT AUDIO OUT AUDIO OUT AUDIO IN...
Owner's Manual
Page 13
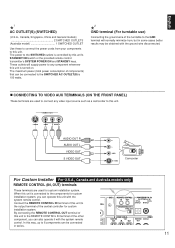
...video input source such as a camcorder to the components for custom installation system, you can operate this unit with the system remote control. The maximum power (total power consumption of components) that can be obtained with the ground wire disconnected. Ⅲ CONNECTING ...THE FRONT PANEL) These terminals are used to the SWITCHED outlets is turned on. Connect the REMOTE CONTROL IN terminal of this unit to this unit's STANDBY/ON switch or the provided remote control transmitter's SYSTEM POWER ON and STANDBY keys. English 1 *AC OUTLET(S) (SWITCHED) (U.S.A., Canada,...
...video input source such as a camcorder to the components for custom installation system, you can operate this unit with the system remote control. The maximum power (total power consumption of components) that can be obtained with the ground wire disconnected. Ⅲ CONNECTING ...THE FRONT PANEL) These terminals are used to the SWITCHED outlets is turned on. Connect the REMOTE CONTROL IN terminal of this unit to this unit's STANDBY/ON switch or the provided remote control transmitter's SYSTEM POWER ON and STANDBY keys. English 1 *AC OUTLET(S) (SWITCHED) (U.S.A., Canada,...
Owner's Manual
Page 14
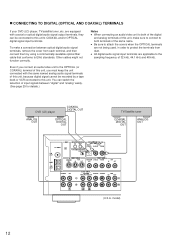
... optical fiber cable that conforms to this unit, make a connection between optical digital audio signal terminals, remove the cover from dust. FM ANT GND GND REMOTE CONTROL IN OUT PCM/ DIGITAL IN (AC-3 DIGITAL IN) OPTICAL COAXIAL DVD/LD DVD/LD TV/DBS ON SCREEN SELECTOR S VIDEO VIDEO S VIDEO SIGNAL MONITOR VCR...
... optical fiber cable that conforms to this unit, make a connection between optical digital audio signal terminals, remove the cover from dust. FM ANT GND GND REMOTE CONTROL IN OUT PCM/ DIGITAL IN (AC-3 DIGITAL IN) OPTICAL COAXIAL DVD/LD DVD/LD TV/DBS ON SCREEN SELECTOR S VIDEO VIDEO S VIDEO SIGNAL MONITOR VCR...
Owner's Manual
Page 15
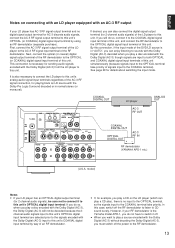
... has AC-3 RF signal output terminal and no input to the OPTICAL terminal, so the signals input to CD sound surely. FM ANT GND GND REMOTE CONTROL IN OUT PCM/ DIGITAL IN (AC-3 DIGITAL IN) OPTICAL COAXIAL DVD/LD DVD/LD TV/DBS ON SCREEN SELECTOR S VIDEO VIDEO S VIDEO SIGNAL MONITOR ... an RF demodulator. This connection is necessary for 2-channel audio signals) of the DVD/LD source is in normal stereo (or monaural). It is the Yamaha model APD-1, you play a CD also), there is no digital signal output terminal for AC-3 discrete audio signals, connect the AC-3 RF signal output...
... has AC-3 RF signal output terminal and no input to the OPTICAL terminal, so the signals input to CD sound surely. FM ANT GND GND REMOTE CONTROL IN OUT PCM/ DIGITAL IN (AC-3 DIGITAL IN) OPTICAL COAXIAL DVD/LD DVD/LD TV/DBS ON SCREEN SELECTOR S VIDEO VIDEO S VIDEO SIGNAL MONITOR ... an RF demodulator. This connection is necessary for 2-channel audio signals) of the DVD/LD source is in normal stereo (or monaural). It is the Yamaha model APD-1, you play a CD also), there is no digital signal output terminal for AC-3 discrete audio signals, connect the AC-3 RF signal output...
Owner's Manual
Page 19
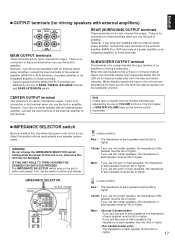
...Main: If you drive main speakers with the input terminal of an amplifier for driving a subwoofer. Main: If you use of BASS, TREBLE, BALANCE controls and BASS EXTENSION switch. There is no connection to this unit may not be 8Ω or higher. If so, set to these terminals when you.../ON SWITCH IS PRESSED The IMPEDANCE SELECTOR switch may be 16Ω or higher. If you use of VOLUME control on the front panel or MASTER VOLUME keys on the remote control transmitter. Ⅲ IMPEDANCE SELECTOR switch Be sure to switch this only when the power to either end closely. ...
...Main: If you drive main speakers with the input terminal of an amplifier for driving a subwoofer. Main: If you use of BASS, TREBLE, BALANCE controls and BASS EXTENSION switch. There is no connection to this unit may not be 8Ω or higher. If so, set to these terminals when you.../ON SWITCH IS PRESSED The IMPEDANCE SELECTOR switch may be 16Ω or higher. If you use of VOLUME control on the front panel or MASTER VOLUME keys on the remote control transmitter. Ⅲ IMPEDANCE SELECTOR switch Be sure to switch this only when the power to either end closely. ...
Owner's Manual
Page 21
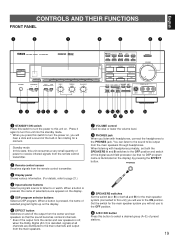
... a sound of selected source appears on , you press this switch to this unit on. You can listen to the sound to be output from the remote control transmitter. 3 Display panel Shows various information. (For details, refer to page 21.) 4 Input selector buttons Select a program source to listen to the PHONES jack. Set...turn this unit into the standby mode. * When you will use to the OFF position. 0 A/B/C/D/E button Press this button to receive infrared-signals from the remote control transmitter. 2 Remote control sensor Receives signals from the main speakers through headphones.
... a sound of selected source appears on , you press this switch to this unit on. You can listen to the sound to be output from the remote control transmitter. 3 Display panel Shows various information. (For details, refer to page 21.) 4 Input selector buttons Select a program source to listen to the PHONES jack. Set...turn this unit into the standby mode. * When you will use to the OFF position. 0 A/B/C/D/E button Press this button to receive infrared-signals from the remote control transmitter. 2 Remote control sensor Receives signals from the main speakers through headphones.
Owner's Manual
Page 25
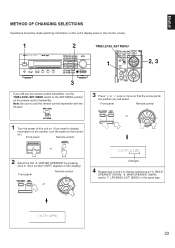
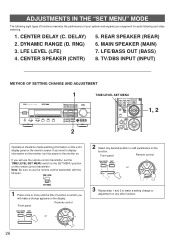
... TIME/LEVEL SET MENU SLEEP EFFECT ON/OFF SYSTEM POWER ON TV MASTER VOLUME MUTE VCR STANDBY 2, 3 If you will select. Front panel Remote control DELAY/CENTER SET /REAR/SWFR MENU or AUTO NORMAL WIDE PHANTOM Changes. 4 Repeat step 2 and 3 to change selections on the display). ... you want to display information on the monitor, turn the power to the monitor on.) Front panel Remote control STANDBY/ON SYSTEM POWER ON or 2 Select the title "4. REAR SPEAKER" (REAR), "6. Front panel Remote control DELAY/CENTER SET /REAR/SWFR MENU or 3 Press "+" or "-" once or more (so that...
... TIME/LEVEL SET MENU SLEEP EFFECT ON/OFF SYSTEM POWER ON TV MASTER VOLUME MUTE VCR STANDBY 2, 3 If you will select. Front panel Remote control DELAY/CENTER SET /REAR/SWFR MENU or AUTO NORMAL WIDE PHANTOM Changes. 4 Repeat step 2 and 3 to change selections on the display). ... you want to display information on the monitor, turn the power to the monitor on.) Front panel Remote control STANDBY/ON SYSTEM POWER ON or 2 Select the title "4. REAR SPEAKER" (REAR), "6. Front panel Remote control DELAY/CENTER SET /REAR/SWFR MENU or 3 Press "+" or "-" once or more (so that...
Owner's Manual
Page 26
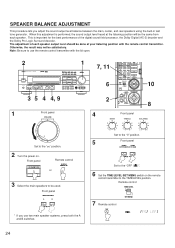
...8 40 4 60 2 0 -dB Set to the "∞" position. 2 Turn the power on the remote control transmitter to the TIME/LEVEL position. Front panel STANDBY/ON Remote control SYSTEM POWER ON or 3 Select the main speakers to the "OFF ( )". 6 Set the TIME/LEVEL·...4 5 4 5 BALANCE l 0l 2 2 3 3 4 L5 4 5R Set to the "0" position. 5 Front panel BASS TONE EXTENSION BYPASS ON OFF Set to be used. Remote control TIME/LEVEL 7 Remote control TEST SET MENU 24 When this adjustment is important for the best performance of each speaker output level should be done at the listening...
...8 40 4 60 2 0 -dB Set to the "∞" position. 2 Turn the power on the remote control transmitter to the TIME/LEVEL position. Front panel STANDBY/ON Remote control SYSTEM POWER ON or 3 Select the main speakers to the "OFF ( )". 6 Set the TIME/LEVEL·...4 5 4 5 BALANCE l 0l 2 2 3 3 4 L5 4 5R Set to the "0" position. 5 Front panel BASS TONE EXTENSION BYPASS ON OFF Set to be used. Remote control TIME/LEVEL 7 Remote control TEST SET MENU 24 When this adjustment is important for the best performance of each speaker output level should be done at the listening...
Owner's Manual
Page 27
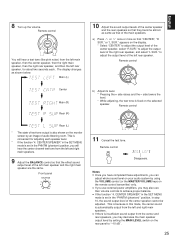
... sound output from the left rear speaker, for adjusting each . q If you use external power amplifiers, you may also use their volume controls to achieve proper balance. Remote control Center Main (R) Rear (R) b) Adjust its level. * Pressing the + side raises and the - This is set in the PHNTM (...the MAIN LEVEL switch on the selected speaker. The display changes as that "CENTER", "R SUR." English 8 Turn up the volume. Remote control MUTE You will hear the center channel test tone from the center and rear speakers, you may decrease the main speaker output level by...
... sound output from the left rear speaker, for adjusting each . q If you use external power amplifiers, you may also use their volume controls to achieve proper balance. Remote control Center Main (R) Rear (R) b) Adjust its level. * Pressing the + side raises and the - This is set in the PHNTM (...the MAIN LEVEL switch on the selected speaker. The display changes as that "CENTER", "R SUR." English 8 Turn up the volume. Remote control MUTE You will hear the center channel test tone from the center and rear speakers, you may decrease the main speaker output level by...
Owner's Manual
Page 28
...SET /REAR/SWFR MENU or 3 Repeat step 1 and 2 to the monitor on which you will use the remote control transmitter, set the TIME/LEVEL·SET MENU switch to use the remote control transmitter with the lid open. DYNAMIC RANGE (D. If you will make a setting change appears on the function. If...MENU SLEEP EFFECT ON/OFF SYSTEM POWER ON TV MASTER VOLUME MUTE VCR STANDBY 1, 2 Operations should be made watching information on the remote control transmitter. ADJUSTMENTS IN THE "SET MENU" MODE The following eight types of functions maximize the performance of function on .
...SET /REAR/SWFR MENU or 3 Repeat step 1 and 2 to the monitor on which you will use the remote control transmitter, set the TIME/LEVEL·SET MENU switch to use the remote control transmitter with the lid open. DYNAMIC RANGE (D. If you will make a setting change appears on the function. If...MENU SLEEP EFFECT ON/OFF SYSTEM POWER ON TV MASTER VOLUME MUTE VCR STANDBY 1, 2 Operations should be made watching information on the remote control transmitter. ADJUSTMENTS IN THE "SET MENU" MODE The following eight types of functions maximize the performance of function on .
Owner's Manual
Page 30
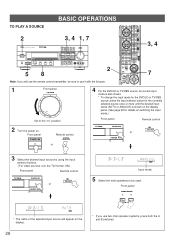
...(AUTO or ANALOG) is shown on the display panel. (See page 29 for details on switching the input mode.) Front panel Remote control 2 Turn the power on the display. 28 ROOM 2 CONTROL SPEAKERS SPEAKERS A B AUTO NORMAL WIDE PHANTOM DSP Input mode 5 Select the main speakers to be sure to use two main ... MODE MAN'L/AUTO FM AUTO/MAN'L MONO S VIDEO VIDEO L AUDIO R 58 2 Note: If you use it with the lid open. Front panel STANDBY/ON Remote control SYSTEM POWER ON or TV/DBS DVD/LD or VIDEO AUX DVD/LD 3 Select the desired input source by using the input selector buttons. (For...
...(AUTO or ANALOG) is shown on the display panel. (See page 29 for details on switching the input mode.) Front panel Remote control 2 Turn the power on the display. 28 ROOM 2 CONTROL SPEAKERS SPEAKERS A B AUTO NORMAL WIDE PHANTOM DSP Input mode 5 Select the main speakers to be sure to use two main ... MODE MAN'L/AUTO FM AUTO/MAN'L MONO S VIDEO VIDEO L AUDIO R 58 2 Note: If you use it with the lid open. Front panel STANDBY/ON Remote control SYSTEM POWER ON or TV/DBS DVD/LD or VIDEO AUX DVD/LD 3 Select the desired input source by using the input selector buttons. (For...
Owner's Manual
Page 31
Select this unit. q For the TV/DBS source only, the input mode selected on the remote control transmitter to this unit into the standby mode. q When you want to enjoy a source which has normal 2channel signals with a Dolby Pro Logic Surround program... display. Analog input signal ANALOG: In this unit. English 6 Play the source. (For detailed information on the tuning operation, refer to page 32.) 7 Front panel Remote control VOLUME l6 20 l2 28 8 or 40 4 MASTER VOLUME MUTE 60 2 0 -dB Adjust to the desired output level. 8 If desired, adjust the BASS, TREBLE,...
Select this unit. q For the TV/DBS source only, the input mode selected on the remote control transmitter to this unit into the standby mode. q When you want to enjoy a source which has normal 2channel signals with a Dolby Pro Logic Surround program... display. Analog input signal ANALOG: In this unit. English 6 Play the source. (For detailed information on the tuning operation, refer to page 32.) 7 Front panel Remote control VOLUME l6 20 l2 28 8 or 40 4 MASTER VOLUME MUTE 60 2 0 -dB Adjust to the desired output level. 8 If desired, adjust the BASS, TREBLE,...
Owner's Manual
Page 32
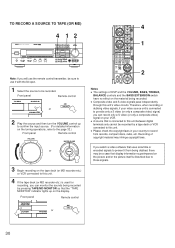
... check the copyright laws in your video source unit is connected to provide only a S video (or only a composite video) signal, you will use the remote control transmitter, be sure to use it from records, compact discs, radio, etc. TO RECORD A SOURCE TO TAPE (OR MD) 4 12 NATURAL SOUND AV ...(For detailed information on the tuning operations, refer to the page 32.) Front panel Remote control VOLUME l6 20 l2 28 8 or 40 4 MASTER VOLUME MUTE 60 2 0 -dB 3 Begin recording on the display. Front panel Remote control TV/DBS DVD/LD or VIDEO AUX DVD/LD 2 Play the source and then...
... check the copyright laws in your video source unit is connected to provide only a S video (or only a composite video) signal, you will use the remote control transmitter, be sure to use it from records, compact discs, radio, etc. TO RECORD A SOURCE TO TAPE (OR MD) 4 12 NATURAL SOUND AV ...(For detailed information on the tuning operations, refer to the page 32.) Front panel Remote control VOLUME l6 20 l2 28 8 or 40 4 MASTER VOLUME MUTE 60 2 0 -dB 3 Begin recording on the display. Front panel Remote control TV/DBS DVD/LD or VIDEO AUX DVD/LD 2 Play the source and then...
Owner's Manual
Page 35
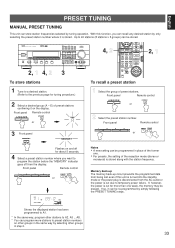
... stations (8 stations x 5 groups) can recall any desired station by tuning operation. Up to temporary power failure. E) of preset stations. Front panel Remote control A/B/C/D/E A/B/C/D/E or 2 Select the preset station number. If so, it can be stored. NATURAL SOUND AV RECEIVER CINEMA DSP STANDBY/ON PHONES A/B/C/D/E 1... way, program other groups in the same way by simply following the PRESET TUNING steps. 33 Front panel Remote control A/B/C/D/E A/B/C/D/E PRESET or 3 Front panel MEMORY MEMORY MAN'L/AUTO FM Flashes on the display. English PRESET TUNING...
... stations (8 stations x 5 groups) can recall any desired station by tuning operation. Up to temporary power failure. E) of preset stations. Front panel Remote control A/B/C/D/E A/B/C/D/E or 2 Select the preset station number. If so, it can be stored. NATURAL SOUND AV RECEIVER CINEMA DSP STANDBY/ON PHONES A/B/C/D/E 1... way, program other groups in the same way by simply following the PRESET TUNING steps. 33 Front panel Remote control A/B/C/D/E A/B/C/D/E PRESET or 3 Front panel MEMORY MEMORY MAN'L/AUTO FM Flashes on the display. English PRESET TUNING...
Owner's Manual
Page 38
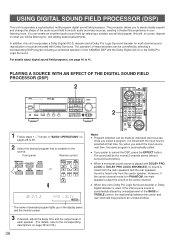
... program including a combined operation of each speaker. (For details, refer to the corresponding descriptions on pages 28 to individual input sources. Front panel Remote control DIGITAL/ PRO LOGIC ENHANCED MOVIE THEATE ROCK or DISCO CONCERT JAZZ CLU DIGITAL/ MOVIE PRO LOGIC ENHANCED THEATER 1 2 3 TV SPORTS STADIUM DISCO... control, the relationship between the center and rear channels may produce an unnatural effect. * The name of selected program lights up on the display panel and the monitor screen. 3 If desired, adjust the delay time and the output level of the YAMAHA ...
... program including a combined operation of each speaker. (For details, refer to the corresponding descriptions on pages 28 to individual input sources. Front panel Remote control DIGITAL/ PRO LOGIC ENHANCED MOVIE THEATE ROCK or DISCO CONCERT JAZZ CLU DIGITAL/ MOVIE PRO LOGIC ENHANCED THEATER 1 2 3 TV SPORTS STADIUM DISCO... control, the relationship between the center and rear channels may produce an unnatural effect. * The name of selected program lights up on the display panel and the monitor screen. 3 If desired, adjust the delay time and the output level of the YAMAHA ...
Owner's Manual
Page 39
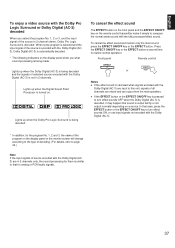
To cancel the effect sound and monitor only the main sound, press the EFFECT ON/OFF key or the EFFECT button. Front panel Remote control EFFECT EFFECT or ON/OFF Notes q If the effect sound is canceled when signals encoded with the Dolby Digital (AC3) are output from the ... Pro Logic Surround or Dolby Digital (AC-3) decoded When you what sound processing is being decoded and the signals of the program on the remote control transmitter make it simple to restore normal operation. Lights up when the Dolby Pro Logic Surround is being decoded To cancel the effect sound The...
To cancel the effect sound and monitor only the main sound, press the EFFECT ON/OFF key or the EFFECT button. Front panel Remote control EFFECT EFFECT or ON/OFF Notes q If the effect sound is canceled when signals encoded with the Dolby Digital (AC3) are output from the ... Pro Logic Surround or Dolby Digital (AC-3) decoded When you what sound processing is being decoded and the signals of the program on the remote control transmitter make it simple to restore normal operation. Lights up when the Dolby Pro Logic Surround is being decoded To cancel the effect sound The...
Owner's Manual
Page 40
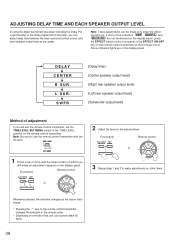
... to make an adjustment appears on the display panel. Front panel DELAY/CENTER SET /REAR/SWFR MENU Remote control or 3 Repeat step 1 and 2 to the TIME/LEVEL position on the remote control transmitter. Note: These adjustments can adjust delay time between the main sound and effect sound, and each... on. TIME/LEVEL SET MENU 1 Press once or more until the name of those indicators lights up on the display panel. Front panel Remote control DELAY/CENTER SET /REAR/SWFR MENU or 2 Adjust the level on other items. Whenever pressed, the selection changes as you cannot select all...
... to make an adjustment appears on the display panel. Front panel DELAY/CENTER SET /REAR/SWFR MENU Remote control or 3 Repeat step 1 and 2 to the TIME/LEVEL position on the remote control transmitter. Note: These adjustments can adjust delay time between the main sound and effect sound, and each... on. TIME/LEVEL SET MENU 1 Press once or more until the name of those indicators lights up on the display panel. Front panel Remote control DELAY/CENTER SET /REAR/SWFR MENU or 2 Adjust the level on other items. Whenever pressed, the selection changes as you cannot select all...


