
Owners Manual
Page 1
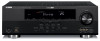
U RX-V465 AV Receiver OWNER'S MANUAL
U RX-V465 AV Receiver OWNER'S MANUAL

Owners Manual
Page 3
...instructions in is damaged, liquid has been spilled or objects have fallen into your safety. Modifications not expressly approved by Yamaha may cause interference harmful to coaxial type cable. Follow all servicing to comply with the apparatus. The above statements apply... requirements provides a reasonable level of electric shock to accessories and/or another product use the product. 2 IMPORTANT: When connecting this manual, meets FCC requirements. A grounding type plug has two blades and a third grounding prong. Failure to follow instructions could void your...
...instructions in is damaged, liquid has been spilled or objects have fallen into your safety. Modifications not expressly approved by Yamaha may cause interference harmful to coaxial type cable. Follow all servicing to comply with the apparatus. The above statements apply... requirements provides a reasonable level of electric shock to accessories and/or another product use the product. 2 IMPORTANT: When connecting this manual, meets FCC requirements. A grounding type plug has two blades and a third grounding prong. Failure to follow instructions could void your...

Owners Manual
Page 4
...safe place for any damage resulting from earphones and headphones can be reached easily. 17 Be sure to read this Owner's Manual in the space below. Yamaha will not be opened for future reference. FOR CANADIAN CUSTOMERS To prevent electric shock, match wide blade of this unit by ...ASTANDBY/ON to set for long periods of this unit upside-down. Containers with liquid in an environment with high humidity (i.e. Contact qualified Yamaha service personnel when any reasons. 15 When not planning to use of this unit must be exposed to liquid dripping or splashing. away ...
...safe place for any damage resulting from earphones and headphones can be reached easily. 17 Be sure to read this Owner's Manual in the space below. Yamaha will not be opened for future reference. FOR CANADIAN CUSTOMERS To prevent electric shock, match wide blade of this unit by ...ASTANDBY/ON to set for long periods of this unit upside-down. Containers with liquid in an environment with high humidity (i.e. Contact qualified Yamaha service personnel when any reasons. 15 When not planning to use of this unit must be exposed to liquid dripping or splashing. away ...

Owners Manual
Page 5
INTRODUCTION PREPARATION BASIC OPERATION ADVANCED OPERATION Contents INTRODUCTION Features 2 About this manual 3 Supplied accessories 3 Part names and functions 4 Front panel 4 Rear panel 5 Front panel display 6 Remote control 7 Quick start guide 8 L PREPARATION Preparing remote ... 10 Connecting speakers 11 Information on jacks and cable plugs 13 Connecting a TV monitor or projector 14 Connecting other components 15 Connecting a Yamaha iPod universal dock or Bluetooth™ wireless audio receiver 16 Using the VIDEO AUX jacks on the front panel .... 16 Connecting the FM...
INTRODUCTION PREPARATION BASIC OPERATION ADVANCED OPERATION Contents INTRODUCTION Features 2 About this manual 3 Supplied accessories 3 Part names and functions 4 Front panel 4 Rear panel 5 Front panel display 6 Remote control 7 Quick start guide 8 L PREPARATION Preparing remote ... 10 Connecting speakers 11 Information on jacks and cable plugs 13 Connecting a TV monitor or projector 14 Connecting other components 15 Connecting a Yamaha iPod universal dock or Bluetooth™ wireless audio receiver 16 Using the VIDEO AUX jacks on the front panel .... 16 Connecting the FM...
Owners Manual
Page 7
... or the pages at the end of this manual • y indicates a tip for the information about each position of the parts. • ☞ indicates the page describing the related information. x.v.Color™ "x.v.Color" is a trademark of Yamaha Corporation. Design and specifications are trademark of DTS... logos, Symbol, DTS-HD and DTSHD Master Audio are subject to production. INTRODUCTION PREPARATION About this manual for your operation. • Some operations can be performed by Yamaha in part as a result of improvements, etc. Dolby, Pro Logic and the double-D symbol are...
... or the pages at the end of this manual • y indicates a tip for the information about each position of the parts. • ☞ indicates the page describing the related information. x.v.Color™ "x.v.Color" is a trademark of Yamaha Corporation. Design and specifications are trademark of DTS... logos, Symbol, DTS-HD and DTSHD Master Audio are subject to production. INTRODUCTION PREPARATION About this manual for your operation. • Some operations can be performed by Yamaha in part as a result of improvements, etc. Dolby, Pro Logic and the double-D symbol are...

Owners Manual
Page 22
If there is too much ambient noise, the results may appear. y • See page 39 for the "Manual Setup" procedure. 2 Connect the supplied optimizer microphone to fix the optimizer microphone at the same height as possible while the "Auto Setup" procedure is... half way (or slightly less). • The crossover frequency controls of the connected subwoofer are set at your listening room (YPAO) This unit has a Yamaha Parametric Acoustic Optimizer (YPAO). VOLUME CROSSOVER/ HIGH CUT "MIC ON. Do not allow small children to enter the room during the "Auto Setup" procedure. ...
If there is too much ambient noise, the results may appear. y • See page 39 for the "Manual Setup" procedure. 2 Connect the supplied optimizer microphone to fix the optimizer microphone at the same height as possible while the "Auto Setup" procedure is... half way (or slightly less). • The crossover frequency controls of the connected subwoofer are set at your listening room (YPAO) This unit has a Yamaha Parametric Acoustic Optimizer (YPAO). VOLUME CROSSOVER/ HIGH CUT "MIC ON. Do not allow small children to enter the room during the "Auto Setup" procedure. ...

Owners Manual
Page 32
... You can switch between stereo and monaural for FM broadcast in the option menu (see page 33. 3 Select "Auto Preset," and press nENTER. Use manual station preset. 1 Press NINPUT l / h repeatedly (or press gTUNER) to switch the input source to better quality sound even when the tuner cannot receive... STEREO TUNED FM 92.5 MHz The frequency changes in the following two modes for tuning. ■ Frequency tuning mode (Auto tuning / Manual tuning) You can preset the frequencies of tuner input appears on the remote control. The option menu screen for the best reception. Status ...
... You can switch between stereo and monaural for FM broadcast in the option menu (see page 33. 3 Select "Auto Preset," and press nENTER. Use manual station preset. 1 Press NINPUT l / h repeatedly (or press gTUNER) to switch the input source to better quality sound even when the tuner cannot receive... STEREO TUNED FM 92.5 MHz The frequency changes in the following two modes for tuning. ■ Frequency tuning mode (Auto tuning / Manual tuning) You can preset the frequencies of tuner input appears on the remote control. The option menu screen for the best reception. Status ...

Owners Manual
Page 33
...that is cleared. See page 28 and register stations. • You can call preset stations registered by automatic station preset or manual station preset. To end the operation, press mOPTION. New registered frequency 01:Empty Preset number Flashing Empty (or frequency that ... MEMORY each time a station is displayed on the front panel display, followed soon by pressing a sNumeric keys while calling a preset station. "Manual Preset" appears on the right of multiple preset numbers, repeat the above steps. When you select a registered preset number, a registered frequency is ...
...that is cleared. See page 28 and register stations. • You can call preset stations registered by automatic station preset or manual station preset. To end the operation, press mOPTION. New registered frequency 01:Empty Preset number Flashing Empty (or frequency that ... MEMORY each time a station is displayed on the front panel display, followed soon by pressing a sNumeric keys while calling a preset station. "Manual Preset" appears on the right of multiple preset numbers, repeat the above steps. When you select a registered preset number, a registered frequency is ...

Owners Manual
Page 42
... 42 42 42 42 42 42 42 42 42 42 42 43 43 43 43 43 38 En Menu/Submenu Speaker Setup 1 Auto Setup (YPAO) 2 Manual Setup A)Config B)Level C)Distance D)Equalizer E)Test Tone Sound Setup 1 D. Setup 1 HDMI Standby Audio 2 Display Dimmer FL Scroll 3 Volume Adptv DRC MaxVol ...this unit (Setup menu) You can change the settings of the connected speaker (sound reproduction capacity), suitable for sound outputs. Manually adjusts output characteristics of speakers. Manually fine adjusts the delay of the setup menu" first, and see the respective pages. Sets the maximum volume level so that...
... 42 42 42 42 42 42 42 42 42 42 42 43 43 43 43 43 38 En Menu/Submenu Speaker Setup 1 Auto Setup (YPAO) 2 Manual Setup A)Config B)Level C)Distance D)Equalizer E)Test Tone Sound Setup 1 D. Setup 1 HDMI Standby Audio 2 Display Dimmer FL Scroll 3 Volume Adptv DRC MaxVol ...this unit (Setup menu) You can change the settings of the connected speaker (sound reproduction capacity), suitable for sound outputs. Manually adjusts output characteristics of speakers. Manually fine adjusts the delay of the setup menu" first, and see the respective pages. Sets the maximum volume level so that...

Owners Manual
Page 43
...marked with woofer diameters 16 cm or larger and smaller than 16 cm, respectively. y • The speaker configuration includes items for manual adjustment. The output status is as connection status of speaker and a size of adjustments are displayed. y • When nCursor or... capacity), suitable for your preference if necessary. ■ A)Config Sets speaker configurations, such as follows. After Auto Setup (YPAO) is "Manual Setup" for defining a speaker size: Large or Small. Fine adjust the parameters for the listening environment. y • You can set parameters...
...marked with woofer diameters 16 cm or larger and smaller than 16 cm, respectively. y • The speaker configuration includes items for manual adjustment. The output status is as connection status of speaker and a size of adjustments are displayed. y • When nCursor or... capacity), suitable for your preference if necessary. ■ A)Config Sets speaker configurations, such as follows. After Auto Setup (YPAO) is "Manual Setup" for defining a speaker size: Large or Small. Fine adjust the parameters for the listening environment. y • You can set parameters...

Owners Manual
Page 45
... (see page 39). • When only one surround back speaker is selected, you do not use the automatic lip-sync function. The graphic equalizer of "2 Manual Setup" while listening to 80.0ft) Defaults: 3.00m (10.0ft) "Front L/Front R/ SWFR" 2.60m (8.5ft) "Center" 2.40m (8.0ft) "Sur.... 41 En L / Sur. Off Not generate test tones. Sound Setup You can adjust signal levels in feet. Fine adjust the correction time in "Manual." Note • If Auto Setup is connected, "Sur. To adjust the signal level within each range, select the desired speaker with nCursor l /...
... (see page 39). • When only one surround back speaker is selected, you do not use the automatic lip-sync function. The graphic equalizer of "2 Manual Setup" while listening to 80.0ft) Defaults: 3.00m (10.0ft) "Front L/Front R/ SWFR" 2.60m (8.5ft) "Center" 2.40m (8.0ft) "Sur.... 41 En L / Sur. Off Not generate test tones. Sound Setup You can adjust signal levels in feet. Fine adjust the correction time in "Manual." Note • If Auto Setup is connected, "Sur. To adjust the signal level within each range, select the desired speaker with nCursor l /...

Owners Manual
Page 46
...halts scrolling, and then displays first 14 characters. 3 Volume You can set items for headphones. 42 En Not adjust the dynamic range automatically. Manual Adjustable range: 0* to the HDMI OUT jack. Off Not output the HDMI signals to this unit. y • To enables pass-through output...to this unit for reproducing sound signals input from this unit (Setup menu) Auto Adjustable range: 0 to 240ms (1 ms step) Enables manual fine adjustment of the front panel display is adjusted as follows. Operating various settings for this unit to the monitor vary depending on specifications ...
...halts scrolling, and then displays first 14 characters. 3 Volume You can set items for headphones. 42 En Not adjust the dynamic range automatically. Manual Adjustable range: 0* to the HDMI OUT jack. Off Not output the HDMI signals to this unit. y • To enables pass-through output...to this unit for reproducing sound signals input from this unit (Setup menu) Auto Adjustable range: 0 to 240ms (1 ms step) Enables manual fine adjustment of the front panel display is adjusted as follows. Operating various settings for this unit to the monitor vary depending on specifications ...
Owners Manual
Page 48
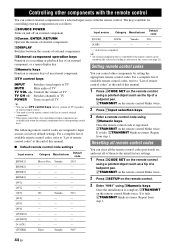
...TV CH +/- Repeat from step 1. [AV6] - - - [AUDIO1] - - - [AUDIO2] - - - [V-AUX] - - - [TUNER] Tuner Yamaha 5007 44 En Resetting all remote control codes You can clear all of a ballpoint pen. Repeat from step 1. Controlling other components by the remote control... component operation keys Function as the tip of a ballpoint pen. Switches channels of this manual. ■ Default remote control code settings Input source Category Manufacturer Default code [HDMI1] Blu-ray Disc Yamaha 2018 [HDMI2] - - - [HDMI3] - - - "-" indicates no assignment ...
...TV CH +/- Repeat from step 1. [AV6] - - - [AUDIO1] - - - [AUDIO2] - - - [V-AUX] - - - [TUNER] Tuner Yamaha 5007 44 En Resetting all remote control codes You can clear all of a ballpoint pen. Repeat from step 1. Controlling other components by the remote control... component operation keys Function as the tip of a ballpoint pen. Switches channels of this manual. ■ Default remote control code settings Input source Category Manufacturer Default code [HDMI1] Blu-ray Disc Yamaha 2018 [HDMI2] - - - [HDMI3] - - - "-" indicates no assignment ...

Owners Manual
Page 51
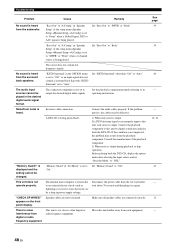
... decoders. Check the Speaker indicators on this unit back on the monitor. Select another one side only. Display Speaker Setup in the Setup the volume (Manual Setup→B)Level).
... decoders. Check the Speaker indicators on this unit back on the monitor. Select another one side only. Display Speaker Setup in the Setup the volume (Manual Setup→B)Level).
Owners Manual
Page 52
... be changed. appears on the front panel display. "Bass Out" of "A)Config" in "Speaker Setup" of the setup menu (Speaker Setup→Manual Setup→A)Config) is set to "Front" when a Dolby Digital, DTS or AAC signal is output during playback or skip operation Before playing back... equipment. A DTS-CD is being played. "CHECK SP WIRES!" "Memory Guard" in "Speaker Setup" of the setup menu (Speaker Setup→Manual Setup→A)Config) is set to an external electric shock (such as lightning or excessive static electricity) or by digital connection and play back the...
... be changed. appears on the front panel display. "Bass Out" of "A)Config" in "Speaker Setup" of the setup menu (Speaker Setup→Manual Setup→A)Config) is set to "Front" when a Dolby Digital, DTS or AAC signal is output during playback or skip operation Before playing back... equipment. A DTS-CD is being played. "CHECK SP WIRES!" "Memory Guard" in "Speaker Setup" of the setup menu (Speaker Setup→Manual Setup→A)Config) is set to an external electric shock (such as lightning or excessive static electricity) or by digital connection and play back the...

Owners Manual
Page 53
..., or place it in an area far from a station or an input from the antenna is weak. Tune in manually or by lightning, fluorescent lamps, motors, thermostats and other electrical equipment. Use the manual tuning method. Move this unit to cool down and then - Problem Cause Remedy No picture or sound. The...
..., or place it in an area far from a station or an input from the antenna is weak. Tune in manually or by lightning, fluorescent lamps, motors, thermostats and other electrical equipment. Use the manual tuning method. Move this unit to cool down and then - Problem Cause Remedy No picture or sound. The...

Owners Manual
Page 54
.... The batteries are some models that do not match. Unknown iPod The iPod being used is properly placed in the Yamaha iPod universal dock. this manual. Disconnected Your iPod is in the Yamaha iPod universal dock. 16 iPod universal dock. 50 En The remote control will function within a maximum range of recognizing the...
.... The batteries are some models that do not match. Unknown iPod The iPod being used is properly placed in the Yamaha iPod universal dock. this manual. Disconnected Your iPod is in the Yamaha iPod universal dock. 16 iPod universal dock. 50 En The remote control will function within a maximum range of recognizing the...

Owners Manual
Page 59
...so that there are differences in the sound heard. Bitstream Dolby Digital, DTS DVD-Video, etc. Refer to the supplied instruction manuals for details. • This unit is inevitable that accurate representations of all the sound field programs can differ so widely, it... that the component outputs the bitstream audio signals directly (does not decode the bitstream signals on a wealth of actually measured data, Yamaha CINEMA DSP provides the audiovisual experience of a movie theater in the listening room of your listening experience by regenerating the missing harmonics ...
...so that there are differences in the sound heard. Bitstream Dolby Digital, DTS DVD-Video, etc. Refer to the supplied instruction manuals for details. • This unit is inevitable that accurate representations of all the sound field programs can differ so widely, it... that the component outputs the bitstream audio signals directly (does not decode the bitstream signals on a wealth of actually measured data, Yamaha CINEMA DSP provides the audiovisual experience of a movie theater in the listening room of your listening experience by regenerating the missing harmonics ...

Owners Manual
Page 61
... source registration 21 Installing batteries, remote control 9 iPod playback 30 iPod universal dock connection 16 iPod, troubleshooting 50 ■L Low frequency sound adjustment 22 ■M Manual, 2 Lipsync, sound setup 42 MaxVol, 3 Volume, function setup 43 Memory guard, setup menu 43 MEMORY, front panel 4 MONITOR OUT, rear panel 5 Mono Movie, sound field...
... source registration 21 Installing batteries, remote control 9 iPod playback 30 iPod universal dock connection 16 iPod, troubleshooting 50 ■L Low frequency sound adjustment 22 ■M Manual, 2 Lipsync, sound setup 42 MaxVol, 3 Volume, function setup 43 Memory guard, setup menu 43 MEMORY, front panel 4 MONITOR OUT, rear panel 5 Mono Movie, sound field...
Owners Manual
Page 75
...components and enable the HDMI control function. See "Standby Through" or "Standby" (Setup menu → Function setup → 1 HDMI) on the manual for that supports the HDMI control function is assigned to "On." - For details, refer to this unit. Setup menu Function Setup → 1 ...HDMI connection. y • You do not need to do the following the instructions for the TV are turned on . U RX-V665/RX-V565/RX-V465 English Additional information About the HDMI control function This unit supports the HDMI control function. Bring up under the following . ...
...components and enable the HDMI control function. See "Standby Through" or "Standby" (Setup menu → Function setup → 1 HDMI) on the manual for that supports the HDMI control function is assigned to "On." - For details, refer to this unit. Setup menu Function Setup → 1 ...HDMI connection. y • You do not need to do the following the instructions for the TV are turned on . U RX-V665/RX-V565/RX-V465 English Additional information About the HDMI control function This unit supports the HDMI control function. Bring up under the following . ...


