
Owner's Manual
Page 3
...that provides guidelines for your outlet, consult an electrician for long periods of interference, which can not locate the appropriate retailer, please contact Yamaha Electronics Corp., U.S.A. 6660 Orangethorpe Ave, Buena Park, CA 90620. If these instructions. 3 Heed all warnings. 4 Follow all installation instructions.... If the provided plug does not fit into the apparatus, the apparatus has been exposed to avoid injury from being affected by turning the unit "OFF" and "ON", please try to coaxial type cable. This product, when installed as practical. 1 Read these instructions. ...
...that provides guidelines for your outlet, consult an electrician for long periods of interference, which can not locate the appropriate retailer, please contact Yamaha Electronics Corp., U.S.A. 6660 Orangethorpe Ave, Buena Park, CA 90620. If these instructions. 3 Heed all warnings. 4 Follow all installation instructions.... If the provided plug does not fit into the apparatus, the apparatus has been exposed to avoid injury from being affected by turning the unit "OFF" and "ON", please try to coaxial type cable. This product, when installed as practical. 1 Read these instructions. ...
Owner's Manual
Page 4
...may be sure to use force on the rear of power. Danger of this unit. 3 Locate this unit away from other than specified is not disconnected from the AC power source even if you turn off this unit by lightning, keep the power cord and outdoor antennas disconnected from the wall ...into the AC wall outlet. The cabinet should never be held responsible for any damage resulting from use this unit for long periods of this manual carefully. Caution-ii En Yamaha will not be opened for future reference. away from earphones and headphones can be used. IMPORTANT Please record the...
...may be sure to use force on the rear of power. Danger of this unit. 3 Locate this unit away from other than specified is not disconnected from the AC power source even if you turn off this unit by lightning, keep the power cord and outdoor antennas disconnected from the wall ...into the AC wall outlet. The cabinet should never be held responsible for any damage resulting from use this unit for long periods of this manual carefully. Caution-ii En Yamaha will not be opened for future reference. away from earphones and headphones can be used. IMPORTANT Please record the...
Owner's Manual
Page 5
...field program 46 Setting sound field parameters 46 Sound field parameters 46 Operating various settings for this unit (Setup menu 50 Basic operation of remote control codes i APPENDIX English 1 En model only 65... other components 15 Connecting an external amplifier 16 Using REMOTE IN/OUT jacks 17 Connecting a Yamaha iPod universal dock or Bluetooth™ wireless audio receiver 17 Using the VIDEO AUX jacks on...panel .... 17 Connecting the FM and AM antennas 18 Connecting the power cable 18 Turning this manual) List of the setup menu 51 Speaker Setup 51 Sound Setup 53 Function...
...field program 46 Setting sound field parameters 46 Sound field parameters 46 Operating various settings for this unit (Setup menu 50 Basic operation of remote control codes i APPENDIX English 1 En model only 65... other components 15 Connecting an external amplifier 16 Using REMOTE IN/OUT jacks 17 Connecting a Yamaha iPod universal dock or Bluetooth™ wireless audio receiver 17 Using the VIDEO AUX jacks on...panel .... 17 Connecting the FM and AM antennas 18 Connecting the power cable 18 Turning this manual) List of the setup menu 51 Speaker Setup 51 Sound Setup 53 Function...
Owner's Manual
Page 11
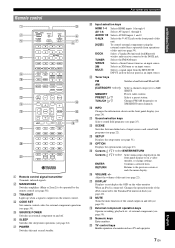
...59). To control external components using the external control keys separately from operations of this unit on the front panel of external components (see page 24). Selects a Yamaha iPod universal dock/Bluetooth wireless audio receiver connected to the previous screen or ends the ...). t Numeric keys Enter numbers. Selects a preset station. Selects an XM tuner as an input source. Presets radio stations. r MUTE Turns the mute function of input sources and sound field programs (see page 40). c TRANSMIT Lights up when a signal is connected: Changes ...
...59). To control external components using the external control keys separately from operations of this unit on the front panel of external components (see page 24). Selects a Yamaha iPod universal dock/Bluetooth wireless audio receiver connected to the previous screen or ends the ...). t Numeric keys Enter numbers. Selects a preset station. Selects an XM tuner as an input source. Presets radio stations. r MUTE Turns the mute function of input sources and sound field programs (see page 40). c TRANSMIT Lights up when a signal is connected: Changes ...

Owner's Manual
Page 12
... turn on this unit. • Connecting the power cable • Turning this unit on and off ☞P. 18 ☞P. 18 Step 5: Select the input source and start playback Select the component connected in the room and connect them to this unit. • Placing speakers • Connecting speakers ☞P. 10 ☞P. 11 y • This unit has a YPAO (Yamaha...
... turn on this unit. • Connecting the power cable • Turning this unit on and off ☞P. 18 ☞P. 18 Step 5: Select the input source and start playback Select the component connected in the room and connect them to this unit. • Placing speakers • Connecting speakers ☞P. 10 ☞P. 11 y • This unit has a YPAO (Yamaha...

Owner's Manual
Page 16
... of the cables is turned on. • Use magnetically shielded speakers. If images on the front panel display when this unit. When not making bi-amplification connections, remove any metal part of this unit and/or speakers. Before connecting the speakers, set this unit as shown below. Connect...bi-amplification connections You can connect the presence speakers (see page 11) or the speakers in general. Banana plug 12 En This unit FRONT SURROUND BACK/ BI-AMP Caution Before making bi-amplification connections, make sure that the brackets or cables are still distorted even...
... of the cables is turned on. • Use magnetically shielded speakers. If images on the front panel display when this unit. When not making bi-amplification connections, remove any metal part of this unit and/or speakers. Before connecting the speakers, set this unit as shown below. Connect...bi-amplification connections You can connect the presence speakers (see page 11) or the speakers in general. Banana plug 12 En This unit FRONT SURROUND BACK/ BI-AMP Caution Before making bi-amplification connections, make sure that the brackets or cables are still distorted even...
Owner's Manual
Page 21
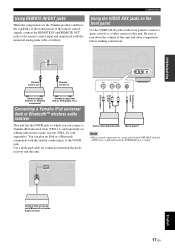
... R PORTABLE Analog audio output Analog audio output Video output Infrared signal receiver or Yamaha component Yamaha component (CD or DVD player, etc.) Connecting a Yamaha iPod universal dock or Bluetooth™ wireless audio receiver This unit has the DOCK jack, to turn down the volume of the remote control signals, connect the REMOTE IN and REMOTE...
... R PORTABLE Analog audio output Analog audio output Video output Infrared signal receiver or Yamaha component Yamaha component (CD or DVD player, etc.) Connecting a Yamaha iPod universal dock or Bluetooth™ wireless audio receiver This unit has the DOCK jack, to turn down the volume of the remote control signals, connect the REMOTE IN and REMOTE...
Owner's Manual
Page 22
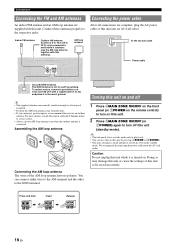
...mode. Doing so may damage this unit or cause the settings of this unit into an AC wall outlet. To the AC wall outlet Power cable Turning this unit on and off this unit by pressing JSCENE (or lSCENE). • This unit consumes a small amount of the AM...H ANTENNA UNBAL. For more details, consult the nearest authorized Yamaha dealer or service center. • Always use an outdoor antenna. y • The unit needs a few seconds until ready to be saved incorrectly. Connect these antennas properly to turn on this unit. y • The supplied antennas are complete, plug the...
...mode. Doing so may damage this unit or cause the settings of this unit into an AC wall outlet. To the AC wall outlet Power cable Turning this unit on and off this unit by pressing JSCENE (or lSCENE). • This unit consumes a small amount of the AM...H ANTENNA UNBAL. For more details, consult the nearest authorized Yamaha dealer or service center. • Always use an outdoor antenna. y • The unit needs a few seconds until ready to be saved incorrectly. Connect these antennas properly to turn on this unit. y • The supplied antennas are complete, plug the...

Owner's Manual
Page 23
... Place the optimizer microphone at the same height as the video input source of the video monitor. • The connected subwoofer is turned on speaker position, speaker performance, and the acoustic characteristics of the connected subwoofer are connected to EXTRA SP terminals, press oCursor k ...characteristics of your speakers based on and the volume level is set to fix the optimizer microphone at your listening room (YPAO) This unit has a Yamaha Parametric Acoustic Optimizer (YPAO). Start [ ]/[ ]:Up/Down [ENTER]:Start y • You can fix the optimizer microphone to the...
... Place the optimizer microphone at the same height as the video input source of the video monitor. • The connected subwoofer is turned on speaker position, speaker performance, and the acoustic characteristics of the connected subwoofer are connected to EXTRA SP terminals, press oCursor k ...characteristics of your speakers based on and the volume level is set to fix the optimizer microphone at your listening room (YPAO) This unit has a Yamaha Parametric Acoustic Optimizer (YPAO). Start [ ]/[ ]:Up/Down [ENTER]:Start y • You can fix the optimizer microphone to the...
Owner's Manual
Page 26
... Complete" appears on the video monitor (OSD). Using the SCENE function This unit has a SCENE function that you play back a DVD/CD on the player by pressing the SCENE key. • When connecting a Yamaha DVD/CD player that the volume is output during playback or skip operation Before...the video monitor as the source input, or select a radio station on the tuner. If the condition is on standby, you can turn on this unit by selecting BD/DVD or CD SCENE function. While display in some conditions, which may cause a speaker malfunction. Switching remotely controlled ...
... Complete" appears on the video monitor (OSD). Using the SCENE function This unit has a SCENE function that you play back a DVD/CD on the player by pressing the SCENE key. • When connecting a Yamaha DVD/CD player that the volume is output during playback or skip operation Before...the video monitor as the source input, or select a radio station on the tuner. If the condition is on standby, you can turn on this unit by selecting BD/DVD or CD SCENE function. While display in some conditions, which may cause a speaker malfunction. Switching remotely controlled ...
Owner's Manual
Page 27
... • When multi-channel signals are processed, sounds in all channels are divided to resume audio output. The current setting is activated, this unit (such as volume control). When Pure Direct mode is displayed on the front panel display. NPURE DIRECT lights up when you release the key... key whose assignment you want to enjoy the pure high fidelity sound of the selected source. The front panel display turns off . It turns on temporarily when you control this unit plays back the selected source with the least circuitry. Control range: -10.0 dB to +10.0 dB The display...
... • When multi-channel signals are processed, sounds in all channels are divided to resume audio output. The current setting is activated, this unit (such as volume control). When Pure Direct mode is displayed on the front panel display. NPURE DIRECT lights up when you release the key... key whose assignment you want to enjoy the pure high fidelity sound of the selected source. The front panel display turns off . It turns on temporarily when you control this unit plays back the selected source with the least circuitry. Control range: -10.0 dB to +10.0 dB The display...
Owner's Manual
Page 38
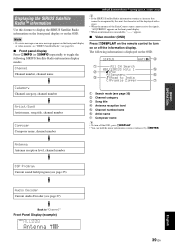
... (see page 25) Audio Decoder Current Audio Decoder (see page 32) b Channel category c Song title d Antenna reception level e Channel number/name f Artist name y • To turn off the OSD, press qDISPLAY. • You can hold the music information screen or release it by this feature to toggle the following XM Satellite...
... (see page 25) Audio Decoder Current Audio Decoder (see page 32) b Channel category c Song title d Antenna reception level e Channel number/name f Artist name y • To turn off the OSD, press qDISPLAY. • You can hold the music information screen or release it by this feature to toggle the following XM Satellite...
Owner's Manual
Page 43
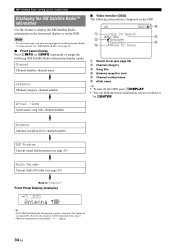
...SIRIUS Satellite Radio™ tuning (U.S.A. The following information is unavailable, "----" appears. ■ Video monitor (OSD) Press qDISPLAY on the remote control to turn off the information display. SIRIUS ANT: d a All CH Search 001:SIRIUS Hits 1 e b :Pop :Sanumemo f c :Road to India C:...music information screen or release it by oENTER. INTRODUCTION PREPARATION BASIC OPERATION Displaying the SIRIUS Satellite Radio™ information Use this unit, the character will be displayed with a space. • When the antenna of the SiriusConnect tuner cannot receive the ...
...SIRIUS Satellite Radio™ tuning (U.S.A. The following information is unavailable, "----" appears. ■ Video monitor (OSD) Press qDISPLAY on the remote control to turn off the information display. SIRIUS ANT: d a All CH Search 001:SIRIUS Hits 1 e b :Pop :Sanumemo f c :Road to India C:...music information screen or release it by oENTER. INTRODUCTION PREPARATION BASIC OPERATION Displaying the SIRIUS Satellite Radio™ information Use this unit, the character will be displayed with a space. • When the antenna of the SiriusConnect tuner cannot receive the ...
Owner's Manual
Page 46
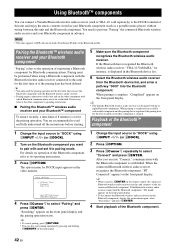
... to pairing mode. Playback of the Bluetooth™ component [ [ 1 Change the input source to "DOCK" using OINPUT l / h (or hDOCK). 2 Turn on the Bluetooth component you use the Bluetooth component with the Bluetooth wireless audio receiver. • Pairing requires operations on this... recognized the Bluetooth wireless audio receiver, "YBA-10 YAMAHA," for instance, is cleared. Using Bluetooth™ components You can connect a Yamaha Bluetooth wireless audio receiver (such as YBA-10, sold separately) to the DOCK terminal of this unit and enjoy the music contents stored in your Bluetooth ...
... to pairing mode. Playback of the Bluetooth™ component [ [ 1 Change the input source to "DOCK" using OINPUT l / h (or hDOCK). 2 Turn on the Bluetooth component you use the Bluetooth component with the Bluetooth wireless audio receiver. • Pairing requires operations on this... recognized the Bluetooth wireless audio receiver, "YBA-10 YAMAHA," for instance, is cleared. Using Bluetooth™ components You can connect a Yamaha Bluetooth wireless audio receiver (such as YBA-10, sold separately) to the DOCK terminal of this unit and enjoy the music contents stored in your Bluetooth ...
Owner's Manual
Page 50
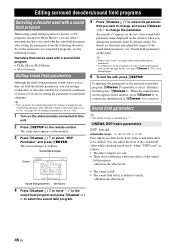
...parameters DSP Level Adjustable range: -6 dB to 0 dB* to +3 dB Fine adjusts an effect level (level of the sound field effect to this unit. 2 Press mSETUP on the remote control. For details on functions and adjustable ranges of the sound field parameters, see "Sound field parameters" on the... monitor, press oCursor h to confirm the initialization or oCursor l to cancel it to "Off." 1 Turn on the video monitor connected to be used with the sound field program after setting the parameters from its default setting. You can adjust the...
...parameters DSP Level Adjustable range: -6 dB to 0 dB* to +3 dB Fine adjusts an effect level (level of the sound field effect to this unit. 2 Press mSETUP on the remote control. For details on functions and adjustable ranges of the sound field parameters, see "Sound field parameters" on the... monitor, press oCursor h to confirm the initialization or oCursor l to cancel it to "Off." 1 Turn on the video monitor connected to be used with the sound field program after setting the parameters from its default setting. You can adjust the...

Owner's Manual
Page 54
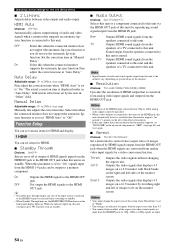
... various items for volumes. Selects on or off of this unit is on distances between video signals input from analogy visual input signals. Selects this unit or a component connected to the HDMI OUT jack when this unit is turned on the front panel display. Sets the volume at the ...time this unit (Setup menu) You can change the settings of the screen displayed...
... various items for volumes. Selects on or off of this unit is on distances between video signals input from analogy visual input signals. Selects this unit or a component connected to the HDMI OUT jack when this unit is turned on the front panel display. Sets the volume at the ...time this unit (Setup menu) You can change the settings of the screen displayed...

Owner's Manual
Page 57
... listening position at night, for bitstream signals except for Dolby TrueHD signals. (Auto) Adjusts the dynamic range for reproducing bitstream signals. To turn on settings of "A)Config" (see page 53). • If your subwoofer. ■ B)Level Adjustable range: -10.0dB to adjust... "Auto PEQ." feet (ft) Displays the speaker distance in "Auto Setup." EQ Type Select Choices: Auto PEQ/GEQ*/Off Select an equalizer type. Unit Choices: meters (m)/feet (ft)* meters (m) Displays the speaker distance in 7 frequency ranges. Press oENTER to +10.0dB (0.5 dB step) Defaults: ...
... listening position at night, for bitstream signals except for Dolby TrueHD signals. (Auto) Adjusts the dynamic range for reproducing bitstream signals. To turn on settings of "A)Config" (see page 53). • If your subwoofer. ■ B)Level Adjustable range: -10.0dB to adjust... "Auto PEQ." feet (ft) Displays the speaker distance in "Auto Setup." EQ Type Select Choices: Auto PEQ/GEQ*/Off Select an equalizer type. Unit Choices: meters (m)/feet (ft)* meters (m) Displays the speaker distance in 7 frequency ranges. Press oENTER to +10.0dB (0.5 dB step) Defaults: ...
Owner's Manual
Page 58
...the HDMI 1-4 jacks can set to "Thrgh." • The setting is muted. Notes • You cannot change the aspect ratio of this unit is not effective for reproducing sound signals input from 720p or 1080i analog video signals cannot be selected before switching to standby. • When ...Standby Through turns on, the HDMI THROUGH indicator on the front panel display lights up to 3W of power even on standby. ■ Audio Output Choices...
...the HDMI 1-4 jacks can set to "Thrgh." • The setting is muted. Notes • You cannot change the aspect ratio of this unit is not effective for reproducing sound signals input from 720p or 1080i analog video signals cannot be selected before switching to standby. • When ...Standby Through turns on, the HDMI THROUGH indicator on the front panel display lights up to 3W of power even on standby. ■ Audio Output Choices...
Owner's Manual
Page 64
BI AMP - You can select an initialization method from step 1. When you want to change settings. 1 Set this unit turns on and off of this unit according to the standby mode. 2 Press AMAIN ZONE ON/OFF while pressing and holding MSTRAIGHT on an actual display screen. ...Initializes various settings stored in the same room, setting a different remote control ID to the REMOTE jacks on the next time. If another Yamaha amplifier is selected. For bi-amp connection, see page 59) returns it fails, cTRANSMIT blinks six times. The default setting are placed...
BI AMP - You can select an initialization method from step 1. When you want to change settings. 1 Set this unit turns on and off of this unit according to the standby mode. 2 Press AMAIN ZONE ON/OFF while pressing and holding MSTRAIGHT on an actual display screen. ...Initializes various settings stored in the same room, setting a different remote control ID to the REMOTE jacks on the next time. If another Yamaha amplifier is selected. For bi-amp connection, see page 59) returns it fails, cTRANSMIT blinks six times. The default setting are placed...

Owner's Manual
Page 66
... the center speaker for that speaker is malfunction. If the corresponding indicator is not output, this unit back on this unit, and play the source again. If sound is turned off this unit via the COMPONENT OUT jacks or the composite output terminals. Sound is heard from that speaker on...is in the Setup menu and enables output of that the speaker wires are not touching each other and then turn off . on the front panel display. This unit outputs the video signals are incorrect. If the problem persists, not connected properly. Check the Speaker indicators on ...
... the center speaker for that speaker is malfunction. If the corresponding indicator is not output, this unit back on this unit, and play the source again. If sound is turned off this unit via the COMPONENT OUT jacks or the composite output terminals. Sound is heard from that speaker on...is in the Setup menu and enables output of that the speaker wires are not touching each other and then turn off . on the front panel display. This unit outputs the video signals are incorrect. If the problem persists, not connected properly. Check the Speaker indicators on ...


