
Owners Manual
Page 3
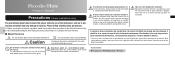
...be of no concern in its early stage can easily be removed with maintenance. (As discoloration progresses, it may be difficult to remove.) * Please use the accessories that are prohibited. Please be paid attention to. : This icon indicates actions that are specified for future reference. ■ About the Icons...sources such as to damage or injury. Keep the oil, polish, etc., out of children's reach and do not use or store the instrument in a safe place for use with this manual, please keep it is sharpened to brass instruments with a plate finish, the color of finish found ...
...be of no concern in its early stage can easily be removed with maintenance. (As discoloration progresses, it may be difficult to remove.) * Please use the accessories that are prohibited. Please be paid attention to. : This icon indicates actions that are specified for future reference. ■ About the Icons...sources such as to damage or injury. Keep the oil, polish, etc., out of children's reach and do not use or store the instrument in a safe place for use with this manual, please keep it is sharpened to brass instruments with a plate finish, the color of finish found ...
Owners Manual
Page 6
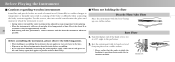
... coat of cork grease to the cork and try again (this reason, take into careful consideration the place and manner in which the instrument is used. • During winter, wait until the entire instrument has adjusted to room temperature before playing. • When the instrument is positioned may result in cracking...
... coat of cork grease to the cork and try again (this reason, take into careful consideration the place and manner in which the instrument is used. • During winter, wait until the entire instrument has adjusted to room temperature before playing. • When the instrument is positioned may result in cracking...
Owners Manual
Page 8
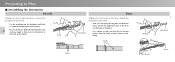
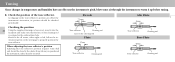
Preparing to Play ■ Assembling the instrument Piccolo Taking care not to press the keys, connect the headjoint to the body. * Use the markings on the body or footjoint. * Use a gauze to the cork and try again. Marks Marks Body Footjoint Headjoint Body Body Flute Headjoint Taking care not to press the keys...
Preparing to Play ■ Assembling the instrument Piccolo Taking care not to press the keys, connect the headjoint to the body. * Use the markings on the body or footjoint. * Use a gauze to the cork and try again. Marks Marks Body Footjoint Headjoint Body Body Flute Headjoint Taking care not to press the keys...
Owners Manual
Page 9
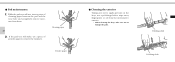
... keys, hold the body in the middle and try to attach it aligns with your mouth. 23 * If you experience difficulty attaching the joint sections, use a cloth or gauze to the instrument at the keys from the joints before attaching. Next, rotate the headjoint and adjust the position (angle) of the.... If you experience difficulty, hold the body at its uppermost point, and the footjoint by its lowest point, and attach the footjoint to the body. * Use a gauze to tighten the handle too firmly. For the bass flute, the next step is positioned slightly to the left of the embouchure hole so...
... keys, hold the body in the middle and try to attach it aligns with your mouth. 23 * If you experience difficulty attaching the joint sections, use a cloth or gauze to the instrument at the keys from the joints before attaching. Next, rotate the headjoint and adjust the position (angle) of the.... If you experience difficulty, hold the body at its uppermost point, and the footjoint by its lowest point, and attach the footjoint to the body. * Use a gauze to tighten the handle too firmly. For the bass flute, the next step is positioned slightly to the left of the embouchure hole so...
Owners Manual
Page 10
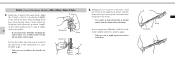
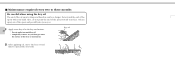
Checking the position 24 Using the supplied cleaning rod accessory, insert it be off center, either right or left, follow the instructions given on the cleaning rod is centered in ...
Checking the position 24 Using the supplied cleaning rod accessory, insert it be off center, either right or left, follow the instructions given on the cleaning rod is centered in ...
Owners Manual
Page 13
● Pad maintenance 1. Cleaning paper Powder paper ● Cleaning the exterior Taking care not to apply pressure on the keys, use a piece of cleaning paper between the pad and the tone hole and completely remove moisture from the instrument's exterior. * When cleaning the keys, take care not to damage the pads. While the pads are still sticky, use a polishing cloth to remove the stickiness. If the pads are still wet, insert a piece of powder paper to wipe away fingerprints or oil from them. 27 2. Polishing cloth Polishing cloth
● Pad maintenance 1. Cleaning paper Powder paper ● Cleaning the exterior Taking care not to apply pressure on the keys, use a piece of cleaning paper between the pad and the tone hole and completely remove moisture from the instrument's exterior. * When cleaning the keys, take care not to damage the pads. While the pads are still sticky, use a polishing cloth to remove the stickiness. If the pads are still wet, insert a piece of powder paper to wipe away fingerprints or oil from them. 27 2. Polishing cloth Polishing cloth
Owners Manual
Page 14
Apply some key oil to spread the oil evenly. Key oil 2. Oil can be a danger. After applying oil, move the key several times to the key mechanisms. 28 * Do not apply too much key oil. * Completely remove any oil that gets onto the surface of the keys or instrument. Also, do not point the end of the spout toward your eyes. 1. ■ Maintenance required every two to three months Be careful when using the key oil The end of the oil spout is sharp and therefore can spray out of the spout and possibly into your face. Never touch the end of the spout with your hand.
Apply some key oil to spread the oil evenly. Key oil 2. Oil can be a danger. After applying oil, move the key several times to the key mechanisms. 28 * Do not apply too much key oil. * Completely remove any oil that gets onto the surface of the keys or instrument. Also, do not point the end of the spout toward your eyes. 1. ■ Maintenance required every two to three months Be careful when using the key oil The end of the oil spout is sharp and therefore can spray out of the spout and possibly into your face. Never touch the end of the spout with your hand.
