
Owners Manual
Page 3
... removed with the particular type of finish found on the instrument. Take care as temperature, humidity, etc. Piccolo/Flute Owner's Manual Precautions Please read before using the instrument, a guardian should clearly explain these precautions. The mouthpiece or other people. Placing the instrument where it...Be aware of the finish's top coat which should be paid attention to. : This icon indicates actions that are specified for use with maintenance. (As discoloration progresses, it should be aware of this mark may cause the instrument to touch the pin springs during...
... removed with the particular type of finish found on the instrument. Take care as temperature, humidity, etc. Piccolo/Flute Owner's Manual Precautions Please read before using the instrument, a guardian should clearly explain these precautions. The mouthpiece or other people. Placing the instrument where it...Be aware of the finish's top coat which should be paid attention to. : This icon indicates actions that are specified for use with maintenance. (As discoloration progresses, it should be aware of this mark may cause the instrument to touch the pin springs during...
Owners Manual
Page 6
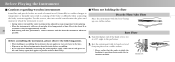
.... 20 • Both during and after performance, remove moisture and dirt from the joints before playing. • When the instrument is used. • During winter, wait until the entire instrument has adjusted to room temperature before assembling. • If you experience difficulty connecting the...apply any excessive force to the keys. • Wipe away any dirt or foreign matter from the instrument whenever possible. Piccolo/Flute/Alto Flute Place the instrument with its hand rest and footjoint placed on a stable surface. Hand rest Before Playing the Instrument ■ ...
.... 20 • Both during and after performance, remove moisture and dirt from the joints before playing. • When the instrument is used. • During winter, wait until the entire instrument has adjusted to room temperature before assembling. • If you experience difficulty connecting the...apply any excessive force to the keys. • Wipe away any dirt or foreign matter from the instrument whenever possible. Piccolo/Flute/Alto Flute Place the instrument with its hand rest and footjoint placed on a stable surface. Hand rest Before Playing the Instrument ■ ...
Owners Manual
Page 8
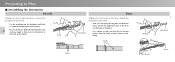
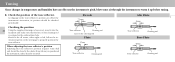
...; Assembling the instrument Piccolo Taking care not to press the keys, connect the headjoint to the body. * Use the markings on the body or footjoint. * Use a gauze to the cork and try again. Body Flute Headjoint Taking care not to press the keys, attach the headjoint to the body. * Take care not grasp...
...; Assembling the instrument Piccolo Taking care not to press the keys, connect the headjoint to the body. * Use the markings on the body or footjoint. * Use a gauze to the cork and try again. Body Flute Headjoint Taking care not to press the keys, attach the headjoint to the body. * Take care not grasp...
Owners Manual
Page 9
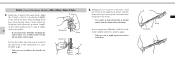
...the joints before attaching. Taking care not to press to the keys, hold the body in the middle and try again. Flute (Curved Headjoint Models)/Alto Flute/Bass Flute 1. For the bass flute, the next step is positioned slightly to the left of the embouchure hole so that it again. * Take care not... the hand rest to the instrument at a comfortable angle. * Take care not to the main body. If you experience difficulty attaching the joint sections, use a cloth or gauze to the keys. Next, rotate the headjoint and adjust the position (angle) of the keys when looking at its uppermost point, ...
...the joints before attaching. Taking care not to press to the keys, hold the body in the middle and try again. Flute (Curved Headjoint Models)/Alto Flute/Bass Flute 1. For the bass flute, the next step is positioned slightly to the left of the embouchure hole so that it again. * Take care not... the hand rest to the instrument at a comfortable angle. * Take care not to the main body. If you experience difficulty attaching the joint sections, use a cloth or gauze to the keys. Next, rotate the headjoint and adjust the position (angle) of the keys when looking at its uppermost point, ...
Owners Manual
Page 10
Should it be checked periodically. Checking the position 24 Using the supplied cleaning rod accessory, insert it up before tuning. 1. As slippage in the tone reflector's position can effect the instrument's intonation, its position should ... the next page to warm it into the headjoint and make sure that the line on the cleaning rod Flute 17mm Tone reflector Cleaning rod Alto Flute 26mm Tone reflector Cleaning rod Bass Flute 40mm Tone reflector Cleaning rod When adjusting the tone reflector's position Adjusting the tone reflector's position requires some skill...
Should it be checked periodically. Checking the position 24 Using the supplied cleaning rod accessory, insert it up before tuning. 1. As slippage in the tone reflector's position can effect the instrument's intonation, its position should ... the next page to warm it into the headjoint and make sure that the line on the cleaning rod Flute 17mm Tone reflector Cleaning rod Alto Flute 26mm Tone reflector Cleaning rod Bass Flute 40mm Tone reflector Cleaning rod When adjusting the tone reflector's position Adjusting the tone reflector's position requires some skill...

