Owner's Manual
Page 2
... CAUTION RISK OF ELECTRIC SHOCK DO NOT OPEN CAUTION: TO REDUCE THE RISK OF ELECTRIC SHOCK, DO NOT REMOVE COVER (OR BACK). i NO USER-SERVICEABLE PARTS INSIDE. The exclamation point within the product's enclosure that produce heat. 9 Do not defeat the safety purpose of electric shock to constitute a risk of the...
... CAUTION RISK OF ELECTRIC SHOCK DO NOT OPEN CAUTION: TO REDUCE THE RISK OF ELECTRIC SHOCK, DO NOT REMOVE COVER (OR BACK). i NO USER-SERVICEABLE PARTS INSIDE. The exclamation point within the product's enclosure that produce heat. 9 Do not defeat the safety purpose of electric shock to constitute a risk of the...
Owner's Manual
Page 3
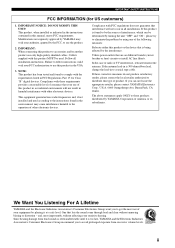
.../uses radio frequencies and, if not installed and used . Since hearing damage from loud sounds is found to eliminate the problem by the FCC, to accessories and/or another product ...you to those products distributed by YAMAHA Corporation of this product MUST be determined by the interference. IMPORTANT SAFETY INSTRUCTIONS FCC INFORMATION (for Class "B" digital devices. If these requirements provides... with FCC regulations does not guarantee that interference will not result in FCC Regulations, Part 15 for US customers) 1. IMPORTANT NOTICE: DO NOT MODIFY THIS UNIT! The ...
.../uses radio frequencies and, if not installed and used . Since hearing damage from loud sounds is found to eliminate the problem by the FCC, to accessories and/or another product ...you to those products distributed by YAMAHA Corporation of this product MUST be determined by the interference. IMPORTANT SAFETY INSTRUCTIONS FCC INFORMATION (for Class "B" digital devices. If these requirements provides... with FCC regulations does not guarantee that interference will not result in FCC Regulations, Part 15 for US customers) 1. IMPORTANT NOTICE: DO NOT MODIFY THIS UNIT! The ...
Owner's Manual
Page 8
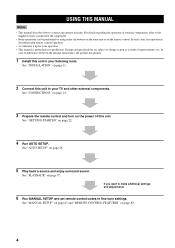
...refer to the supplied owner's manual for your TV and other external components. See "PLAYBACK" on page 26. 5 Play back a source and enjoy surround sound. See "INSTALLATION" on page 11. 2 Connect this unit to your operation. • This manual is described using remote control operation. • y ... and specifications are subject to production. In case of differences between the manual and product, the product has priority. 1 Install this unit in part as a result of this unit. See "GETTING STARTED" on page 82. 4 If you want to make additional settings and adjustments 6 Run...
...refer to the supplied owner's manual for your TV and other external components. See "PLAYBACK" on page 26. 5 Play back a source and enjoy surround sound. See "INSTALLATION" on page 11. 2 Connect this unit to your operation. • This manual is described using remote control operation. • y ... and specifications are subject to production. In case of differences between the manual and product, the product has priority. 1 Install this unit in part as a result of this unit. See "GETTING STARTED" on page 82. 4 If you want to make additional settings and adjustments 6 Run...

Owner's Manual
Page 9
INTRODUCTION SUPPLIED ACCESSORIES SUPPLIED ACCESSORIES Check that you have received all of the following parts. Remote control (×1) Batteries (×2) (AA, R6, UM-3) Optical cable (×1) STANDBY/ON POWER POWER AV TV DVD AUX VCR ...SLEEP ST+3BEAM 2 3BEAM 3 STEREO TARGET 4 5 6 MUSIC 7 MOVIE 8 VOL MODE 9 SPORTS 0 OFF +10 SURROUND CH LEVEL CINEMA DSP MENU TEST ENTER RETURN VOLUME CH TV VOL OSD video pin cable (×1) Digital audio pin cable (×1) (Yellow) Optimizer microphone (×1) (Orange) Audio pin cable (×1) MUTE TV INPUT TV MUTE...
INTRODUCTION SUPPLIED ACCESSORIES SUPPLIED ACCESSORIES Check that you have received all of the following parts. Remote control (×1) Batteries (×2) (AA, R6, UM-3) Optical cable (×1) STANDBY/ON POWER POWER AV TV DVD AUX VCR ...SLEEP ST+3BEAM 2 3BEAM 3 STEREO TARGET 4 5 6 MUSIC 7 MOVIE 8 VOL MODE 9 SPORTS 0 OFF +10 SURROUND CH LEVEL CINEMA DSP MENU TEST ENTER RETURN VOLUME CH TV VOL OSD video pin cable (×1) Digital audio pin cable (×1) (Yellow) Optimizer microphone (×1) (Orange) Audio pin cable (×1) MUTE TV INPUT TV MUTE...
Owner's Manual
Page 30
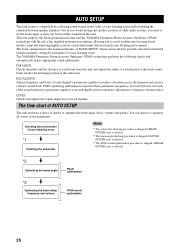
...This unit employs the beam optimization feature and the YAMAHA Parametric Room Acoustic Optimizer (YPAO) technology with the aid of other audio systems, you to avoid troublesome listening-based speaker setup and achieving highly accurate sound adjustments that each of the seven bands in its... the beam angle, delay, volume and quality. You can choose to optimize all or part of checks to reduce coloration across the channels and create a cohesive sound field. The YAMAHA Parametric Room Acoustic Optimizer (YPAO) technology performs the following checks and automatically makes appropriate...
...This unit employs the beam optimization feature and the YAMAHA Parametric Room Acoustic Optimizer (YPAO) technology with the aid of other audio systems, you to avoid troublesome listening-based speaker setup and achieving highly accurate sound adjustments that each of the seven bands in its... the beam angle, delay, volume and quality. You can choose to optimize all or part of checks to reduce coloration across the channels and create a cohesive sound field. The YAMAHA Parametric Room Acoustic Optimizer (YPAO) technology performs the following checks and automatically makes appropriate...
Owner's Manual
Page 31
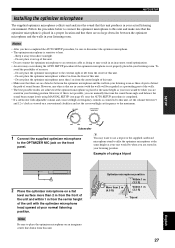
...• The optimizer microphone is not possible, you are no obstacles between 9 and 12 o'clock as your ears would be regarded as a protruding part of using MANUAL SETUP (see page 63) once the AUTO SETUP procedure is completed. • If a subwoofer with the walls will be when...sure to place the optimizer microphone on the front panel. AUTO SETUP Installing the optimizer microphone The supplied optimizer microphone collects and analyzes the sound that there are seated in your listening position. y You may want to use a tripod or the supplied cardboard microphone stand to ...
...• The optimizer microphone is not possible, you are no obstacles between 9 and 12 o'clock as your ears would be regarded as a protruding part of using MANUAL SETUP (see page 63) once the AUTO SETUP procedure is completed. • If a subwoofer with the walls will be when...sure to place the optimizer microphone on the front panel. AUTO SETUP Installing the optimizer microphone The supplied optimizer microphone collects and analyzes the sound that there are seated in your listening position. y You may want to use a tripod or the supplied cardboard microphone stand to ...
Owner's Manual
Page 32
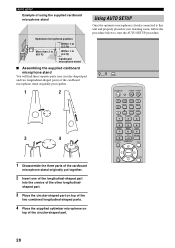
... 5BEAM 1 ST+3BEAM 2 3BEAM 3 STEREO UNIVERSAL 4 5 6 MUSIC 7 MOVIE 8 NIGHT 9 SPORTS 0 OFF +10 SURROUND CH LEVEL CINEMA DSP MENU 1 Disassemble the three parts of the circular-shaped part. AUTO SETUP Example of using the supplied cardboard microphone stand Optimizer microphone position Within 1 m (3.3 ft) More than 2 m ... put together. 2 Insert one of the longitudinal-shaped part into the crevice of the other longitudinalshaped part. 3 Place the circular-shaped part on top of the two combined longitudinal-shaped parts. 4 Place the supplied optimizer microphone on top of ...
... 5BEAM 1 ST+3BEAM 2 3BEAM 3 STEREO UNIVERSAL 4 5 6 MUSIC 7 MOVIE 8 NIGHT 9 SPORTS 0 OFF +10 SURROUND CH LEVEL CINEMA DSP MENU 1 Disassemble the three parts of the circular-shaped part. AUTO SETUP Example of using the supplied cardboard microphone stand Optimizer microphone position Within 1 m (3.3 ft) More than 2 m ... put together. 2 Insert one of the longitudinal-shaped part into the crevice of the other longitudinalshaped part. 3 Place the circular-shaped part on top of the two combined longitudinal-shaped parts. 4 Place the supplied optimizer microphone on top of ...


