Specification Sheet
Page 1
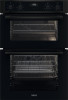
... the need for Even Cooking The hot air generated inside the oven during cooking is continuously moved around with its fan and ring element. Integrated Oven ZKCNA4K1 Quick heating and even cooking The Series 20 FanCook Oven circulates hot air heat with a fan, so all your kitchen adventure a little more convenient. No scrubbing needed...
... the need for Even Cooking The hot air generated inside the oven during cooking is continuously moved around with its fan and ring element. Integrated Oven ZKCNA4K1 Quick heating and even cooking The Series 20 FanCook Oven circulates hot air heat with a fan, so all your kitchen adventure a little more convenient. No scrubbing needed...

Specification Sheet
Page 2
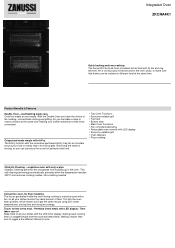
... Microwave output (W) Cavity Size (L) Largest Surface area Colour Energy class Energy consumption, conventional mode, kWh per cycle Energy consumption per EU standard cycle ProdPartCode Top Oven Cooking Functions No Catalytic Catalytic 888x594x568 875x560x550 5300 220-240 30 50 50°C - 275°C 0 61 1175 Black A 0.94 0.78 All Open Bottom,... Fan + light, Grill + top, Grill + top + fan, Light, Ring (10) + top (50) + fan (w/o Lamp), Ring + bottom + fan, Ring + fan, Top + bottom Cooking Function Bottom Oven Integrated Oven ZKCNA4K1 Bottom, Grill, Light, Top, Top + bottom, Top + grill
... Microwave output (W) Cavity Size (L) Largest Surface area Colour Energy class Energy consumption, conventional mode, kWh per cycle Energy consumption per EU standard cycle ProdPartCode Top Oven Cooking Functions No Catalytic Catalytic 888x594x568 875x560x550 5300 220-240 30 50 50°C - 275°C 0 61 1175 Black A 0.94 0.78 All Open Bottom,... Fan + light, Grill + top, Grill + top + fan, Light, Ring (10) + top (50) + fan (w/o Lamp), Ring + bottom + fan, Ring + fan, Top + bottom Cooking Function Bottom Oven Integrated Oven ZKCNA4K1 Bottom, Grill, Light, Top, Top + bottom, Top + grill

User Manual
Page 1
User Manual GETTING STARTED? ZKCNA4K1 ZKCNA4X1 EN User Manual Built-In Double Oven EASY.
User Manual GETTING STARTED? ZKCNA4K1 ZKCNA4X1 EN User Manual Built-In Double Oven EASY.
User Manual
Page 3
... that meets installation requirements. • Keep the minimum distance from other appliances and units. • Before mounting the appliance, check if the oven door opens without restraint. • The appliance is equipped with the wiring rules. • WARNING: Ensure that the appliance is switched off... use safety gloves and enclosed footwear. • Do not pull the appliance by the manufacturer, its accessible parts become hot during use oven gloves to remove or put in unit must meet the stability requirements of DIN 68930. • Disconnect the appliance from the power supply...
... that meets installation requirements. • Keep the minimum distance from other appliances and units. • Before mounting the appliance, check if the oven door opens without restraint. • The appliance is equipped with the wiring rules. • WARNING: Ensure that the appliance is switched off... use safety gloves and enclosed footwear. • Do not pull the appliance by the manufacturer, its accessible parts become hot during use oven gloves to remove or put in unit must meet the stability requirements of DIN 68930. • Disconnect the appliance from the power supply...
User Manual
Page 5
... the Authorised Service Centre. • Use original spare parts only. Risk of energy efficiency class G. • Use only lamps with the oven door closed. • If the appliance is never closed furniture panel and cause subsequent damage to withstand extreme physical conditions in household appliances,...; Do not clean the catalytic enamel with a moist soft cloth. Contact the Authorised Service Centre. • Be careful when you use an oven spray, follow the safety instructions on how to dispose of the appliance. • Disconnect the appliance from the mains socket. • Make ...
... the Authorised Service Centre. • Use original spare parts only. Risk of energy efficiency class G. • Use only lamps with the oven door closed. • If the appliance is never closed furniture panel and cause subsequent damage to withstand extreme physical conditions in household appliances,...; Do not clean the catalytic enamel with a moist soft cloth. Contact the Authorised Service Centre. • Be careful when you use an oven spray, follow the safety instructions on how to dispose of the appliance. • Disconnect the appliance from the mains socket. • Make ...

User Manual
Page 6
... time. To set a clock function. RETRACTABLE KNOBS To use the appliance press the knob. Use the trivet only with the main oven. 6 DISPLAY A B The display works only with the Grill- / roasting pan. CONTROL PANEL Maximum load: 10 kg. •... 9 12 3 10 2 1 11 1 Knob for the top oven functions 2 Knob for the top oven temperature 3 Temperature indicator / symbol for the top oven 4 Display 5 Knob for the main oven functions 6 Temperature indicator / symbol for the main oven 7 Knob for the main oven temperature 8 Heating element 9 Lamp 10 Fan 11 Shelf support, removable...
... time. To set a clock function. RETRACTABLE KNOBS To use the appliance press the knob. Use the trivet only with the main oven. 6 DISPLAY A B The display works only with the Grill- / roasting pan. CONTROL PANEL Maximum load: 10 kg. •... 9 12 3 10 2 1 11 1 Knob for the top oven functions 2 Knob for the top oven temperature 3 Temperature indicator / symbol for the top oven 4 Display 5 Knob for the main oven functions 6 Temperature indicator / symbol for the main oven 7 Knob for the main oven temperature 8 Heating element 9 Lamp 10 Fan 11 Shelf support, removable...
User Manual
Page 7
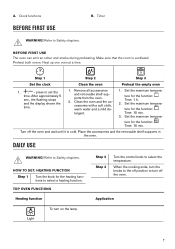
...Step 2 Step 3 Set the clock Clean the oven Preheat the empty oven 1. , - press to select the temperature. Remove all accessories and removable shelf supports from the oven. 2. Set the maximum temperature for the heating functions to turn off the oven and wait until it is ventilated. Time: 1... Make sure that the room is cold. Set the maximum temperature for the function: . Time: 15 min. 3. Preheat both ovens. TOP OVEN FUNCTIONS Heating function To turn the knobs to the off position to select a heating function. Timer WARNING! Set the maximum temperature ...
...Step 2 Step 3 Set the clock Clean the oven Preheat the empty oven 1. , - press to select the temperature. Remove all accessories and removable shelf supports from the oven. 2. Set the maximum temperature for the heating functions to turn off the oven and wait until it is ventilated. Time: 1... Make sure that the room is cold. Set the maximum temperature for the function: . Time: 15 min. 3. Preheat both ovens. TOP OVEN FUNCTIONS Heating function To turn the knobs to the off position to select a heating function. Timer WARNING! Set the maximum temperature ...
User Manual
Page 8
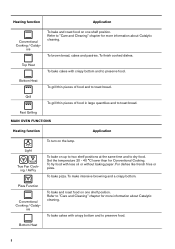
... intensive browning and a crispy bottom. Pizza Function Conventional Cooking / Cataly- Heating function Application Conventional Cooking / Cataly- To brown bread, cakes and pastries. Fast Grilling MAIN OVEN FUNCTIONS Heating function Application To turn on one shelf position. ing / AirFry To bake on one shelf position. To bake pizza. Refer to "Care and...
... intensive browning and a crispy bottom. Pizza Function Conventional Cooking / Cataly- Heating function Application Conventional Cooking / Cataly- To brown bread, cakes and pastries. Fast Grilling MAIN OVEN FUNCTIONS Heating function Application To turn on one shelf position. ing / AirFry To bake on one shelf position. To bake pizza. Refer to "Care and...
User Manual
Page 9
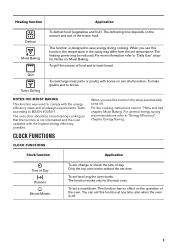
... from the set , change or check the time of day. The function works only for the main oven. To set this function at any time, also when the oven is off . The defrosting time depends on the operation of Day Duration Minute Minder To set temperature. ...CLOCK FUNCTIONS Clock function Application Time of the oven. This function is not interrupted and the oven operates with the highest energy efficiency possible. When you use this function the lamp automatically turns off . 9 To...
... from the set , change or check the time of day. The function works only for the main oven. To set this function at any time, also when the oven is off . The defrosting time depends on the operation of Day Duration Minute Minder To set temperature. ...CLOCK FUNCTIONS Clock function Application Time of the oven. This function is not interrupted and the oven operates with the highest energy efficiency possible. When you use this function the lamp automatically turns off . 9 To...
User Manual
Page 10
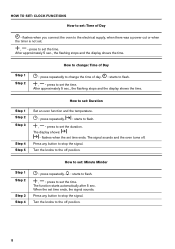
... to set: Time of Day - press to set the time. Step 1 Step 2 Step 3 Step 4 Step 5 How to set : Duration Set an oven function and the temperature. - starts to flash. , - When the set the duration. Turn the knobs to set time ends, the signal sounds. starts to... and the display shows the time. press to the off . press repeatedly. - Press any button to set time ends. The signal sounds and the oven turns off position. press repeatedly. - After approximately 5 sec., the flashing stops and the display shows the time. flashes when the set : Minute Minder...
... to set: Time of Day - press to set the time. Step 1 Step 2 Step 3 Step 4 Step 5 How to set : Duration Set an oven function and the temperature. - starts to flash. , - When the set the duration. Turn the knobs to set time ends, the signal sounds. starts to... and the display shows the time. press to the off . press repeatedly. - Press any button to set time ends. The signal sounds and the oven turns off position. press repeatedly. - After approximately 5 sec., the flashing stops and the display shows the time. flashes when the set : Minute Minder...

User Manual
Page 12
... the shelf support and the wire shelf on the third shelf position. Roasting larger pieces of meat or poultry on automatically to operate until the oven cools down . ADDITIONAL FUNCTIONS COOLING FAN When the oven operates, the cooling fan turns on one shelf position. If you turn off the...
... the shelf support and the wire shelf on the third shelf position. Roasting larger pieces of meat or poultry on automatically to operate until the oven cools down . ADDITIONAL FUNCTIONS COOLING FAN When the oven operates, the cooling fan turns on one shelf position. If you turn off the...

User Manual
Page 13
.... Cakes and pastries at different heights do not always brown equally. The cake is not ready in the baking time specified in the oven can extend the baking time by 10 - 15 minutes if you bake cakes on more than one shelf position. Next time set slightly lower...to cook smaller quantities of food. It gives especially good results when used to change the temperature setting if an unequal browning occurs. Main oven The main oven is too low. It is incorrect. The differences equalize during baking. When the trays are cold again, the distortions disappear. BAKING Top...
.... Cakes and pastries at different heights do not always brown equally. The cake is not ready in the baking time specified in the oven can extend the baking time by 10 - 15 minutes if you bake cakes on more than one shelf position. Next time set slightly lower...to cook smaller quantities of food. It gives especially good results when used to change the temperature setting if an unequal browning occurs. Main oven The main oven is too low. It is incorrect. The differences equalize during baking. When the trays are cold again, the distortions disappear. BAKING Top...
User Manual
Page 16
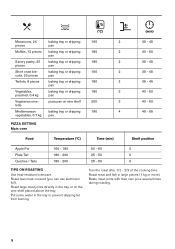
... in the tray or on wire shelf 200 3 40 - 50 lette Mediterranean baking tray or dripping 180 4 45 - 55 vegetables, 0.7 kg pan PIZZA SETTING Main oven Food Temperature (°C) Time (min) Shelf position Apple Pie Plate Tart Quiches / Tarts 160 - 180 180 - 200 180 - 200 TIPS ON ROASTING Use heat-resistant...
... in the tray or on wire shelf 200 3 40 - 50 lette Mediterranean baking tray or dripping 180 4 45 - 55 vegetables, 0.7 kg pan PIZZA SETTING Main oven Food Temperature (°C) Time (min) Shelf position Apple Pie Plate Tart Quiches / Tarts 160 - 180 180 - 200 180 - 200 TIPS ON ROASTING Use heat-resistant...
User Manual
Page 17
... Food Quantity Temperature (°C) Time (min) Roast beef or fillet: rare, preheat the empty oven Roast beef or fillet: medium, preheat the empty oven Roast beef or fillet: well done, preheat the empty oven Pork per cm of thickness per cm of thickness per cm of thickness 190 - 200 180 - 190 170 - 180...
... Food Quantity Temperature (°C) Time (min) Roast beef or fillet: rare, preheat the empty oven Roast beef or fillet: medium, preheat the empty oven Roast beef or fillet: well done, preheat the empty oven Pork per cm of thickness per cm of thickness per cm of thickness 190 - 200 180 - 190 170 - 180...

User Manual
Page 18
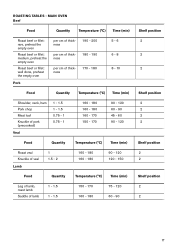
.... Always grill with the grill functions for 5 minutes. Always set the pan to collect the fat into the shelf position as recommended in the top oven adjust the shelf position to 1 kg 220 - 250 25 - 40 2 leg of hare Loin of Game 1.5 - 2 210 - 220 75 - 105 1 Leg of meat or fish... with the maximum temperature setting. CAUTION! For grilling in the grilling table. Set the shelf into the first shelf position. Grilling and Fast Grilling - Top oven Food Time (min) Bacon Rashers Beefburgers Chicken Joints 5 -6 10 - 20 20 - 40 18 Always preheat the empty...
.... Always grill with the grill functions for 5 minutes. Always set the pan to collect the fat into the shelf position as recommended in the top oven adjust the shelf position to 1 kg 220 - 250 25 - 40 2 leg of hare Loin of Game 1.5 - 2 210 - 220 75 - 105 1 Leg of meat or fish... with the maximum temperature setting. CAUTION! For grilling in the grilling table. Set the shelf into the first shelf position. Grilling and Fast Grilling - Top oven Food Time (min) Bacon Rashers Beefburgers Chicken Joints 5 -6 10 - 20 20 - 40 18 Always preheat the empty...

User Manual
Page 19
Medium - Main oven 15 - 25 20 - 25 10 - 12 4 - 6 12 - 18 6 - 10 20 - 30 3 - 4 4 - 6 6 - 8 12 - 15 Food Temperature (°C) Time (min) 1st side 2nd side Shelf position Roast ... (min) Lamb Chops Pork Chops Whole Fish, Trout / Makarel Fillets, Plaice / Cod Kebabs Kidneys, Lamb / Pig Sausages Toasted Sandwiches Steaks: - Well Done Grilling - Rare - MAIN OVEN Remove the food packaging and put the food on a plate. Do not cover the food with a bowl or a plate, as this can extend the defrost...
Medium - Main oven 15 - 25 20 - 25 10 - 12 4 - 6 12 - 18 6 - 10 20 - 30 3 - 4 4 - 6 6 - 8 12 - 15 Food Temperature (°C) Time (min) 1st side 2nd side Shelf position Roast ... (min) Lamb Chops Pork Chops Whole Fish, Trout / Makarel Fillets, Plaice / Cod Kebabs Kidneys, Lamb / Pig Sausages Toasted Sandwiches Steaks: - Well Done Grilling - Rare - MAIN OVEN Remove the food packaging and put the food on a plate. Do not cover the food with a bowl or a plate, as this can extend the defrost...

User Manual
Page 21
... store the food in a dishwasher. Do not clean the non-stick accessories using abrasive cleaner or sharp-edged objects. Pull the front of the oven with a soft cloth with warm water and a mild detergent. Spots or discolouration of the shelf support away from the side wall. Use a ...catalytic coating have no effect on the catalytic surfaces. Fat accumulation or other residue may cause fire. Do not clean the accessories in the oven for longer than 20 minutes. HOW TO REMOVE: SHELF SUPPORTS Remove the shelf supports to clean metal surfaces. Clean the cavity after each ...
... store the food in a dishwasher. Do not clean the non-stick accessories using abrasive cleaner or sharp-edged objects. Pull the front of the oven with a soft cloth with warm water and a mild detergent. Spots or discolouration of the shelf support away from the side wall. Use a ...catalytic coating have no effect on the catalytic surfaces. Fat accumulation or other residue may cause fire. Do not clean the accessories in the oven for longer than 20 minutes. HOW TO REMOVE: SHELF SUPPORTS Remove the shelf supports to clean metal surfaces. Clean the cavity after each ...
User Manual
Page 22
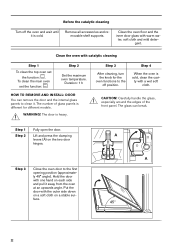
... the glass, especially around the edges of glass panels is heavy. Hold the door with one hand on each side and pull it . Clean the oven floor and the inner door glass with the outer side down on a soft cloth on the two door hinges. ter, soft cloth and mild detergent... until it is cold, clean the cavity with catalytic cleaning Step 1 To clean the top oven set the function: . Put the door with warm wa- Step 3 Close the oven door to clean it away from the oven at an upwards angle. Remove all accessories and removable shelf supports. The glass can remove the...
... the glass, especially around the edges of glass panels is heavy. Hold the door with one hand on each side and pull it . Clean the oven floor and the inner door glass with the outer side down on a soft cloth on the two door hinges. ter, soft cloth and mild detergent... until it is cold, clean the cavity with catalytic cleaning Step 1 To clean the top oven set the function: . Put the door with warm wa- Step 3 Close the oven door to clean it away from the oven at an upwards angle. Remove all accessories and removable shelf supports. The glass can remove the...
User Manual
Page 23
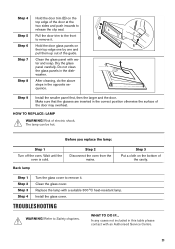
Do not clean the glass panels in the opposite sequence. Before you replace the lamp: Step 1 Turn off the oven. Install the glass cover. Dry the glass panel carefully. Risk of the door at the two sides and push inwards to release the clip seal. 2 ... door. Make sure that the glasses are inserted in this table please contact with an Authorised Service Centre. 23 Wait until the oven is cold. Back lamp Step 2 Disconnect the oven from the mains. Step 3 Put a cloth on 1 their top edge one by one and pull them up out of the cavity...
Do not clean the glass panels in the opposite sequence. Before you replace the lamp: Step 1 Turn off the oven. Install the glass cover. Dry the glass panel carefully. Risk of the door at the two sides and push inwards to release the clip seal. 2 ... door. Make sure that the glasses are inserted in this table please contact with an Authorised Service Centre. 23 Wait until the oven is cold. Back lamp Step 2 Disconnect the oven from the mains. Step 3 Put a cloth on 1 their top edge one by one and pull them up out of the cavity...
User Manual
Page 24
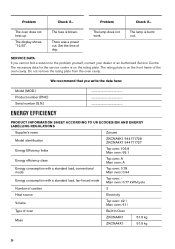
...name Zanussi Model identification ZKCNA4K1 944171728 ZKCNA4X1 944171727 Energy Efficiency Index Top oven: 106.8 Main oven: 95.1 Energy efficiency class Top oven: A Main oven: A Energy consumption with a standard load, conventional mode Top oven: 0.78 Main oven: 0.94 Energy consumption with a standard load, fan-forced mode Top oven: Main oven: ... rating plate. There was a power cut. Set the time of oven Built-In Oven Mass ZKCNA4K1 ZKCNA4X1 51.5 kg 51.5 kg 24 Do not remove the rating plate from the oven cavity. The lamp does not work. The lamp is blown. Problem...
...name Zanussi Model identification ZKCNA4K1 944171728 ZKCNA4X1 944171727 Energy Efficiency Index Top oven: 106.8 Main oven: 95.1 Energy efficiency class Top oven: A Main oven: A Energy consumption with a standard load, conventional mode Top oven: 0.78 Main oven: 0.94 Energy consumption with a standard load, fan-forced mode Top oven: Main oven: ... rating plate. There was a power cut. Set the time of oven Built-In Oven Mass ZKCNA4K1 ZKCNA4X1 51.5 kg 51.5 kg 24 Do not remove the rating plate from the oven cavity. The lamp does not work. The lamp is blown. Problem...


