
Operating Guide
Page 1
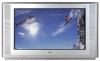
Operating Guide | Warranty Model Numbers | C32V23, C36V23, C34W23 | Digital TVs © Copyright 2002, Zenith Electronics Corporation
Operating Guide | Warranty Model Numbers | C32V23, C36V23, C34W23 | Digital TVs © Copyright 2002, Zenith Electronics Corporation
Operating Guide
Page 2
... a trademark of Dolby Laboratories. Entertainment MachineTM is connected. • Consult the dealer or an experienced radio/TV technician for proper grounding and, in the literature accompanying the appliance. Dolby Digital® Manufactured under license from Zenith Electronics Corporation. The exclamation point within an equilateral triangle is intended to alert the user to...
... a trademark of Dolby Laboratories. Entertainment MachineTM is connected. • Consult the dealer or an experienced radio/TV technician for proper grounding and, in the literature accompanying the appliance. Dolby Digital® Manufactured under license from Zenith Electronics Corporation. The exclamation point within an equilateral triangle is intended to alert the user to...

Operating Guide
Page 5
Customize the TV's Features Setup Menu (Start with VCR, Install batteries in remote control . . . 11 S-VHS VCR, Install batteries in the remote control. Time Menu Clock 32 Off Timer 33 On Timer 33 Sleep Timer 34 Special Menu Aspect Ratio 35 Analog Caption 36 Language ... Glossary 53 Notes 54 - 55 Zenith Warranty Back Cover Video Menu 30 EZ Picture: (Custom, Normal, Digital Preset, Night Time, Movie, Note: Design and specifications are trademarks of Dolby Laboratories. Set up all connections have been made, plug your TV, see pages listed below to hook...
Customize the TV's Features Setup Menu (Start with VCR, Install batteries in remote control . . . 11 S-VHS VCR, Install batteries in the remote control. Time Menu Clock 32 Off Timer 33 On Timer 33 Sleep Timer 34 Special Menu Aspect Ratio 35 Analog Caption 36 Language ... Glossary 53 Notes 54 - 55 Zenith Warranty Back Cover Video Menu 30 EZ Picture: (Custom, Normal, Digital Preset, Night Time, Movie, Note: Design and specifications are trademarks of Dolby Laboratories. Set up all connections have been made, plug your TV, see pages listed below to hook...
Operating Guide
Page 6
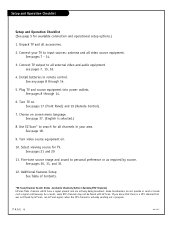
...selected.) 8. See any page 8 through 14. 6. Setup and Operation Checklist Setup and Operation Checklist (See page 5 for TV. Install batteries in your TV to personal preference or as required by EZ Scan, run EZ Scan again; Select viewing source for available connection and operational setup... options.) 1. As a result, some DTV channels may not be found by source. Plug TV and source equipment into power outlets. Turn video source equipment on. 10. Connect your area. See pages 8 through 14. 5. Additional features...
...selected.) 8. See any page 8 through 14. 6. Setup and Operation Checklist Setup and Operation Checklist (See page 5 for TV. Install batteries in your TV to personal preference or as required by EZ Scan, run EZ Scan again; Select viewing source for available connection and operational setup... options.) 1. As a result, some DTV channels may not be found by source. Plug TV and source equipment into power outlets. Turn video source equipment on. 10. Connect your area. See pages 8 through 14. 5. Additional features...
Operating Guide
Page 7
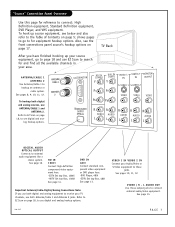
... hookup an antenna or cable system. HD IN 1080i Connect high-definition component video equipment here. -EDTV Set top Box, 1080i -HDTV Set top Box, 1080i See page 14. "Source" Connection Panel Overview Use this page for equipment hookup options. See page 15....7 Refer to connect: High Definition equipment, Standard Definition equipment, DVD Player, and VHS equipment. VIDEO / R - VIDEO 1 IN VIDEO 2 IN Connect your TV channels, use ANTENNA/CABLE 1 and ANTENNA 2. log hookup options. See pages 8, 9, 10, 11, 12. Also, see digital and analog hookup options. L...
... hookup an antenna or cable system. HD IN 1080i Connect high-definition component video equipment here. -EDTV Set top Box, 1080i -HDTV Set top Box, 1080i See page 14. "Source" Connection Panel Overview Use this page for equipment hookup options. See page 15....7 Refer to connect: High Definition equipment, Standard Definition equipment, DVD Player, and VHS equipment. VIDEO / R - VIDEO 1 IN VIDEO 2 IN Connect your TV channels, use ANTENNA/CABLE 1 and ANTENNA 2. log hookup options. See pages 8, 9, 10, 11, 12. Also, see digital and analog hookup options. L...
Operating Guide
Page 8
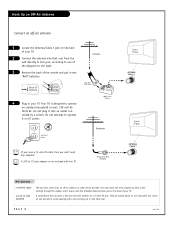
... AC. A 300 to 75 ohm adapter is designed to the right. 3 Remove the back of your TV. Hook Up an Off-Air Antenna Connect an off -air antenna or cable service provider. Do not plug... ohm RF cable, then you don't need any adapters! RF Coaxial Wire (75 ohm) Typical TV Back ANTENNA/ CABLE 1 Typical TV Back ANTENNA/ CABLE 1 Mini glossary 75 OHM RF CABLE 300 TO 75 OHM ADAPTER The wire ...out on the back of Remote Flat Wire (300 ohm) 4 Plug in two "AAA" batteries. Your TV is not included with a wire sticking through the middle, and it into an outlet con- Each end looks ...
... AC. A 300 to 75 ohm adapter is designed to the right. 3 Remove the back of your TV. Hook Up an Off-Air Antenna Connect an off -air antenna or cable service provider. Do not plug... ohm RF cable, then you don't need any adapters! RF Coaxial Wire (75 ohm) Typical TV Back ANTENNA/ CABLE 1 Typical TV Back ANTENNA/ CABLE 1 Mini glossary 75 OHM RF CABLE 300 TO 75 OHM ADAPTER The wire ...out on the back of Remote Flat Wire (300 ohm) 4 Plug in two "AAA" batteries. Your TV is not included with a wire sticking through the middle, and it into an outlet con- Each end looks ...
Operating Guide
Page 9
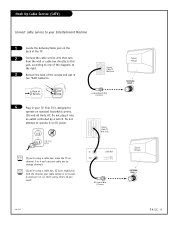
...jack, according to one of the diagrams to the right. 3 Remove the back of Remote 4 Plug in two "AAA" batteries. Typical Cable TV Wall Jack Coaxial Round Wire (75 ohm) Typical TV Back ANTENNA/ CABLE 1 Typical Cable TV Wall Jack In Cable Box Out output switch 3 4 RF Coaxial Wire (75 ohm) Typical... TV Back ANTENNA/ CABLE 1 206-3767 PAGE 9 If you're using a cable box, leave the TV on the back of the TV. 2 Connect the cable service wire that 's all you 're using a cable box, EZ Scan might only...
...jack, according to one of the diagrams to the right. 3 Remove the back of Remote 4 Plug in two "AAA" batteries. Typical Cable TV Wall Jack Coaxial Round Wire (75 ohm) Typical TV Back ANTENNA/ CABLE 1 Typical Cable TV Wall Jack In Cable Box Out output switch 3 4 RF Coaxial Wire (75 ohm) Typical... TV Back ANTENNA/ CABLE 1 206-3767 PAGE 9 If you're using a cable box, leave the TV on the back of the TV. 2 Connect the cable service wire that 's all you 're using a cable box, EZ Scan might only...
Operating Guide
Page 10
... Back VCR Back AV Panel In output switch 3 4 Out Audio Video TV Back 120 V AC 60 Hz No adapters or A/V cables are included with the TV. Do not plug it on standard household current, 120-volt 60 Hertz AC. See your Zenith dealer to operate it into an outlet controlled by a switch. Do...
... Back VCR Back AV Panel In output switch 3 4 Out Audio Video TV Back 120 V AC 60 Hz No adapters or A/V cables are included with the TV. Do not plug it on standard household current, 120-volt 60 Hertz AC. See your Zenith dealer to operate it into an outlet controlled by a switch. Do...
Operating Guide
Page 11
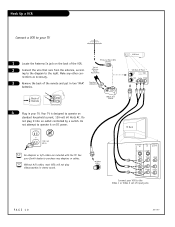
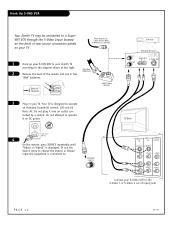
...VCRs will not play videocassettes in two "AAA" batteries. Hook Up Cable Service (CATV) and VCR Connect Cable service and a VCR to the TV Typical Cable TV Wall Jack In Cable Box output Out switch 3 4 1 Locate the Antenna/Cable In jack on standard household current, 120-volt 60 Hertz AC.... tions necessary for your TV. ANTENNA/ CABLE 1 206-3767 TV Back HD IN Y Pr RGB Pb DVD IN Y VIDEO 1 IN VIDEO 2 MONITOR IN OUTPUT S-VIDEO 1 S-VIDEO 2 Pr VIDEO VIDEO VIDEO Pb R...
...VCRs will not play videocassettes in two "AAA" batteries. Hook Up Cable Service (CATV) and VCR Connect Cable service and a VCR to the TV Typical Cable TV Wall Jack In Cable Box output Out switch 3 4 1 Locate the Antenna/Cable In jack on standard household current, 120-volt 60 Hertz AC.... tions necessary for your TV. ANTENNA/ CABLE 1 206-3767 TV Back HD IN Y Pr RGB Pb DVD IN Y VIDEO 1 IN VIDEO 2 MONITOR IN OUTPUT S-VIDEO 1 S-VIDEO 2 Pr VIDEO VIDEO VIDEO Pb R...
Operating Guide
Page 12
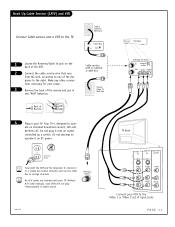
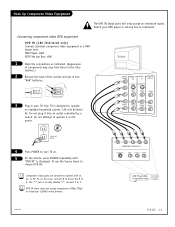
... VCR through the S-Video Input located on the front or rear source connection panels on your TV From Antenna or Cable Service With or Without a Cable Box 1 Hook up your S-VHS VCR to your Zenith TV according to operate on DC power. 300/75 ohm Adapter VCR Back VCR Back AV Panel output... In switch 3 4 Audio Out R L S-Video Out Out TV Back 120 V AC 60 Hz 4 On the remote, press SOURCE repeatedly until "Video1...
... VCR through the S-Video Input located on the front or rear source connection panels on your TV From Antenna or Cable Service With or Without a Cable Box 1 Hook up your S-VHS VCR to your Zenith TV according to operate on DC power. 300/75 ohm Adapter VCR Back VCR Back AV Panel output... In switch 3 4 Audio Out R L S-Video Out Out TV Back 120 V AC 60 Hz 4 On the remote, press SOURCE repeatedly until "Video1...
Operating Guide
Page 13
trations.) 2 Remove the back of the remote and put in the illus- Your TV is designed to turn TV on. 5 On the remote, press SOURCE repeatedly until "DVD IN" is usually labeled "Y", connect Y to interlaced. TV Back HD IN Y Pr RGB Pb DVD IN (480i) Y VIDEO 1 IN VIDEO 2 MONITOR IN OUTPUT S-...Plug in your DVD player or set-top box to Y. Do not plug it on standard household current, 120-volt 60 Hertz AC. Switch your TV. DVD IN input does not accept progressive (480p/720p) or interlaced (1080i) video formats. The "Y" jack is displayed. Back of components may...
trations.) 2 Remove the back of the remote and put in the illus- Your TV is designed to turn TV on. 5 On the remote, press SOURCE repeatedly until "DVD IN" is usually labeled "Y", connect Y to interlaced. TV Back HD IN Y Pr RGB Pb DVD IN (480i) Y VIDEO 1 IN VIDEO 2 MONITOR IN OUTPUT S-...Plug in your DVD player or set-top box to Y. Do not plug it on standard household current, 120-volt 60 Hertz AC. Switch your TV. DVD IN input does not accept progressive (480p/720p) or interlaced (1080i) video formats. The "Y" jack is displayed. Back of components may...
Operating Guide
Page 14
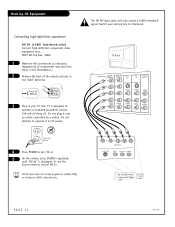
... put in your set-top box to operate on standard household current, 120-volt 60 Hertz AC. Or use the Source menu to turn TV on DC power. TV Back HD IN (1080i) Y DVD IN (480i) Y VIDEO 1 VIDEO 2 IN IN S-VIDEO 1 S-VIDEO 2 MONITOR OUTPUT Pr Pr RGB Pb Pb VIDEO... VIDEO VIDEO R AUDIO L R AUDIO L R AUDIO L R AUDIO L R AUDIO L 120 V AC 60 Hz 4 Press POWER to choose HD-In. HDTV Set top Box, 1080i 1 Make the HD connections ...
... put in your set-top box to operate on standard household current, 120-volt 60 Hertz AC. Or use the Source menu to turn TV on DC power. TV Back HD IN (1080i) Y DVD IN (480i) Y VIDEO 1 VIDEO 2 IN IN S-VIDEO 1 S-VIDEO 2 MONITOR OUTPUT Pr Pr RGB Pb Pb VIDEO... VIDEO VIDEO R AUDIO L R AUDIO L R AUDIO L R AUDIO L R AUDIO L 120 V AC 60 Hz 4 Press POWER to choose HD-In. HDTV Set top Box, 1080i 1 Make the HD connections ...

Operating Guide
Page 15
If you are watching a DIGITAL CHANNEL or the source connected to see the image and hear the sound from the TV. TV Back HD IN Y Pr RGB Pb DVD IN Y VIDEO 1 VIDEO 2 MONITOR IN IN OUTPUT S-VIDEO 1 S-VIDEO 2 Pr VIDEO VIDEO VIDEO Pb R AUDIO L R AUDIO L R AUDIO L MONO R ... Audio Out jacks to connect an external amplifier and speakers. (Refer to the Audio Menu on page 31 for instructions on how to turn the TV's internal speakers off and on.) 3 Select Audio/Video Input on the external device to the HD-IN or DVD-IN jacks, MONITOR OUTPUT is not...
If you are watching a DIGITAL CHANNEL or the source connected to see the image and hear the sound from the TV. TV Back HD IN Y Pr RGB Pb DVD IN Y VIDEO 1 VIDEO 2 MONITOR IN IN OUTPUT S-VIDEO 1 S-VIDEO 2 Pr VIDEO VIDEO VIDEO Pb R AUDIO L R AUDIO L R AUDIO L MONO R ... Audio Out jacks to connect an external amplifier and speakers. (Refer to the Audio Menu on page 31 for instructions on how to turn the TV's internal speakers off and on.) 3 Select Audio/Video Input on the external device to the HD-IN or DVD-IN jacks, MONITOR OUTPUT is not...

Operating Guide
Page 16
...out to external audio equipment (stereo system) via the Digital Audio Optical Output port 1 Connect one end of an optical cable to the TV Digital Audio Optical Output port. 2 Connect the other end of the optical cable to the digital audio optical input on the audio equipment.... 3 See the external audio equipment instruction manual for operation. TV Back ANTENNA/ CABLE 1 ANTENNA/ CABLE 2 CALIBRATION HD IN Y DVD IN Y VIDEO 1 VIDEO 2 MONITOR IN IN OUTPUT S-VIDEO 1 S-VIDEO 2 Pr Pr Pb...
...out to external audio equipment (stereo system) via the Digital Audio Optical Output port 1 Connect one end of an optical cable to the TV Digital Audio Optical Output port. 2 Connect the other end of the optical cable to the digital audio optical input on the audio equipment.... 3 See the external audio equipment instruction manual for operation. TV Back ANTENNA/ CABLE 1 ANTENNA/ CABLE 2 CALIBRATION HD IN Y DVD IN Y VIDEO 1 VIDEO 2 MONITOR IN IN OUTPUT S-VIDEO 1 S-VIDEO 2 Pr Pr Pb...

Operating Guide
Page 17
Temporary Connections menu C32V23/C36V23 Front Control Panel channel volume power 1 Connect your preference. C34W23 Side Control Panel menu channel TV Operation 1 Press POWER to turn TV on screen. 2 Use Channel Up/Down to select menu option. 3 Use Volume Left/Right to adjust menu option. 4 Use MENU ...Used for stereo sound from screen. Front-Side Panel Controls/Inputs Using the front/side panel to operate the TV's basic features and to make temporary connections Typical TV Front Panel menu channel volume power Menu Operation 1 Press MENU to place menus on and off. 2 Use...
Temporary Connections menu C32V23/C36V23 Front Control Panel channel volume power 1 Connect your preference. C34W23 Side Control Panel menu channel TV Operation 1 Press POWER to turn TV on screen. 2 Use Channel Up/Down to select menu option. 3 Use Volume Left/Right to adjust menu option. 4 Use MENU ...Used for stereo sound from screen. Front-Side Panel Controls/Inputs Using the front/side panel to operate the TV's basic features and to make temporary connections Typical TV Front Panel menu channel volume power Menu Operation 1 Press MENU to place menus on and off. 2 Use...
Operating Guide
Page 18
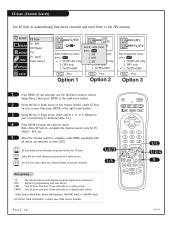
.... 3 Using the Up or Down arrow, select option 1, 2, or 3. (Based on your cable service provider. PRG POWER CABLE VCR AUX TV SURF FLASHBK MUTE CHANNEL VOLUME VOLUME CHANNEL 123 4 56 7 89 0 - EZ Scan (Channel Search) Use EZ Scan to complete the channel search ...is complete, press MENU repeatedly until all menus are removed, or press QUIT. Label Input Source SPECIAL LOCK TV/DTV Ant 1 X Ant 2 Select antenna input, press ENTER 1. TV/DTV Ant only 2. TV/DTV+CATV CATV Ant 1 CADTV SelectAncta2ble bandX, press ENTER Se1l.eSctdantenna input, p2re.sHs RCENTER 3. Option...
.... 3 Using the Up or Down arrow, select option 1, 2, or 3. (Based on your cable service provider. PRG POWER CABLE VCR AUX TV SURF FLASHBK MUTE CHANNEL VOLUME VOLUME CHANNEL 123 4 56 7 89 0 - EZ Scan (Channel Search) Use EZ Scan to complete the channel search ...is complete, press MENU repeatedly until all menus are removed, or press QUIT. Label Input Source SPECIAL LOCK TV/DTV Ant 1 X Ant 2 Select antenna input, press ENTER 1. TV/DTV Ant only 2. TV/DTV+CATV CATV Ant 1 CADTV SelectAncta2ble bandX, press ENTER Se1l.eSctdantenna input, p2re.sHs RCENTER 3. Option...
Operating Guide
Page 19
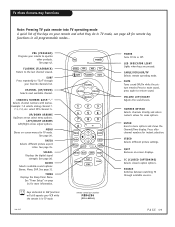
...26. See "Timer Setup" on page 34 for remote key functions in all programmable modes... CABLE/VCR/AUX/TV Selects remote operating mode. CC (CLOSED CAPTIONING) Selects closed caption options. TV Mode Remote Key Functions Note: Pressing TV puts remote into TV operating mode A quick list of the ... AUDIO VIDEO CC QUIT RECORD PAUSE TIMER SOURCE REWIND PLAY STOP F FWD remote control part number MBR4286 (P124-00240) POWER Turns TV On or Off. VIDEO Selects different picture settings. LEFT/RIGHT ARROWS Left/Right arrows adjust options. SIGNAL Displays the digital signal strength...
...26. See "Timer Setup" on page 34 for remote key functions in all programmable modes... CABLE/VCR/AUX/TV Selects remote operating mode. CC (CLOSED CAPTIONING) Selects closed caption options. TV Mode Remote Key Functions Note: Pressing TV puts remote into TV operating mode A quick list of the ... AUDIO VIDEO CC QUIT RECORD PAUSE TIMER SOURCE REWIND PLAY STOP F FWD remote control part number MBR4286 (P124-00240) POWER Turns TV On or Off. VIDEO Selects different picture settings. LEFT/RIGHT ARROWS Left/Right arrows adjust options. SIGNAL Displays the digital signal strength...
Operating Guide
Page 20
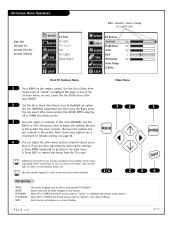
... CONTRAST, use a checkmark to "select" or highlight and choose menu options. Press MENU repeatedly to go back to set up and operate TV features. Use the number keypad to enter numerical values when required. 1/4 2 Mini glossary MENU ENTER UP/DOWN LEFT/RIGHT QUIT On-screen ... settings: a. You can adjust the other menu options like the CONTRAST adjustment bar, then press the Right arrow. R 1 ENTER QUIT 34 PAGE 20 206-3767 Label Input Source SPECIAL LOCK SETUP VIDEO AUDIO TIME SPECIAL LOCK EZ Picture Contrast Brightness Color Tint Sharpness Color Temp Z-...
... CONTRAST, use a checkmark to "select" or highlight and choose menu options. Press MENU repeatedly to go back to set up and operate TV features. Use the number keypad to enter numerical values when required. 1/4 2 Mini glossary MENU ENTER UP/DOWN LEFT/RIGHT QUIT On-screen ... settings: a. You can adjust the other menu options like the CONTRAST adjustment bar, then press the Right arrow. R 1 ENTER QUIT 34 PAGE 20 206-3767 Label Input Source SPECIAL LOCK SETUP VIDEO AUDIO TIME SPECIAL LOCK EZ Picture Contrast Brightness Color Tint Sharpness Color Temp Z-...

Operating Guide
Page 21
... Jackpack, Set of component Audio/Video Input jacks at 1080i. The source equipment you want to see and hear on your TV ANTENNA/ CABLE 1 ANTENNA 2 CALIBRATION HD IN (1080i) Y DVD IN (480i) Y VIDEO 1 VIDEO 2 MONITOR IN IN OUTPUT S-VIDEO 1 S-VIDEO 2 Pr Pr Pb...DIGITAL AUDIO OUTPUT OPTICAL R R AUDIO AUDIO L L R AUDIO L R AUDIO L R AUDIO L S-Video Video L Audio R 1 Press SOURCE repeatedly to view should be turned on TV front Jackpack, S-Video Input jack use with front Audio Input jacks. S-Video Input jack use with Video 2 Audio Input jacks. F S-Video In: on . 206-3767...
... Jackpack, Set of component Audio/Video Input jacks at 1080i. The source equipment you want to see and hear on your TV ANTENNA/ CABLE 1 ANTENNA 2 CALIBRATION HD IN (1080i) Y DVD IN (480i) Y VIDEO 1 VIDEO 2 MONITOR IN IN OUTPUT S-VIDEO 1 S-VIDEO 2 Pr Pr Pb...DIGITAL AUDIO OUTPUT OPTICAL R R AUDIO AUDIO L L R AUDIO L R AUDIO L R AUDIO L S-Video Video L Audio R 1 Press SOURCE repeatedly to view should be turned on TV front Jackpack, S-Video Input jack use with front Audio Input jacks. S-Video Input jack use with Video 2 Audio Input jacks. F S-Video In: on . 206-3767...
Operating Guide
Page 22
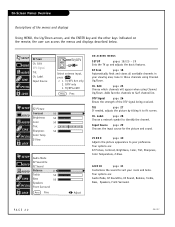
... Ant 1 X Ant 2 Select antenna input, press ENTER 1. TV/DTV+CATV Menu Prev. EZ Scan page 18 Automatically finds and stores all available channels... list. CATV only 3. Ch. Your options are : EZ Picture, Contrast, Brightness, Color, Tint, Sharpness, Color Temperature, Z-View. TV/DTV Ant only 2. tune in your preference. Adds favorite channels to identify the channel. DTV Signal page 26 Shows the strength of the...sound to fit screen. R Adjust ON-SCREEN MENUS SETUP pages 18/25 - 29 Sets the TV up and adjusts the basic features. Ch. Edit DTV Signal Tilt Ch.
... Ant 1 X Ant 2 Select antenna input, press ENTER 1. TV/DTV+CATV Menu Prev. EZ Scan page 18 Automatically finds and stores all available channels... list. CATV only 3. Ch. Your options are : EZ Picture, Contrast, Brightness, Color, Tint, Sharpness, Color Temperature, Z-View. TV/DTV Ant only 2. tune in your preference. Adds favorite channels to identify the channel. DTV Signal page 26 Shows the strength of the...sound to fit screen. R Adjust ON-SCREEN MENUS SETUP pages 18/25 - 29 Sets the TV up and adjusts the basic features. Ch. Edit DTV Signal Tilt Ch.


