
Operation Guide
Page 3
... ventilation openings. If the provided plug does not fit into the product, the product has been exposed to protect it from tip-over - Protect the power cord from the wall outlet before the product is used, use can be followed. 5. This product does not contain any way, such as... power-supply cord or plug is provided or the manufacturer's instructions have fallen into your safety. Do not install near water. - Use only with the cart, ...
... ventilation openings. If the provided plug does not fit into the product, the product has been exposed to protect it from tip-over - Protect the power cord from the wall outlet before the product is used, use can be followed. 5. This product does not contain any way, such as... power-supply cord or plug is provided or the manufacturer's instructions have fallen into your safety. Do not install near water. - Use only with the cart, ...
Operation Guide
Page 7
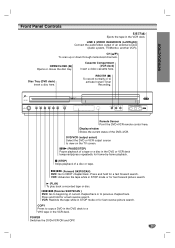
.../Right)) Connect the audio/video output of an external source (Audio system, TV/Monitor, another VCR). VCR: Rewinds the tape while in the VCR deck. POWER Switches the DVD+VCR ON and OFF. 7
.../Right)) Connect the audio/video output of an external source (Audio system, TV/Monitor, another VCR). VCR: Rewinds the tape while in the VCR deck. POWER Switches the DVD+VCR ON and OFF. 7

Operation Guide
Page 9
...left/right/up/down) Selects menu options. CH/TRK(v+/V-) : Selects VCR channels. RETURN (O) Removes the menu. ZOOM Enlarges DVD video image. POWER: Switches TV ON and OFF. - MUTE: Turns on the dis- PROGRAM Accesses or removes Program menu. INPUT Selects the VCR deck's ...BACKWARD / FORWARD (m/M) - Returns to beginning of recording. 9 INTRODUCTION Press repeatedly to DVD. Plays tracks in a menu. Remote Control POWER Turns DVD+VCR ON and OFF. DVD: Search backward or forward. - REC/ITR (z) Starts recording. Selects recording speed. Fast forwards ...
...left/right/up/down) Selects menu options. CH/TRK(v+/V-) : Selects VCR channels. RETURN (O) Removes the menu. ZOOM Enlarges DVD video image. POWER: Switches TV ON and OFF. - MUTE: Turns on the dis- PROGRAM Accesses or removes Program menu. INPUT Selects the VCR deck's ...BACKWARD / FORWARD (m/M) - Returns to beginning of recording. 9 INTRODUCTION Press repeatedly to DVD. Plays tracks in a menu. Remote Control POWER Turns DVD+VCR ON and OFF. DVD: Search backward or forward. - REC/ITR (z) Starts recording. Selects recording speed. Fast forwards ...
Operation Guide
Page 10
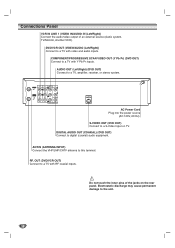
... Plug into the power source (AC 120V, 60 Hz). S-VIDEO OUT (DVD OUT) Connect to a TV with RF coaxial inputs. OUT (DVD/VCR OUT) Connect to a S-Video Input on ...
... Plug into the power source (AC 120V, 60 Hz). S-VIDEO OUT (DVD OUT) Connect to a TV with RF coaxial inputs. OUT (DVD/VCR OUT) Connect to a S-Video Input on ...

Operation Guide
Page 21
... vertical jitter, adjust tracking controls very carefully. The tape will go into playback mode automatically. Special effects playback notes Horizontal lines (noise bars) will power-up automatically. Tune the TV to the DVD+VCR output channel (CH 3 or 4) or set the TV's source selector to stop , rewind .../AUDIO connection is made between the DVD+VCR and the TV, set the TV's source selector to normal when the tape is ejected or the power cord is pressed, the DVD+VCR will start playback automatically. 2 Press N (PLAY) once. If slow motion mode continues for more than 3 ...
... vertical jitter, adjust tracking controls very carefully. The tape will go into playback mode automatically. Special effects playback notes Horizontal lines (noise bars) will power-up automatically. Tune the TV to the DVD+VCR output channel (CH 3 or 4) or set the TV's source selector to stop , rewind .../AUDIO connection is made between the DVD+VCR and the TV, set the TV's source selector to normal when the tape is ejected or the power cord is pressed, the DVD+VCR will start playback automatically. 2 Press N (PLAY) once. If slow motion mode continues for more than 3 ...
Operation Guide
Page 22
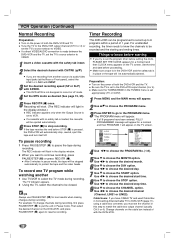
... panel), select the LINE1 or LINE2 with INPUT. 3 Set the desired recording speed (SP or SLP) with the DVD+VCR. 22 Change channels on the power of 1 year. This DVD+VCR is pressed, the DVD+VCR will flash in LP mode. 4 Set the MTS mode as desired (See page 15, 25... the TV is set the program timer before setting the clock, PLEASE SET THE CLOCK appears for a moment and then CLOCK menu appears on the power of with SPEED. ips Always use PAUSE/STEP (X) for a moment and then PROGRAM 1 will appear. 2 Use v/V to choose the PROGRAM menu. 3 Press ENTER to go...
... panel), select the LINE1 or LINE2 with INPUT. 3 Set the desired recording speed (SP or SLP) with the DVD+VCR. 22 Change channels on the power of 1 year. This DVD+VCR is pressed, the DVD+VCR will flash in LP mode. 4 Set the MTS mode as desired (See page 15, 25... the TV is set the program timer before setting the clock, PLEASE SET THE CLOCK appears for a moment and then CLOCK menu appears on the power of with SPEED. ips Always use PAUSE/STEP (X) for a moment and then PROGRAM 1 will appear. 2 Use v/V to choose the PROGRAM menu. 3 Press ENTER to go...

Operation Guide
Page 23
... AC outlet, the correct clock time and timer settings are finished programming and you want to set to record the preset programs. otes If the power fails or the DVD+VCR is via a Cable converter box, you are kept in memory for recording up a timer recording, recording will start if no... 2 will be entered by the DVD+VCR. Cable Users: If your DVD+VCR. For example, in the display window. There will not be reset when power is now set the DVD+VCR to 8 programs on a certain day of 1 year. Reset the clock according to choose the PROGRAM menu. The DVD+VCR...
... AC outlet, the correct clock time and timer settings are finished programming and you want to set to record the preset programs. otes If the power fails or the DVD+VCR is via a Cable converter box, you are kept in memory for recording up a timer recording, recording will start if no... 2 will be entered by the DVD+VCR. Cable Users: If your DVD+VCR. For example, in the display window. There will not be reset when power is now set the DVD+VCR to 8 programs on a certain day of 1 year. Reset the clock according to choose the PROGRAM menu. The DVD+VCR...

Operation Guide
Page 24
... the end of DVD+VCR, you should select the input channel LINE1 by 30-minute increments. During Instant Timer Recording, changing the channel on the power of REC/ITR (z) increases recording time 30 minutes) Checking the Recording Time Press REC/ITR (z) once to select the recording time length. You can be...
... the end of DVD+VCR, you should select the input channel LINE1 by 30-minute increments. During Instant Timer Recording, changing the channel on the power of REC/ITR (z) increases recording time 30 minutes) Checking the Recording Time Press REC/ITR (z) once to select the recording time length. You can be...

Operation Guide
Page 26
... on the TV screen during recording or playback. LOAD TAPE AUTO PLAY AUTO REWIND AUTO EJECT AUTO POWER OFF ote Auto power off does not function during recording or playback. SQPB is inserted. The real-time counter will turn the DVD+VCR's TV indicator off. The tape ... CLK/CNT to about "0:00:00". Counter Memory Function This is useful if there is on the tape during regular DVD play mode. (DVD+VCR power stays on.) S-VHS Quasi Playback (SQPB) This DVD+VCR can always be displayed correctly depending on the condition of the tape and the kind of...
... on the TV screen during recording or playback. LOAD TAPE AUTO PLAY AUTO REWIND AUTO EJECT AUTO POWER OFF ote Auto power off does not function during recording or playback. SQPB is inserted. The real-time counter will turn the DVD+VCR's TV indicator off. The tape ... CLK/CNT to about "0:00:00". Counter Memory Function This is useful if there is on the tape during regular DVD play mode. (DVD+VCR power stays on.) S-VHS Quasi Playback (SQPB) This DVD+VCR can always be displayed correctly depending on the condition of the tape and the kind of...

Operation Guide
Page 29
... during disc playback. To enter a mark, follow these steps. 1 During disc playback, press MARKER when playback reaches the spot that allow you turn off the power, the video mode will return to see the different subtitle languages. Then, press the appropriate number button to memorize. The disc menu is not perfectly...
... during disc playback. To enter a mark, follow these steps. 1 During disc playback, press MARKER when playback reaches the spot that allow you turn off the power, the video mode will return to see the different subtitle languages. Then, press the appropriate number button to memorize. The disc menu is not perfectly...

Operation Guide
Page 34
..., you find the one code number is listed in the table below ). 2. You can control your TV using the buttons below. By pressing POWER INPUT CH +/- Manufacturer LG / GoldStar Zenith Samsung Sony Hitachi Code Number 1 (Default), 2 1, 3, 4 6, 7 8, 9 4 otes Depending on the TV, even after entering the correct manufacturer code. Controlling Your TV with...
..., you find the one code number is listed in the table below ). 2. You can control your TV using the buttons below. By pressing POWER INPUT CH +/- Manufacturer LG / GoldStar Zenith Samsung Sony Hitachi Code Number 1 (Default), 2 1, 3, 4 6, 7 8, 9 4 otes Depending on the TV, even after entering the correct manufacturer code. Controlling Your TV with...
Operation Guide
Page 35
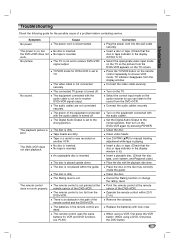
... the remote control at the remote sensor of the equipment connected with the playback side down . Remove the obstacle. REFERENCE Symptom No power. Cause The power cord is inserted. No disc is disconnected. No sound. The disc is a rental or was recorded on the equipment connected with ...The disc is not pointed at the remote sensor of a problem before contacting service. The remote control does not work . Correction Plug the power cord into the wall outlet securely. TV indicator disappears from the DVD+VCR. The remote control is not placed within 23 ft (7 m). ...
... the remote control at the remote sensor of the equipment connected with the playback side down . Remove the obstacle. REFERENCE Symptom No power. Cause The power cord is inserted. No disc is disconnected. No sound. The disc is a rental or was recorded on the equipment connected with ...The disc is not pointed at the remote sensor of a problem before contacting service. The remote control does not work . Correction Plug the power cord into the wall outlet securely. TV indicator disappears from the DVD+VCR. The remote control is not placed within 23 ft (7 m). ...

Operation Guide
Page 36
...: • When the DVD+VCR is possible. In locations where moisture condensation may occur: • Keep the DVD+VCR plugged into an AC power outlet with the CH. Timer recording is set to TV A/V In jacks. indicator appears after programming timer. Camcorder is turned off . DVD+VCR ...mode. indicator does not appear after DVD+VCR is off . to STEREO. See "Channel Selection" on TV screen. Cause Those channels were deleted with POWER On. Antenna or cables are not connected to correct time. Camcorder image via A/V output from a cold place to dry before using CH/TRK (v/V) ...
...: • When the DVD+VCR is possible. In locations where moisture condensation may occur: • Keep the DVD+VCR plugged into an AC power outlet with the CH. Timer recording is set to TV A/V In jacks. indicator appears after programming timer. Camcorder is turned off . DVD+VCR ...mode. indicator does not appear after DVD+VCR is off . to STEREO. See "Channel Selection" on TV screen. Cause Those channels were deleted with POWER On. Antenna or cables are not connected to correct time. Camcorder image via A/V output from a cold place to dry before using CH/TRK (v/V) ...

Operation Guide
Page 39
... system Timer Tape speed Tape width Maximum recording time Rewind time Channel coverage Frequency range Signal-to change without prior notice. 39 REFERENCE Specifications General Power requirements Power consumption Dimensions (approx.) Weight (approx.) Operating temperature Operating humidity Signal system AC 120V, 60 Hz 19 W 16.9" X 3.1" X 10.8" (430 X 78.5 X 273 mm) (w x h x d) 8.82 lbs...
... system Timer Tape speed Tape width Maximum recording time Rewind time Channel coverage Frequency range Signal-to change without prior notice. 39 REFERENCE Specifications General Power requirements Power consumption Dimensions (approx.) Weight (approx.) Operating temperature Operating humidity Signal system AC 120V, 60 Hz 19 W 16.9" X 3.1" X 10.8" (430 X 78.5 X 273 mm) (w x h x d) 8.82 lbs...