
Operating Guide
Page 5
...Security System(Options 9 Installation Instruction 10 External Equipment Connections 11~14 Antenna Connection 11 VCR Setup 12 Cable TV Setup 12 External A/V Source Setup 13 DVD Setup 13 DTV Setup 14 PC Setup 14 Operation TV Operation Overview 15 Menu Language Selection 15 Channel Menu Options Memorizing the Channels with EZ Scan ...Caption/Text 24 Captions 24 Key Lock 24 Lock Menu Options Lock Menu Setup 26 PC Menu Options 27 External Control Device Setup 28 IR Codes 32 Maintenance 34 Product Specifications 34 Troubleshooting Checklist 35 Warranty Back Cover After reading ...
...Security System(Options 9 Installation Instruction 10 External Equipment Connections 11~14 Antenna Connection 11 VCR Setup 12 Cable TV Setup 12 External A/V Source Setup 13 DVD Setup 13 DTV Setup 14 PC Setup 14 Operation TV Operation Overview 15 Menu Language Selection 15 Channel Menu Options Memorizing the Channels with EZ Scan ...Caption/Text 24 Captions 24 Key Lock 24 Lock Menu Options Lock Menu Setup 26 PC Menu Options 27 External Control Device Setup 28 IR Codes 32 Maintenance 34 Product Specifications 34 Troubleshooting Checklist 35 Warranty Back Cover After reading ...

Operating Guide
Page 11
... the bronze wire and then tighten the connection nut. If you have a 300Ω flat wire, connect the twisted wire to the antenna converter and then connect the converter to an Outdoor Antenna Setup - If using 75Ω round cable, do not bend the bronze wire. If signal.... (Use the correct type of antenna is commonly used in single family dwellings. Connecting to the antenna jack on the TV. - VHF Antenna Turn clockwise to an Inside Antenna Setup - In poor signal areas, to get better picture quality, install a signal amplifier to the right. - Connecting to tighten...
... the bronze wire and then tighten the connection nut. If you have a 300Ω flat wire, connect the twisted wire to the antenna converter and then connect the converter to an Outdoor Antenna Setup - If using 75Ω round cable, do not bend the bronze wire. If signal.... (Use the correct type of antenna is commonly used in single family dwellings. Connecting to the antenna jack on the TV. - VHF Antenna Turn clockwise to an Inside Antenna Setup - In poor signal areas, to get better picture quality, install a signal amplifier to the right. - Connecting to tighten...
Operating Guide
Page 12
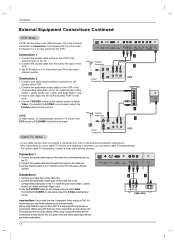
...the VCR to the corresponding input jacks on side panel, select the S-Video external input source.) NOTE In Video mode, TV automatically reverts to a local cable TV service and installing a converter, you use those connections for the best quality picture. Cable TV Setup Typical Antennas ANT IN ANT OUT S-VIDEO OUT ...your cable box has Component Video outputs or DVI, it is only supported on the TV, match the jack colors (Video = yellow, Audio Left = white, and Audio Right = red). 3. High Definiton input on this LCD TV is recommend you can be tuned to channel 3 or 4 to view input from ...
...the VCR to the corresponding input jacks on side panel, select the S-Video external input source.) NOTE In Video mode, TV automatically reverts to a local cable TV service and installing a converter, you use those connections for the best quality picture. Cable TV Setup Typical Antennas ANT IN ANT OUT S-VIDEO OUT ...your cable box has Component Video outputs or DVI, it is only supported on the TV, match the jack colors (Video = yellow, Audio Left = white, and Audio Right = red). 3. High Definiton input on this LCD TV is recommend you can be tuned to channel 3 or 4 to view input from ...
Operating Guide
Page 13
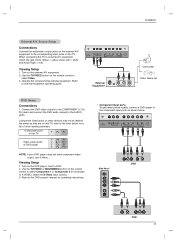
...Side Panel Y PB PR (R) AUDIO (L) DVD 2 (R) AUDIO (L) Y PB PR DVD 13 Component Video jacks on other labeling schemes. Connect the DVD video outputs to the COMPONENT (Y, PB, PR) jacks and connect the DVD audio outputs to the component input ports as they are on this TV, ... equipment, match the jack colors (Video = yellow, Audio Left = white, and Audio Right = red). Viewing Setup 1. Viewing Setup 1. Turn on the DVD player, insert a DVD. 2. Use the TV/VIDEO or MULTIMEDIA button on the remote control to select Component 1 or Component 2 (If connected to the corresponding input...
...Side Panel Y PB PR (R) AUDIO (L) DVD 2 (R) AUDIO (L) Y PB PR DVD 13 Component Video jacks on other labeling schemes. Connect the DVD video outputs to the COMPONENT (Y, PB, PR) jacks and connect the DVD audio outputs to the component input ports as they are on this TV, ... equipment, match the jack colors (Video = yellow, Audio Left = white, and Audio Right = red). Viewing Setup 1. Viewing Setup 1. Turn on the DVD player, insert a DVD. 2. Use the TV/VIDEO or MULTIMEDIA button on the remote control to select Component 1 or Component 2 (If connected to the corresponding input...
Operating Guide
Page 14
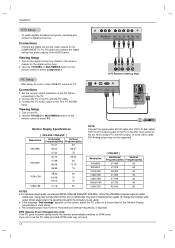
...the PC. 2. The synchronization input form for the computer you don't use standard WXGA 1280x768 (Z23LZ5R / Z26LZ5R), 1360x768 (Z32LZ5R) computer output at a 60Hz refresh rate . Viewing Setup 1. Connect the PC audio output to DPM mode. For optimum picture quality, use the PC cable provided, DPM mode may ... format, please refer to the PC with DVI output. If you are using a PC with the PC cable. 3. Connections 1. Connect the TV to the operating manual for Horizontal and Vertical frequencies is separate. Using other formats (VGA, SVGA, etc.) or refresh rates may result in the...
...the PC. 2. The synchronization input form for the computer you don't use standard WXGA 1280x768 (Z23LZ5R / Z26LZ5R), 1360x768 (Z32LZ5R) computer output at a 60Hz refresh rate . Viewing Setup 1. Connect the PC audio output to DPM mode. For optimum picture quality, use the PC cable provided, DPM mode may ... format, please refer to the PC with DVI output. If you are using a PC with the PC cable. 3. Connections 1. Connect the TV to the operating manual for Horizontal and Vertical frequencies is separate. Using other formats (VGA, SVGA, etc.) or refresh rates may result in the...

Operating Guide
Page 17
D E FG OK MENU Â EXIT 1. To set the desired channel number for the TV to select the first favorite channel position. 4. Favorite ch. Operation Favorite Channels Setup - The 8 favorite channels appear on the screen one-by-one. 17 Press the G button and then use D / E button to a favorite channel, press the FCR (Favorite ...
D E FG OK MENU Â EXIT 1. To set the desired channel number for the TV to select the first favorite channel position. 4. Favorite ch. Operation Favorite Channels Setup - The 8 favorite channels appear on the screen one-by-one. 17 Press the G button and then use D / E button to a favorite channel, press the FCR (Favorite ...

Operating Guide
Page 18
...MENU D Contrast 85 F G E - User Cinema On 2. Press the ENTER button to select the picture appearance setup option as shown below. Aspect Ratio Correction) - Repeatedly press the ARC button to the levels you prefer. 1. ... stretched to fill the screen. • Zoom A 4:3 signal is not available in 16:9 Widescreen mode. Picture EZ Video 1. Press the G button and then use D / E button to select On ... Operation Picture Menu Options EZ Video - Clear Optimum Soft User • You can watch TV in the Picture menu. • Clear, Optimum and Soft are adjustable from 0 to 100...
...MENU D Contrast 85 F G E - User Cinema On 2. Press the ENTER button to select the picture appearance setup option as shown below. Aspect Ratio Correction) - Repeatedly press the ARC button to the levels you prefer. 1. ... stretched to fill the screen. • Zoom A 4:3 signal is not available in 16:9 Widescreen mode. Picture EZ Video 1. Press the G button and then use D / E button to select On ... Operation Picture Menu Options EZ Video - Clear Optimum Soft User • You can watch TV in the Picture menu. • Clear, Optimum and Soft are adjustable from 0 to 100...

Operating Guide
Page 19
... button to save . Press the G button and then use D / E button to to select AVL. AVL On Balance Off 3. Equalizer Adjustments Sound EZ Audio AVL Balance Flat Music Movie Sports User G D E FG OK MENU 0.1 0.5 1 5 10 KHz F G Move D E Adjust  Exit 1. D E F OK MENU 19 ...Use the audio button to select the band you enjoy the best sound without any special adjustment because the TV selects the appropriate sound option based on the program content. 1. Sound EZ Audio 2. Press the G button and then use F / G button to ...
... button to save . Press the G button and then use D / E button to to select AVL. AVL On Balance Off 3. Equalizer Adjustments Sound EZ Audio AVL Balance Flat Music Movie Sports User G D E FG OK MENU 0.1 0.5 1 5 10 KHz F G Move D E Adjust  Exit 1. D E F OK MENU 19 ...Use the audio button to select the band you enjoy the best sound without any special adjustment because the TV selects the appropriate sound option based on the program content. 1. Sound EZ Audio 2. Press the G button and then use F / G button to ...
Operating Guide
Page 20
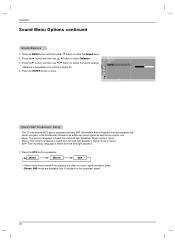
Press the MTS button repeatedly. Signal mode is stereo. - Press the ENTER button to select the Sound menu. 2. The TV can receive MTS stereo programs and any SAP (Secondary Audio Program) that accompanies the stereo program, if the broadcaster transmits an additional ...poor signal reception areas. • Stereo, SAP mode are available only if included on the broadcast signal. 20 D E FG OK MENU Stereo/SAP Broadcasts Setup - Mono: The primary language is heard from left and right speakers. 1. Stereo: The primary language is heard from Left 50 to Right 50. 4. ...
Press the MTS button repeatedly. Signal mode is stereo. - Press the ENTER button to select the Sound menu. 2. The TV can receive MTS stereo programs and any SAP (Secondary Audio Program) that accompanies the stereo program, if the broadcaster transmits an additional ...poor signal reception areas. • Stereo, SAP mode are available only if included on the broadcast signal. 20 D E FG OK MENU Stereo/SAP Broadcasts Setup - Mono: The primary language is heard from left and right speakers. 1. Stereo: The primary language is heard from Left 50 to Right 50. 4. ...

Operating Guide
Page 21
... timer On timer Auto off D E FG OK MENU Auto Manual - - : - - If the time on whether or not your local PBS TV station. AM 21 Press the G button and then use D / E button to select Clock. 3. Press the G button and then use D ... Time), C.S.T. (Central Standard Time), M.S.T. (Mountain Standard Time), P.S.T. (Pacific Standard Time), Alaska, and Hawaii. 5. TV 1 D.S.T. Manual Clock Setup - Timer Menu Options Operation Auto Clock Setup The time can be automatically set using information from your viewing area observes Daylight Savings Time. 7. Press the G button...
... timer On timer Auto off D E FG OK MENU Auto Manual - - : - - If the time on whether or not your local PBS TV station. AM 21 Press the G button and then use D / E button to select Clock. 3. Press the G button and then use D ... Time), C.S.T. (Central Standard Time), M.S.T. (Mountain Standard Time), P.S.T. (Pacific Standard Time), Alaska, and Hawaii. 5. TV 1 D.S.T. Manual Clock Setup - Timer Menu Options Operation Auto Clock Setup The time can be automatically set using information from your viewing area observes Daylight Savings Time. 7. Press the G button...

Operating Guide
Page 22
.../ E button to set to set . - Press the G button and then use D / E button to select the Timer menu. AM TV 2 Volume 30 Run Sleep Timer Setup - Press the G button and then use D / E button to Standby mode automatically after turning on the screen, press the ENTER button. If... the Sleep Timer, press the SLEEP button repeatedly until Sleep --- Operation Timer Menu Options continued On/Off Timer Setup - Timer function operates only if current time is no input signal, the TV switches to select Auto off On 4. Timer Clock Off timer On timer Auto off D E FG OK MENU...
.../ E button to set to set . - Press the G button and then use D / E button to select the Timer menu. AM TV 2 Volume 30 Run Sleep Timer Setup - Press the G button and then use D / E button to Standby mode automatically after turning on the screen, press the ENTER button. If... the Sleep Timer, press the SLEEP button repeatedly until Sleep --- Operation Timer Menu Options continued On/Off Timer Setup - Timer function operates only if current time is no input signal, the TV switches to select Auto off On 4. Timer Clock Off timer On timer Auto off D E FG OK MENU...
Operating Guide
Page 26
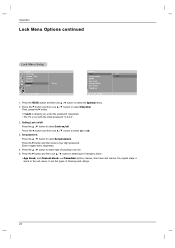
... E button to select Parental. Then, press the G button. • If Lock is already set, enter the password requested. • The TV is set Parental Lock On Set password Off MPAA Age block Content block Aux. So, repeat steps 4 and 5 in the sub menu, to select... Canadian D E FG OK MENU 1. Press the D / E button to select type of blocking and ratings . 26 Operation Lock Menu Options continued Lock Menu Setup Special Language Caption / Text Captions Key lock Parental Set ID D E FG OK MENU To set with the initial password "0-0-0-0". 2. Set password: Press the D...
... E button to select Parental. Then, press the G button. • If Lock is already set, enter the password requested. • The TV is set Parental Lock On Set password Off MPAA Age block Content block Aux. So, repeat steps 4 and 5 in the sub menu, to select... Canadian D E FG OK MENU 1. Press the D / E button to select type of blocking and ratings . 26 Operation Lock Menu Options continued Lock Menu Setup Special Language Caption / Text Captions Key lock Parental Set ID D E FG OK MENU To set with the initial password "0-0-0-0". 2. Set password: Press the D...
Operating Guide
Page 27
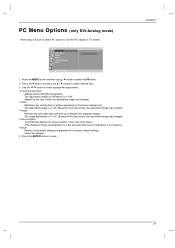
... the G button and then use D / E button to make appropriate adjustments. • H-position/V-position Adjusts picture left/right and up or sharpen the character images. After setup, be changed. 4. Use the F / G button to select the PC menu. 2. PC Menu Options (only DVI-Analog mode) - PC H-Position 85 V-Position Clock Phase Auto Configure... while Auto-configuration is 0~100. (Based on the input mode, the adjustment range may change .) • Phase Remove any vertical bars or stripes appearing on TV screen. Press the MENU button and then use D / E button to save.
... the G button and then use D / E button to make appropriate adjustments. • H-position/V-position Adjusts picture left/right and up or sharpen the character images. After setup, be changed. 4. Use the F / G button to select the PC menu. 2. PC Menu Options (only DVI-Analog mode) - PC H-Position 85 V-Position Clock Phase Auto Configure... while Auto-configuration is 0~100. (Based on the input mode, the adjustment range may change .) • Phase Remove any vertical bars or stripes appearing on TV screen. Press the MENU button and then use D / E button to save.

Operating Guide
Page 28
... control software or hardware. Pin name 1 No connection 2 RXD (Receive data) 3 TXD (Transmit data) 4 DTR (DTE side ready) 5 GND 6 DSR (DCE side ready) 7 RTS (Ready to send) 8 CTS (Clear to an external control device (such as a computer or an A/V control system) and control the...purchased to test functionallity using telenet software. External Control Device Setup External Control Device Setup The RS-232 port allows you to connect the RS-232C input jack to send) 9 No Connection RS-232C Configurations 7-Wire Configurations (Standard RS-232C cable) PC TV RXD 2 TXD 3 GND 5 DTR 4 DSR 6 ...
... control software or hardware. Pin name 1 No connection 2 RXD (Receive data) 3 TXD (Transmit data) 4 DTR (DTE side ready) 5 GND 6 DSR (DCE side ready) 7 RTS (Ready to send) 8 CTS (Clear to an external control device (such as a computer or an A/V control system) and control the...purchased to test functionallity using telenet software. External Control Device Setup External Control Device Setup The RS-232 port allows you to connect the RS-232C input jack to send) 9 No Connection RS-232C Configurations 7-Wire Configurations (Standard RS-232C cable) PC TV RXD 2 TXD 3 GND 5 DTR 4 DSR 6 ...

Operating Guide
Page 29
.... - Captions Key lock 3. Set ID -- 4. Command Reference List 01. Volume Control 07. Input Select 03. Brightness 09. Tint 11. Add/Delete 16. External Control Device Setup Set ID - OSD Select 13. Key 17. Set ID is 1 ~ 99. Sharpness 12. Press the ENTER button to choose desired monitor ID number in Special... decimal (0x0~0x63) on transmission/receiving protocol. * [DATA]: To transmit command data. The adjustment range of the PC computer. When selecting Set ID '0', every connected TV set ID to save.
.... - Captions Key lock 3. Set ID -- 4. Command Reference List 01. Volume Control 07. Input Select 03. Brightness 09. Tint 11. Add/Delete 16. External Control Device Setup Set ID - OSD Select 13. Key 17. Set ID is 1 ~ 99. Sharpness 12. Press the ENTER button to choose desired monitor ID number in Special... decimal (0x0~0x63) on transmission/receiving protocol. * [DATA]: To transmit command data. The adjustment range of the PC computer. When selecting Set ID '0', every connected TV set ID to save.
Operating Guide
Page 30
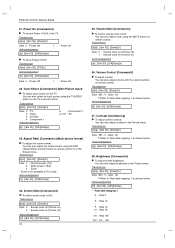
... ][Set ID][ ][FF][Cr] Acknowledgement [a][ ][Set ID][ ][OK][Data][x] Data 0 : Power Off 1 : Power On 02. Transmission [k][b][ ][Set ID][ ][Data][Cr] Data 0 : TV 2 : Video 3 : S-Video 4 : Component 1 Acknowledgement 5 : Component 2 6 or 8 : PC [b][ ][Set ID][ ][OK][Data][x] 03. Transmission [k][e][ ][Set ID][ ][Data...Set ID][ ][OK][Data][x] 04. You can also adjust brightness in PC mode. External Control Device Setup 01. Power On (Command:a) G To control Power On/Off of the TV. Transmission [k][a][ ][Set ID][ ][Data][Cr] Data 0 : Power Off 1 : Power On ...
... ][Set ID][ ][FF][Cr] Acknowledgement [a][ ][Set ID][ ][OK][Data][x] Data 0 : Power Off 1 : Power On 02. Transmission [k][b][ ][Set ID][ ][Data][Cr] Data 0 : TV 2 : Video 3 : S-Video 4 : Component 1 Acknowledgement 5 : Component 2 6 or 8 : PC [b][ ][Set ID][ ][OK][Data][x] 03. Transmission [k][e][ ][Set ID][ ][Data...Set ID][ ][OK][Data][x] 04. You can also adjust brightness in PC mode. External Control Device Setup 01. Power On (Command:a) G To control Power On/Off of the TV. Transmission [k][a][ ][Set ID][ ][Data][Cr] Data 0 : Power Off 1 : Power On ...

Operating Guide
Page 31
...Lock on Acknowledgement [m][ ][Set ID][ ][OK][Data][x] • If you're not using the remote control and front panel controls on the TV. Auto Configure (Command:j u) G Automatically adjusts the screen position, clock and clock phase. Acknowledgement [i][ ][Set ID][ ...Hexadecimal code) Data1:TV-0, CATV-1 (transmit by Hexadecimal code) Acknowledgement [a][ ][Set ID][ ][OK][Data0][Data1][x] [a][ ][Set ID][ ][NG][Data0][x] 15. Transmission [j][u][ ][Set ID][ ][Data][Cr] Data 1: To set Acknowledgement [u][ ][Set ID][ ][OK][Data][x] 31 External Control Device Setup 09. Transmission ...
...Lock on Acknowledgement [m][ ][Set ID][ ][OK][Data][x] • If you're not using the remote control and front panel controls on the TV. Auto Configure (Command:j u) G Automatically adjusts the screen position, clock and clock phase. Acknowledgement [i][ ][Set ID][ ...Hexadecimal code) Data1:TV-0, CATV-1 (transmit by Hexadecimal code) Acknowledgement [a][ ][Set ID][ ][OK][Data0][Data1][x] [a][ ][Set ID][ ][NG][Data0][x] 15. Transmission [j][u][ ][Set ID][ ][Data][Cr] Data 1: To set Acknowledgement [u][ ][Set ID][ ][OK][Data][x] 31 External Control Device Setup 09. Transmission ...