
Operating Guide
Page 5
... Setup 13 DTV Setup 14 PC Setup 14 Operation TV Operation Overview 15 Menu Language Selection 15 Channel Menu Options Memorizing the Channels with EZ Scan . . . . . .16 Add/Delete Channels with Manual Program . . .16 Favorite Channels Setup 17 Picture Menu Options EZ Video 18 Manual Picture Control (User option 18 Cinema Mode Setup.../Text 24 Captions 24 Key Lock 24 Lock Menu Options Lock Menu Setup 26 PC Menu Options 27 External Control Device Setup 28 IR Codes 32 Maintenance 34 Product Specifications 34 Troubleshooting Checklist 35 Warranty Back Cover After reading this...
... Setup 13 DTV Setup 14 PC Setup 14 Operation TV Operation Overview 15 Menu Language Selection 15 Channel Menu Options Memorizing the Channels with EZ Scan . . . . . .16 Add/Delete Channels with Manual Program . . .16 Favorite Channels Setup 17 Picture Menu Options EZ Video 18 Manual Picture Control (User option 18 Cinema Mode Setup.../Text 24 Captions 24 Key Lock 24 Lock Menu Options Lock Menu Setup 26 PC Menu Options 27 External Control Device Setup 28 IR Codes 32 Maintenance 34 Product Specifications 34 Troubleshooting Checklist 35 Warranty Back Cover After reading this...

Operating Guide
Page 9
... on the monitor's performance. However, they have no adverse effect on the back panel. The TV is nothing wrong with the tie Holder. Doing so may produce some temporary distortion ...information, contact http://www.kensington.com, the internet homepage of time. b. c. Installation Installation Accessories Owner's Manual 1.5V 1.5V AAA Batteries Remote Control Power Cord DVI-D cable (PC) DVI to the user's ...be visible on the screen. Avoid touching the LCD screen or holding your finger(s) against it is an optional accessory. - If the TV feels cold to the touch, there may be...
... on the monitor's performance. However, they have no adverse effect on the back panel. The TV is nothing wrong with the tie Holder. Doing so may produce some temporary distortion ...information, contact http://www.kensington.com, the internet homepage of time. b. c. Installation Installation Accessories Owner's Manual 1.5V 1.5V AAA Batteries Remote Control Power Cord DVI-D cable (PC) DVI to the user's ...be visible on the screen. Avoid touching the LCD screen or holding your finger(s) against it is an optional accessory. - If the TV feels cold to the touch, there may be...
Operating Guide
Page 13
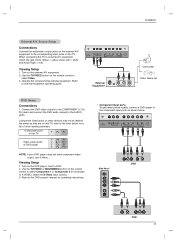
...video output jacks on the external A/V equipment to the corresponding input jacks on the DVD player, insert a DVD. 2. Turn on this TV, refer to the chart below . 1 Side Panel Y PB PR (R) AUDIO (L) DVD 2 (R) AUDIO (L) Y PB PR DVD 13 Refer to external A/V equipment, match the jack ...colors (Video = yellow, Audio Left = white, and Audio Right = red). When connecting the TV to the DVD player's manual for a list of DVD player Y Pb Pr ...
...video output jacks on the external A/V equipment to the corresponding input jacks on the DVD player, insert a DVD. 2. Turn on this TV, refer to the chart below . 1 Side Panel Y PB PR (R) AUDIO (L) DVD 2 (R) AUDIO (L) Y PB PR DVD 13 Refer to external A/V equipment, match the jack ...colors (Video = yellow, Audio Left = white, and Audio Right = red). When connecting the TV to the DVD player's manual for a list of DVD player Y Pb Pr ...
Operating Guide
Page 14
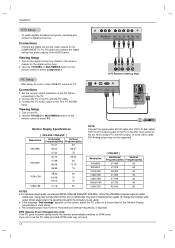
...PC with the PC cable. 3. Set the monitor output resolution on the screen, adjust the PC output to the operating manual for Horizontal and Vertical frequencies is separate. Turn on TV. In some video cards, DVI-Analog output may not work. 14 For optimum picture quality, use the PC cable provided... outputs to the COMPONENT (Y, PB, PR) jacks and connect the digital set -top box. Resolution 640x480 800x600 1024x768 1280x768 1360x768 1920x1080 1280x720 [ Z32LZ5R ] Horizontal Vertical Frequency(kHz) Frequency(Hz) 31.469 60 37.879 60 48.363 60 47.693 60 47.649 60 33.750 60 ...
...PC with the PC cable. 3. Set the monitor output resolution on the screen, adjust the PC output to the operating manual for Horizontal and Vertical frequencies is separate. Turn on TV. In some video cards, DVI-Analog output may not work. 14 For optimum picture quality, use the PC cable provided... outputs to the COMPONENT (Y, PB, PR) jacks and connect the digital set -top box. Resolution 640x480 800x600 1024x768 1280x768 1360x768 1920x1080 1280x720 [ Z32LZ5R ] Horizontal Vertical Frequency(kHz) Frequency(Hz) 31.469 60 37.879 60 48.363 60 47.693 60 47.649 60 33.750 60 ...

Operating Guide
Page 16
...to save. Press the E button and then use the D / E buttons to review the memorized channels. • If you want to add to select Manual prog.. 3. Favorite ch. Press the MENU button and then use D / E button to memory or erase. 4. For Auto program to work, the ... and then use D / E button to Memory or Erased from a cable-type service provider. 1. The current channel is displayed. Channel EZ Scan Manual prog. TV 30 Memory D E FG OK MENU Â EXIT 16 The current channel number is added to select EZ Scan. 3. Operation Channel Menu Options Memorizing...
...to save. Press the E button and then use the D / E buttons to review the memorized channels. • If you want to add to select Manual prog.. 3. Favorite ch. Press the MENU button and then use D / E button to memory or erase. 4. For Auto program to work, the ... and then use D / E button to Memory or Erased from a cable-type service provider. 1. The current channel is displayed. Channel EZ Scan Manual prog. TV 30 Memory D E FG OK MENU Â EXIT 16 The current channel number is added to select EZ Scan. 3. Operation Channel Menu Options Memorizing...

Operating Guide
Page 17
... then use D / E button to select the Channel menu. 2. Favorite Channel lets you quickly tune in -between channels. To set the desired channel number for the TV to select the first favorite channel position. 4. D E FG OK MENU Â EXIT 1. Use the F / G button to select Favorite ch.. 3. Press the MENU button and then... appear on the screen one-by-one. 17 Repeat steps 3 to 4 to a favorite channel, press the FCR (Favorite Channel Review) button repeatedly. Channel EZ Scan Manual prog. Favorite ch.
... then use D / E button to select the Channel menu. 2. Favorite Channel lets you quickly tune in -between channels. To set the desired channel number for the TV to select the first favorite channel position. 4. D E FG OK MENU Â EXIT 1. Use the F / G button to select Favorite ch.. 3. Press the MENU button and then... appear on the screen one-by-one. 17 Repeat steps 3 to 4 to a favorite channel, press the FCR (Favorite Channel Review) button repeatedly. Channel EZ Scan Manual prog. Favorite ch.

Operating Guide
Page 18
... formats; 16:9, Zoom, 4:3. Manual Picture Control (User option) - Use the F / G button to make appropriate adjustments. • Contrast, Brightness, Color, and Sharpness are preset for good picture quality at the factory and cannot be cut off. • 4:3 Standard TV format. Picture EZ Video 1.... brightness, color, sharpness and tint to save . NOTES Zoom is not available in 16:9 Widescreen mode. Press the ENTER button to the levels you prefer. 1. Sets up the TV for the best picture appearance for the best picture appearance. 1. Operation Picture Menu Options EZ ...
... formats; 16:9, Zoom, 4:3. Manual Picture Control (User option) - Use the F / G button to make appropriate adjustments. • Contrast, Brightness, Color, and Sharpness are preset for good picture quality at the factory and cannot be cut off. • 4:3 Standard TV format. Picture EZ Video 1.... brightness, color, sharpness and tint to save . NOTES Zoom is not available in 16:9 Widescreen mode. Press the ENTER button to the levels you prefer. 1. Sets up the TV for the best picture appearance for the best picture appearance. 1. Operation Picture Menu Options EZ ...

Operating Guide
Page 21
...Time), C.S.T. (Central Standard Time), M.S.T. (Mountain Standard Time), P.S.T. (Pacific Standard Time), Alaska, and Hawaii. 5. Press the MENU button and then use D / E button to select Manual. 4. Press the G button and then use D / E button to save . Press the ENTER button to select the Timer menu. 2. Auto D E FG OK MENU F G...Manual Auto Clock Time zone Auto PBS Ch. Press the G button and then use D / E button to select the time zone for the correct time and daylight savings time. Press the ENTER button to select Clock. 3. If the time on whether or not your local PBS TV...
...Time), C.S.T. (Central Standard Time), M.S.T. (Mountain Standard Time), P.S.T. (Pacific Standard Time), Alaska, and Hawaii. 5. Press the MENU button and then use D / E button to select Manual. 4. Press the G button and then use D / E button to save . Press the ENTER button to select the Timer menu. 2. Auto D E FG OK MENU F G...Manual Auto Clock Time zone Auto PBS Ch. Press the G button and then use D / E button to select the time zone for the correct time and daylight savings time. Press the ENTER button to select Clock. 3. If the time on whether or not your local PBS TV...

Operating Guide
Page 31
...To select OSD (On Screen Display) mute on /off, remote control lock is on /off Acknowledgement [l][ ][Set ID][ ][OK][Data][x] 13. Refer User's Manual Acknowledgement [c][ ][Set ID][ ][OK][Data][x] 17. Acknowledgement [j][ ][Set ID][ ][OK][Data][x] 11. Transmission [k][k][ ][Set ID][ ][Data][Cr] Data Min:...][Cr] Data 0: OSD mute on the monitor, use this mode. Key Lock (Command:m) G To lock the remote control and the front panel controls on the TV. Acknowledgement [k][ ][Set ID][ ][OK][Data][x] 12. Tint (Command:j) G To adjust the screen tint. Tune Command (Command:m a) G...
...To select OSD (On Screen Display) mute on /off, remote control lock is on /off Acknowledgement [l][ ][Set ID][ ][OK][Data][x] 13. Refer User's Manual Acknowledgement [c][ ][Set ID][ ][OK][Data][x] 17. Acknowledgement [j][ ][Set ID][ ][OK][Data][x] 11. Transmission [k][k][ ][Set ID][ ][Data][Cr] Data Min:...][Cr] Data 0: OSD mute on the monitor, use this mode. Key Lock (Command:m) G To lock the remote control and the front panel controls on the TV. Acknowledgement [k][ ][Set ID][ ][OK][Data][x] 12. Tint (Command:j) G To adjust the screen tint. Tune Command (Command:m a) G...


