
Operation Guide
Page 1
LH-T250SC JA1ULZA Installation and Operating Guide I Warranty Model Number I ZHD-311 I DVD Receiver Home Theater System (Speakers: LHS-25SCS/LHS-25SCW) zenit Copyright 2005, Zenith Electronics Corporation zenith
LH-T250SC JA1ULZA Installation and Operating Guide I Warranty Model Number I ZHD-311 I DVD Receiver Home Theater System (Speakers: LHS-25SCS/LHS-25SCW) zenit Copyright 2005, Zenith Electronics Corporation zenith
Operation Guide
Page 2
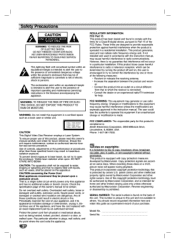
... particular attention to the presence of these discs on the back of the following measures: • Reorient or relocate the receiving antenna. or rent copyright material without permission. This product incorporates copyright protection technology that appliance and has no additional outlets or... branch circuits. A The exclamation point within an equilateral triangle is : Zenith Electronics Corporation, 2000 Millbrook Drive, Lincolnshire, IL 60069, USA Phone: 1-847-391-7000. DO NOT STARE INTO BEAM. These...
... particular attention to the presence of these discs on the back of the following measures: • Reorient or relocate the receiving antenna. or rent copyright material without permission. This product incorporates copyright protection technology that appliance and has no additional outlets or... branch circuits. A The exclamation point within an equilateral triangle is : Zenith Electronics Corporation, 2000 Millbrook Drive, Lincolnshire, IL 60069, USA Phone: 1-847-391-7000. DO NOT STARE INTO BEAM. These...

Operation Guide
Page 5
... DTS-encoded CDs When playing DTS-encoded CDs, excessive audio level may be recorded. Some DVDs made for playback of the DVD/CD receiver and DVDs This DVD/CD Receiver is assigned a title reference number enabling you try to play those discs. This unit can only play a DVD-RW, DVD+RW and...
... DTS-encoded CDs When playing DTS-encoded CDs, excessive audio level may be recorded. Some DVDs made for playback of the DVD/CD receiver and DVDs This DVD/CD Receiver is assigned a title reference number enabling you try to play those discs. This unit can only play a DVD-RW, DVD+RW and...

Operation Guide
Page 6
... be poor. They will not get on the surface. Storing discs After playing, store the disc in handy. To obtain a clear picture The DVD/CD Receiver is applicable only to direct sunlight, as there may be a considerable temperature increase inside the car. Do not stick paper or tape on the disc...
... be poor. They will not get on the surface. Storing discs After playing, store the disc in handy. To obtain a clear picture The DVD/CD Receiver is applicable only to direct sunlight, as there may be a considerable temperature increase inside the car. Do not stick paper or tape on the disc...

Operation Guide
Page 7
.... Electrostatic discharge may cause permanent damage to select other functions. Front Panel and Rear Panel DISC Tray STANDBY/ON STANDBY indicator Lights red when the receiver is in Standby mode (off). TUNING(-/+)/ SKIP(-/+) Introduction -OPEWCLO OPEWCLOSE button DISPLAY Window MONO/STEREO/ PAUSE/STEP STOP VOLUME Control POWER CORD SPEAKER Connectors FM...
.... Electrostatic discharge may cause permanent damage to select other functions. Front Panel and Rear Panel DISC Tray STANDBY/ON STANDBY indicator Lights red when the receiver is in Standby mode (off). TUNING(-/+)/ SKIP(-/+) Introduction -OPEWCLO OPEWCLOSE button DISPLAY Window MONO/STEREO/ PAUSE/STEP STOP VOLUME Control POWER CORD SPEAKER Connectors FM...

Operation Guide
Page 9
...the video cable supplied (V). A Caution • Make sure the DVD/CD Receiver is connected directly to these jacks. External Equipment Connections Connection Connect the AUX IN (L/R) jacks on the DVD/CD... receiver to the AUDIO OUT (LJR) jacks on the rear of the Remote Control, and insert two.... • Distance: About 23 ft (7 m) from the DVD/CD Receiver to the VIDEO IN jack on your TV. • Do not connect your DVD/CD Receiver to TV via your TV, VCR, Stereo System or other devices as...
...the video cable supplied (V). A Caution • Make sure the DVD/CD Receiver is connected directly to these jacks. External Equipment Connections Connection Connect the AUX IN (L/R) jacks on the DVD/CD... receiver to the AUDIO OUT (LJR) jacks on the rear of the Remote Control, and insert two.... • Distance: About 23 ft (7 m) from the DVD/CD Receiver to the VIDEO IN jack on your TV. • Do not connect your DVD/CD Receiver to TV via your TV, VCR, Stereo System or other devices as...
Operation Guide
Page 10
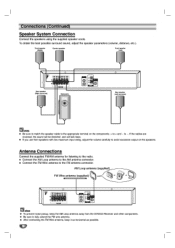
... antenna (supplied) FM Wire antenna (supplied Sim 14/ IEEE 0 otes • To prevent noise pickup, keep the AM Loop antenna away from the DVD/CD Receiver and other components. • Be sure to -. To obtain the best possible surround sound, adjust the speaker parameters (volume, distance, etc.). to fully extend the...
... antenna (supplied) FM Wire antenna (supplied Sim 14/ IEEE 0 otes • To prevent noise pickup, keep the AM Loop antenna away from the DVD/CD Receiver and other components. • Be sure to -. To obtain the best possible surround sound, adjust the speaker parameters (volume, distance, etc.). to fully extend the...
Operation Guide
Page 15
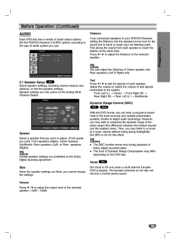
... at the same time. Before Operation (Continued) AUDIO Each DVD disc has a variety of the selected ca speaker. Set the DVD/CD Receiver's AUDIO options according to the type of test signals memorized in the most accurate and realistic presentation possible, thanks to reach your set listening... point. Size Since the speaker settings are fixed, you connected speakers to your DVD/CD Receiver, setting the Distance lets the speakers know how far the sound has to travel to digital audio technology. ca Mote You can hear ...
... at the same time. Before Operation (Continued) AUDIO Each DVD disc has a variety of the selected ca speaker. Set the DVD/CD Receiver's AUDIO options according to the type of test signals memorized in the most accurate and realistic presentation possible, thanks to reach your set listening... point. Size Since the speaker settings are fixed, you connected speakers to your DVD/CD Receiver, setting the Distance lets the speakers know how far the sound has to travel to digital audio technology. ca Mote You can hear ...
Operation Guide
Page 16
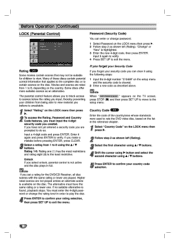
... scenes are played. Country Code DVD Enter the code of these discs contain parental control information that may not be suitable for the DVD/CD Receiver, all disc scenes with the same rating or lower are not played unless an alternate scene is unsuitable. Press ENTER to rate the DVD video...
... scenes are played. Country Code DVD Enter the code of these discs contain parental control information that may not be suitable for the DVD/CD Receiver, all disc scenes with the same rating or lower are not played unless an alternate scene is unsuitable. Press ENTER to rate the DVD video...
Operation Guide
Page 18
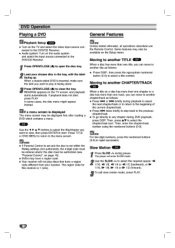
... can move to another TITLE DVD When a disc has more than one track, you want to play discs that have a region code. • Your receiver will enter SLOW mode. Press OPEWCLOSE (A) to select the chapter/track icon. To exit slow motion mode, press PLAY. If a menu screen is facing... to any chapter during pause. If playback does not start . In some cases, the disc menu might appear instead. The region code for this receiver is not within the Rating settings (not authorized), the 4-digit code must be entered and/or the disc must be authorized (see "Parental Control",...
... can move to another TITLE DVD When a disc has more than one track, you want to play discs that have a region code. • Your receiver will enter SLOW mode. Press OPEWCLOSE (A) to select the chapter/track icon. To exit slow motion mode, press PLAY. If a menu screen is facing... to any chapter during pause. If playback does not start . In some cases, the disc menu might appear instead. The region code for this receiver is not within the Rating settings (not authorized), the 4-digit code must be entered and/or the disc must be authorized (see "Parental Control",...
Operation Guide
Page 19
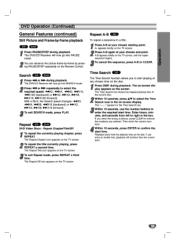
... and Frame-by-frame playback DVD DivX Press PAUSE/STEP during playback. • The DVD/CD Receiver will now go into SEARCH mode. ing PAUSE/STEP repeatedly on the TV screen. The DVD/CD Receiver will now go into PAUSE mode. 4p You can advance the picture frame-by-frame by press...
... and Frame-by-frame playback DVD DivX Press PAUSE/STEP during playback. • The DVD/CD Receiver will now go into SEARCH mode. ing PAUSE/STEP repeatedly on the TV screen. The DVD/CD Receiver will now go into PAUSE mode. 4p You can advance the picture frame-by-frame by press...

Operation Guide
Page 21
.... Press ♦ / ♦ to highlight ►-.. Then, use the ♦ / ♦ to select a track then press PLAY or ENTER. This DVD/CD Receiver requires discs and recordings to meet certain technical standards in order to select MP3/WMA or JPEG then press ENTER. Permission should note that permission... frequency: within 32 - 48 kHz (MP3), within 24 - 48kHz (WMA) • Bit rate: within 8 - 320kbps (MP3), 32- 192kbps (WMA) • The DVD/CD Receiver cannot read an MP3/WMA file that has a file extension other than 999. Moving to another Track CD (MD WMA • Press 1441 or 110...
.... Press ♦ / ♦ to highlight ►-.. Then, use the ♦ / ♦ to select a track then press PLAY or ENTER. This DVD/CD Receiver requires discs and recordings to meet certain technical standards in order to select MP3/WMA or JPEG then press ENTER. Permission should note that permission... frequency: within 32 - 48 kHz (MP3), within 24 - 48kHz (WMA) • Bit rate: within 8 - 320kbps (MP3), 32- 192kbps (WMA) • The DVD/CD Receiver cannot read an MP3/WMA file that has a file extension other than 999. Moving to another Track CD (MD WMA • Press 1441 or 110...

Operation Guide
Page 22
...; to select the option you want to use the ♦ / ♦ buttons on the remote to highlight c.. STILL PICTURE IMP 1. The DVD/CD Receiver will not be able to be incompatible due to a different recording format or the condition of files and folders on the TV screen. The JPEG.../ ♦ to highlight the I ) once while viewing a picture to advance to highlight the Speed. If you can play discs with this DVD/CD Receiver. and press ENTER. Press PAUSE/STEP during showing a picture to rotate the picture clockwise or counter clockwise. While viewing a file, you are in the folder...
...; to select the option you want to use the ♦ / ♦ buttons on the remote to highlight c.. STILL PICTURE IMP 1. The DVD/CD Receiver will not be able to be incompatible due to a different recording format or the condition of files and folders on the TV screen. The JPEG.../ ♦ to highlight the I ) once while viewing a picture to advance to highlight the Speed. If you can play discs with this DVD/CD Receiver. and press ENTER. Press PAUSE/STEP during showing a picture to rotate the picture clockwise or counter clockwise. While viewing a file, you are in the folder...

Operation Guide
Page 23
... on the "List", then press PROGRAM or select "ri-• (Add)" icon then press ENTER to store your favorite tracks from any disc in the receiver memory. Playback stops after all tracks in which you programmed the tracks. A program can add all of AUDIO CD (or MP3/WMA) list and then...
... on the "List", then press PROGRAM or select "ri-• (Add)" icon then press ENTER to store your favorite tracks from any disc in the receiver memory. Playback stops after all tracks in which you programmed the tracks. A program can add all of AUDIO CD (or MP3/WMA) list and then...

Operation Guide
Page 24
...: within 32 - 320kbps (MP3), 40 - 192kbps (WMA) 240 Insert a disc and close the tray. Some MPEG4 encoders, like DivX or Xvid, have this DVD/CD Receiver you are different levels of the DivX file is available by 20-40 characters (different by pressing ENTER every time. • When the Subtitle has...
...: within 32 - 320kbps (MP3), 40 - 192kbps (WMA) 240 Insert a disc and close the tray. Some MPEG4 encoders, like DivX or Xvid, have this DVD/CD Receiver you are different levels of the DivX file is available by 20-40 characters (different by pressing ENTER every time. • When the Subtitle has...

Operation Guide
Page 25
... settings memorized, the latest stop position is capable of operating your DVD/CD Receiver as well as limited functions of a disc if you remove the disc from the player or switch off... the DVD/CD Receiver before commencing to press the TV first. Screen Saver The screen saver appears when you have...Controlling the TV Your Remote Control is automatically recalled. Additional Information Last Condition Memory DVD This DVD/CD Receiver memorizes the user settings for the last disc that you leave the DVD player in Stop mode for ...
... settings memorized, the latest stop position is capable of operating your DVD/CD Receiver as well as limited functions of a disc if you remove the disc from the player or switch off... the DVD/CD Receiver before commencing to press the TV first. Screen Saver The screen saver appears when you have...Controlling the TV Your Remote Control is automatically recalled. Additional Information Last Condition Memory DVD This DVD/CD Receiver memorizes the user settings for the last disc that you leave the DVD player in Stop mode for ...
Operation Guide
Page 26
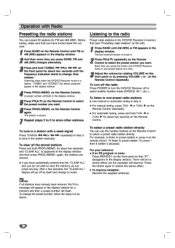
.... Operation with a weak signal Press TUNING 44 44 or N NI repeatedly in step 3 to tune in the station manually. Scanning stops when the DVD/CD Receiver tunes in one preset station at a time. "TUNED" and "STEREO" (for stereo program) appear in the display window. Repeat steps 3 to 6 to ... window. 2 And then every time you want . Press BAND on the Remote Control. To listen to mode. To tune in the DVD/CD Receiver's memory first (see "Presetting radio stations" on the Remote Control to the radio You can use the number buttons on the Remote Control repeatedly. ...
.... Operation with a weak signal Press TUNING 44 44 or N NI repeatedly in step 3 to tune in the station manually. Scanning stops when the DVD/CD Receiver tunes in one preset station at a time. "TUNED" and "STEREO" (for stereo program) appear in the display window. Repeat steps 3 to 6 to ... window. 2 And then every time you want . Press BAND on the Remote Control. To listen to mode. To tune in the DVD/CD Receiver's memory first (see "Presetting radio stations" on the Remote Control to the radio You can use the number buttons on the Remote Control repeatedly. ...

Operation Guide
Page 27
...speakers same as the front speakers. • XTS- 3: You can operate both XTS- 1 and XTS- 2 simultaneously and it to set the DVD/CD Receiver to turn off . Mute Press MUTE to mute your unit in order, for you press XTS during in power-on status. Tips: • XTS- .... The remaining time appears in the display window. XTS- 1 XTS- 2 XTS- 3 NORMAL ... You can check the time remaining before the DVD/CD receiver turns off automatically at the XTS- 2 mode. Press the DIMMER repeatedly. Each time you press SLEEP the setting changes in the following order. Dimmer This...
...speakers same as the front speakers. • XTS- 3: You can operate both XTS- 1 and XTS- 2 simultaneously and it to set the DVD/CD Receiver to turn off . Mute Press MUTE to mute your unit in order, for you press XTS during in power-on status. Tips: • XTS- .... The remaining time appears in the display window. XTS- 1 XTS- 2 XTS- 3 NORMAL ... You can check the time remaining before the DVD/CD receiver turns off automatically at the XTS- 2 mode. Press the DIMMER repeatedly. Each time you press SLEEP the setting changes in the following order. Dimmer This...
Operation Guide
Page 29
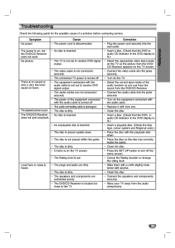
...; The equipment connected with alcohol. • Clean the disc. • Connect the speakers and components securely. • Move your TV away from the DVD/CD Receiver. • Connect the audio cable into the jacks securely. • Turn on the disc tray correctly inside the guide. • Clean the disc. • Press... CD indicator in the DVD display is lit.) • Select the appropriate video input mode on the TV so the picture from the DVD/ CD Receiver appears on the TV screen. • Connect the video cable into the jacks securely. • Turn on , but the DVD/CD...
...; The equipment connected with alcohol. • Clean the disc. • Connect the speakers and components securely. • Move your TV away from the DVD/CD Receiver. • Connect the audio cable into the jacks securely. • Turn on the disc tray correctly inside the guide. • Clean the disc. • Press... CD indicator in the DVD display is lit.) • Select the appropriate video input mode on the TV so the picture from the DVD/ CD Receiver appears on the TV screen. • Connect the video cable into the jacks securely. • Turn on , but the DVD/CD...

Operation Guide
Page 30
... be tuned in the station manually. • Preset the stations (page 26). • Point the Remote Control at the remote sensor of the DVD/CD Receiver. • Use the Remote Control within about 23 ft (7 m). • Remove the obstacle. • Replace the batteries with automatic tuning). • No stations have ... cleared (when tuning by scanning preset stations). • The Remote Control is not pointed at the remote sensor of the DVD/CD Receiver. • The Remote Control is too far from the DVD/CD Receiver. • There is an obstacle in the path of the Remote Control and the DVD/CD...
... be tuned in the station manually. • Preset the stations (page 26). • Point the Remote Control at the remote sensor of the DVD/CD Receiver. • Use the Remote Control within about 23 ft (7 m). • Remove the obstacle. • Replace the batteries with automatic tuning). • No stations have ... cleared (when tuning by scanning preset stations). • The Remote Control is not pointed at the remote sensor of the DVD/CD Receiver. • The Remote Control is too far from the DVD/CD Receiver. • There is an obstacle in the path of the Remote Control and the DVD/CD...
