

User Guide
Page 12
... used to operate at 115V or 230V. To verify that your system has the correct setting for your location before turning on the system back panel can be damaged. Make sure this switch is integrated into the system to provide power to the correct voltage position.
... used to operate at 115V or 230V. To verify that your system has the correct setting for your location before turning on the system back panel can be damaged. Make sure this switch is integrated into the system to provide power to the correct voltage position.

User Guide
Page 14
Turn on the front panel of your computer. 3. Turning the Computer On and Off Follow the instructions below to shut down the system. 4. In this case, the "Microsoft Windows Startup ...
Turn on the front panel of your computer. 3. Turning the Computer On and Off Follow the instructions below to shut down the system. 4. In this case, the "Microsoft Windows Startup ...
User Guide
Page 19
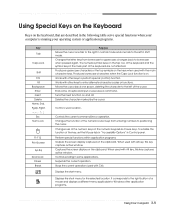
..., deleting the character to enter alternate character codes or functions. When used with other keys to the left in Shift mode. Controls scrolling in Control panel. Using Special Keys on the Keyboard Keys on the keyboard, that are not affected. The numeric/symbol keys on the clipboard. Works with Ctrl). Changes...
..., deleting the character to enter alternate character codes or functions. When used with other keys to the left in Shift mode. Controls scrolling in Control panel. Using Special Keys on the Keyboard Keys on the keyboard, that are not affected. The numeric/symbol keys on the clipboard. Works with Ctrl). Changes...

User Guide
Page 20
... enabled, the corresponding light in the Mouse section of your keyboard may differ from right-handed to turn on the numeric keypad of the Control Panel. If you are left-handed, you can change mouse button configurations in the upper right corner of the Control... Panel. press the key once to left-handed. Double click ( ) : Quickly press and release the left mouse button twice. Click with the right mouse button ( ) : Press ...
... enabled, the corresponding light in the Mouse section of your keyboard may differ from right-handed to turn on the numeric keypad of the Control Panel. If you are left-handed, you can change mouse button configurations in the upper right corner of the Control... Panel. press the key once to left-handed. Double click ( ) : Quickly press and release the left mouse button twice. Click with the right mouse button ( ) : Press ...

User Guide
Page 21
... steps: 1. Click the OK button. To control the volume by using the Master Volume window, follow these steps: 1. Using Your Computer 3-7 Click Start, click Control Panel, click Appearance and Themes, and then click Display. Click the Close button. Or click the right mouse button on the empty desktop area and click...
... steps: 1. Click the OK button. To control the volume by using the Master Volume window, follow these steps: 1. Using Your Computer 3-7 Click Start, click Control Panel, click Appearance and Themes, and then click Display. Click the Close button. Or click the right mouse button on the empty desktop area and click...

User Guide
Page 23
... the electrical outlet and from any telecommunications links, networks, or modems before performing any cables connected to access its power source and from the back panel. Then disconnect any of your computer.
... the electrical outlet and from any telecommunications links, networks, or modems before performing any cables connected to access its power source and from the back panel. Then disconnect any of your computer.

User Guide
Page 24
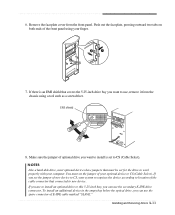
To open the system cover, remove two screws on the back panel of your system every time you touch a component. 4-2 Installing and Removing Drives NOTE Be sure to free it from the system and lift it off until can be removed completely. Slide the cover toward the rear to ground yourself by touching your computer. 4. If you are not properly grounded, you could generate an electric shock when you remove the cover. Set the cover aside. 3.
To open the system cover, remove two screws on the back panel of your system every time you touch a component. 4-2 Installing and Removing Drives NOTE Be sure to free it from the system and lift it off until can be removed completely. Slide the cover toward the rear to ground yourself by touching your computer. 4. If you are not properly grounded, you could generate an electric shock when you remove the cover. Set the cover aside. 3.

User Guide
Page 32
And then slide the optical drive from the chassis by pulling the front panel. Remove the front panel from the system. 5. NOTES Be careful, not to split the power and LED cables from the chassis, you have to carefully apart the cover not to bent or break the front panel. 4. Remove the screws securing the optical drive. When you remove the front panel from the front panel. 4-10 Installing and Removing Drives
And then slide the optical drive from the chassis by pulling the front panel. Remove the front panel from the system. 5. NOTES Be careful, not to split the power and LED cables from the chassis, you have to carefully apart the cover not to bent or break the front panel. 4. Remove the screws securing the optical drive. When you remove the front panel from the front panel. 4-10 Installing and Removing Drives
User Guide
Page 33
... connector that covers the 5.25-inch drive bay you want to CS (Cable Select). You must be set to use, remove it from the front panel. If you are to install an optional drive to work properly with your finger. 7. 6. If you set the jumper of your system recognizes the ... optional device to new device. EMI shield 8. NOTES Like a hard disk drive, most optional devices have jumpers that must set the jumper of the front panel using a tool such as a screwdriver. To install an additional device in the empty bay below the optical drive, you can use the secondary E-IDE drive...
... connector that covers the 5.25-inch drive bay you want to CS (Cable Select). You must be set to use, remove it from the front panel. If you are to install an optional drive to work properly with your finger. 7. 6. If you set the jumper of your system recognizes the ... optional device to new device. EMI shield 8. NOTES Like a hard disk drive, most optional devices have jumpers that must set the jumper of the front panel using a tool such as a screwdriver. To install an additional device in the empty bay below the optical drive, you can use the secondary E-IDE drive...
User Guide
Page 34
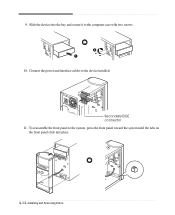
To reassemble the front panel to the system, press the front panel toward the system until the tabs on the front panel click into the bay and secure it to the device installed. 9. Secondary EIDE connector 11. Slide the device into place. 4-12 Installing and Removing Drives Connect the power and interface cables to the computer case with two screws. 10.
To reassemble the front panel to the system, press the front panel toward the system until the tabs on the front panel click into the bay and secure it to the device installed. 9. Secondary EIDE connector 11. Slide the device into place. 4-12 Installing and Removing Drives Connect the power and interface cables to the computer case with two screws. 10.

User Guide
Page 42
... the PowerDVD Add bookmark button Next subtitle button Show/Hide button Next audio stream button Next angle button Karaoke button Increase volume button Status display panel Video position slider Mute button Decrease volume button Capture frame button Go-up button Repeat button Menu button Go to bookmark button This button is...
... the PowerDVD Add bookmark button Next subtitle button Show/Hide button Next audio stream button Next angle button Karaoke button Increase volume button Status display panel Video position slider Mute button Decrease volume button Capture frame button Go-up button Repeat button Menu button Go to bookmark button This button is...

User Guide
Page 45
... and Support.) Display & Monitor Cause The monitor doesn't work How do I change the display resolution and color depth, follow these steps: 1. Click Start, click Control Panel, click Appearance and Themes, and then click Display. When the Display Properties window appears, click the Settings tab. 3. To open Windows Help, click the Start...
... and Support.) Display & Monitor Cause The monitor doesn't work How do I change the display resolution and color depth, follow these steps: 1. Click Start, click Control Panel, click Appearance and Themes, and then click Display. When the Display Properties window appears, click the Settings tab. 3. To open Windows Help, click the Start...

User Guide
Page 48
... lecteur CD-ROM est invisible à l'ceil nu. Caution The laser used in the CD-ROM drive can damage your eyes close to the font panel opening door and other than those specified herein may result in order to avoid EXPOSURE TO INVISIBLE LASER RADIATION.
... lecteur CD-ROM est invisible à l'ceil nu. Caution The laser used in the CD-ROM drive can damage your eyes close to the font panel opening door and other than those specified herein may result in order to avoid EXPOSURE TO INVISIBLE LASER RADIATION.


