

User Guide
Page 1
To ensure reliableoperation of your dealer or local power company. Don't use liquid cleaners or aerosol cleaners. Objects may fall, causing seriousdamage to the product. 4 Slots and openings in a builtin installation unless proper ventilation is provided. 5 Never push objects of any kind on the product. 6 This computer should only be placed in the cabinet and the back have to use an extension cord with a 3-wire grounding type plug, a plug having a third (grounding) pin. Never spill liquid of any kind into it from the main electrical power outlet before cleaning. Only connect ...
To ensure reliableoperation of your dealer or local power company. Don't use liquid cleaners or aerosol cleaners. Objects may fall, causing seriousdamage to the product. 4 Slots and openings in a builtin installation unless proper ventilation is provided. 5 Never push objects of any kind on the product. 6 This computer should only be placed in the cabinet and the back have to use an extension cord with a 3-wire grounding type plug, a plug having a third (grounding) pin. Never spill liquid of any kind into it from the main electrical power outlet before cleaning. Only connect ...

User Guide
Page 2
Unplug this product from the main power outlet and call for service under any of other controls may require extensive repair work to restore to remove the main system unit cover, observe the following conditions: 1 If the power cord or plug is plugged back in. (Apres le couvercle a enleve, visse le couvercle en place et remettre le cordon d'alimentation.) ii Improper adjustment of the following precautions: 1 The power supply cord must be unplugged before the main system unit cover is removed. (Separe le cordon d'alimentation et puis enleve le couvercle.) 2 Once removed, the cover ...
Unplug this product from the main power outlet and call for service under any of other controls may require extensive repair work to restore to remove the main system unit cover, observe the following conditions: 1 If the power cord or plug is plugged back in. (Apres le couvercle a enleve, visse le couvercle en place et remettre le cordon d'alimentation.) ii Improper adjustment of the following precautions: 1 The power supply cord must be unplugged before the main system unit cover is removed. (Separe le cordon d'alimentation et puis enleve le couvercle.) 2 Once removed, the cover ...

User Guide
Page 5
nor for technical or editorial errors or omissions contained herein; eMachines, Inc. All rights reserved. eMachines, stylized "e" and figure logo are trademarks of eMachines, Inc. NOTE Depending on the model, your computer's components may vary and look slightly different than those pictured. ... the United States and/or other product and brand names are either trademarks or registered trademarks of their respective owners. ©2003 eMachines, Inc. shall not be liable for incidental or consequential damages resulting from the furnishing, performance, or use of this user's guide...
nor for technical or editorial errors or omissions contained herein; eMachines, Inc. All rights reserved. eMachines, stylized "e" and figure logo are trademarks of eMachines, Inc. NOTE Depending on the model, your computer's components may vary and look slightly different than those pictured. ... the United States and/or other product and brand names are either trademarks or registered trademarks of their respective owners. ©2003 eMachines, Inc. shall not be liable for incidental or consequential damages resulting from the furnishing, performance, or use of this user's guide...

User Guide
Page 7
CONTENTS Chapter 1 Chapter 2 Chapter 3 Introduction System Overview...1-1 Setting Up Your System 1. Selecting a Location 2-1 2. Turning the Computer On and Off 2-4 Turning On the Computer 2-4 Turning Off the Computer 2-4 Using Your Computer Using an Optional Floppy Disk Drive 3-1 Using an Optional Media Reader 3-2 Inserting the Media 3-2 Removing the Media 3-3 Using an Optical Drive 3-4 Using Special Keys on the Keyboard 3-5 Using a Mouse ...3-6 Changing the Display Resolution and Color Depth 3-7 Controlling the Audio Volume 3-7 vii Checking the Voltage Selection 2-2 3. ...
CONTENTS Chapter 1 Chapter 2 Chapter 3 Introduction System Overview...1-1 Setting Up Your System 1. Selecting a Location 2-1 2. Turning the Computer On and Off 2-4 Turning On the Computer 2-4 Turning Off the Computer 2-4 Using Your Computer Using an Optional Floppy Disk Drive 3-1 Using an Optional Media Reader 3-2 Inserting the Media 3-2 Removing the Media 3-3 Using an Optical Drive 3-4 Using Special Keys on the Keyboard 3-5 Using a Mouse ...3-6 Changing the Display Resolution and Color Depth 3-7 Controlling the Audio Volume 3-7 vii Checking the Voltage Selection 2-2 3. ...

User Guide
Page 8
Approval Statements Battery Warning Instruction B-1 Fuse Warning Instruction B-1 Laser Product ...B-2 viii Solving Common Problems Power ...A-1 Hard Disk Drive ...A-1 Optical Drive ...A-2 Audio ...A-2 Floppy Disk Drive A-3 Display & Monitor A-3 Keyboard ...A-4 Mouse ...A-4 Appendix B. Chapter 4 Installing and Removing Drives Removing the Cover 4-1 Replacing the Cover 4-3 Installing an Expansion Card 4-4 Installing an Additional Hard Disk Drive 4-6 Installing the 5.25-inch Device in the Peripheral Bay 4-9 Chapter 5 Using the Restore CDs Restoring Your Original Software 5-1...
Approval Statements Battery Warning Instruction B-1 Fuse Warning Instruction B-1 Laser Product ...B-2 viii Solving Common Problems Power ...A-1 Hard Disk Drive ...A-1 Optical Drive ...A-2 Audio ...A-2 Floppy Disk Drive A-3 Display & Monitor A-3 Keyboard ...A-4 Mouse ...A-4 Appendix B. Chapter 4 Installing and Removing Drives Removing the Cover 4-1 Replacing the Cover 4-3 Installing an Expansion Card 4-4 Installing an Additional Hard Disk Drive 4-6 Installing the 5.25-inch Device in the Peripheral Bay 4-9 Chapter 5 Using the Restore CDs Restoring Your Original Software 5-1...

User Guide
Page 9
Introduction 1-1 Introduction System Overview Optical drive Optical drive (optional) USB connector (optional) Power button Emergency eject hole Load/Eject button Floppy disk drive(optional) Media reader slots(optional) Power indicator Hard disk drive access indicator IEEE 1394 connectors (optional) USB 2.0 connectors (optional) Headphone jack Microphone jack USB 2.0 connectors (optional) NOTE Chapter 1 Your optical drives may differ from the illustrations described in this user's guide.
Introduction 1-1 Introduction System Overview Optical drive Optical drive (optional) USB connector (optional) Power button Emergency eject hole Load/Eject button Floppy disk drive(optional) Media reader slots(optional) Power indicator Hard disk drive access indicator IEEE 1394 connectors (optional) USB 2.0 connectors (optional) Headphone jack Microphone jack USB 2.0 connectors (optional) NOTE Chapter 1 Your optical drives may differ from the illustrations described in this user's guide.

User Guide
Page 10
Blank 1-2 Introduction
Blank 1-2 Introduction

User Guide
Page 11
Just follow the steps in temperature, humidity, dust, and smoke. Good air circulation. Avoid direct sunlight or any other peripheral devices. Do not place your system too close to three-hole, grounded outlets. Appropriate power sources. Setting Up Your System 2-1 A flat and hard surface. Soft surfaces like beds and carpeted floors attract static electricity, which generates an electromagnetic field. To prevent static charges, connect all of its components. Leave several inches of space around the computer so air can erase data on /off your computer from extremes in ...
Just follow the steps in temperature, humidity, dust, and smoke. Good air circulation. Avoid direct sunlight or any other peripheral devices. Do not place your system too close to three-hole, grounded outlets. Appropriate power sources. Setting Up Your System 2-1 A flat and hard surface. Soft surfaces like beds and carpeted floors attract static electricity, which generates an electromagnetic field. To prevent static charges, connect all of its components. Leave several inches of space around the computer so air can erase data on /off your computer from extremes in ...

User Guide
Page 12
WARNING If you set the power supply to set the voltage selection switch incorrectly, your location before turning on the system back panel can be used to operate at 115V or 230V. To verify that your system has the correct setting for your system will be damaged. Make sure this switch is integrated into the system to provide power to the correct voltage position. Checking the Voltage Selection A power supply is set correctly for your computer. The power selection switch on your environment, check the voltage selection switch. Voltage selection switch 2-2 Setting Up Your ...
WARNING If you set the power supply to set the voltage selection switch incorrectly, your location before turning on the system back panel can be used to operate at 115V or 230V. To verify that your system has the correct setting for your system will be damaged. Make sure this switch is integrated into the system to provide power to the correct voltage position. Checking the Voltage Selection A power supply is set correctly for your computer. The power selection switch on your environment, check the voltage selection switch. Voltage selection switch 2-2 Setting Up Your ...

User Guide
Page 13
CAUTION For protection of your computer and other devices during a lightning storm, or when it is left unattended and unused for long periods of time, unplug the computer and other devices due to plug the power cord into the system before plugging it into the wall socket. WARNING To avoid generating an electric shock, be sure to lighting and power line surges. This will prevent damage to the computer and other devices from the wall outlet and disconnect the antenna or cable system. Setting Up Your System 2-3 Connecting Your Peripheral Devices To connect the peripheral devices, ...
CAUTION For protection of your computer and other devices during a lightning storm, or when it is left unattended and unused for long periods of time, unplug the computer and other devices due to plug the power cord into the system before plugging it into the wall socket. WARNING To avoid generating an electric shock, be sure to lighting and power line surges. This will prevent damage to the computer and other devices from the wall outlet and disconnect the antenna or cable system. Setting Up Your System 2-3 Connecting Your Peripheral Devices To connect the peripheral devices, ...

User Guide
Page 14
Turning the Computer On and Off Follow the instructions below to turn on your computer, follow these steps: 1. Before turning off your computer, follow these steps: 1. Turn off . Turning On the Computer To turn on the computer or to turn off your computer, save your computer is displayed, click Turn Off to your computer. 3. The system will appear. Turn on the front panel of your computer. 2. In this case, the "Microsoft Windows Startup Menu" menu will load Microsoft ® Windows ® . Click the Start button, and then click Turn Off Computer. 3. Press ...
Turning the Computer On and Off Follow the instructions below to turn on your computer, follow these steps: 1. Before turning off your computer, follow these steps: 1. Turn off . Turning On the Computer To turn on the computer or to turn off your computer, save your computer is displayed, click Turn Off to your computer. 3. The system will appear. Turn on the front panel of your computer. 2. In this case, the "Microsoft Windows Startup Menu" menu will load Microsoft ® Windows ® . Click the Start button, and then click Turn Off Computer. 3. Press ...

User Guide
Page 15
To install another operating system such as shown below. Using Your Computer 3-1 When the disk pops, remove it clicks into the drive, as OS/2 Warp or UNIX, see the manual that came with that you are using Windows® with already installed on your computer. The procedures in this manual assume that system for instructions on . Using an Optional Floppy Disk Drive To use your floppy disk drive, insert the diskette with the label facing up and the metal shutter leading into place. Also, remove all disks before you turn off the computer while a disk drive light is off the ...
To install another operating system such as shown below. Using Your Computer 3-1 When the disk pops, remove it clicks into the drive, as OS/2 Warp or UNIX, see the manual that came with that you are using Windows® with already installed on your computer. The procedures in this manual assume that system for instructions on . Using an Optional Floppy Disk Drive To use your floppy disk drive, insert the diskette with the label facing up and the metal shutter leading into place. Also, remove all disks before you turn off the computer while a disk drive light is off the ...
User Guide
Page 16
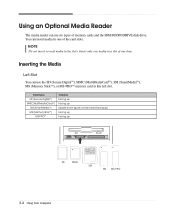
Card type SD (Secure DigitalTM) MMC(MultiMediaCardTM) SM (SmartMediaTM) MS (Memory StickTM) MS-PROTM Insertion Facing up Facing up Upside down (gold contact area facing up) Facing up Facing up SD MMC SM MS MS-PRO 3-2 Using Your Computer NOTE Do not insert several media in a slot at one time. Insert only one of memory cards and the IBM MICRODRIVE disk drive. Inserting the Media Left Slot You can use six types of the card slots. You can insert media in one media in the slots. Using an Optional Media Reader The media reader can use the SD (Secure DigitalTM), MMC (MultiMediaCardTM...
Card type SD (Secure DigitalTM) MMC(MultiMediaCardTM) SM (SmartMediaTM) MS (Memory StickTM) MS-PROTM Insertion Facing up Facing up Upside down (gold contact area facing up) Facing up Facing up SD MMC SM MS MS-PRO 3-2 Using Your Computer NOTE Do not insert several media in a slot at one time. Insert only one of memory cards and the IBM MICRODRIVE disk drive. Inserting the Media Left Slot You can use six types of the card slots. You can insert media in one media in the slots. Using an Optional Media Reader The media reader can use the SD (Secure DigitalTM), MMC (MultiMediaCardTM...

User Guide
Page 17
Card type CF (CompactFlashTM) MICRODRIVETM Insertion Facing up Facing up CF MICRODRIVE NOTE You can use the CF (CompactFlashTM) memory card or MICRODRIVETM disk drive in this right slot. Also, remove the media before you insert the media, the label of the Removable Disk drive may change to the title of the media, if your media has its title. You could lose data. NOTE Never remove the media or turn off the computer while a disk drive light is blinking. Using Your Computer 3-3 When you turn off the computer. Removing the Media To remove the media in My Computer. ...
Card type CF (CompactFlashTM) MICRODRIVETM Insertion Facing up Facing up CF MICRODRIVE NOTE You can use the CF (CompactFlashTM) memory card or MICRODRIVETM disk drive in this right slot. Also, remove the media before you insert the media, the label of the Removable Disk drive may change to the title of the media, if your media has its title. You could lose data. NOTE Never remove the media or turn off the computer while a disk drive light is blinking. Using Your Computer 3-3 When you turn off the computer. Removing the Media To remove the media in My Computer. ...

User Guide
Page 18
NOTES When your system. Your computer references the upper optical drive as D: and the lower optical drive (optional) as it will flash. Put the CD/DVD in the tray with the label side up. At this time, insert a fine rod such as an opened paper clip into the optical drive, first turn on your system is turned off ; Wait about 5 to 10 seconds after using CD or DVD, to open , carefully pull it . When the disc tray pops out, the busy indicator light will go. When the tray is slightly open the tray. CD/DVD When you press the eject button, immediately after pressing the eject ...
NOTES When your system. Your computer references the upper optical drive as D: and the lower optical drive (optional) as it will flash. Put the CD/DVD in the tray with the label side up. At this time, insert a fine rod such as an opened paper clip into the optical drive, first turn on your system is turned off ; Wait about 5 to 10 seconds after using CD or DVD, to open , carefully pull it . When the disc tray pops out, the busy indicator light will go. When the tray is slightly open the tray. CD/DVD When you press the eject button, immediately after pressing the eject ...
User Guide
Page 19
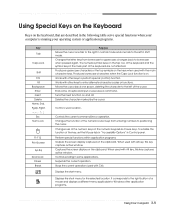
Deletes the character marked by the cursor. Changes the function of the numeric/cursor keys from lowercase to perform special (control) function. Controls scrolling in Control panel. Using Special Keys on the Keyboard Keys on the keyboard, that are not affected. Ends a line of a mouse and displays a different menu applicable to Windows other keys to uppercase; Controls the current command line or operation. Suspends the current operation. The numeric/symbol keys on the top row of the keyboard and the symbol keys in the main part of the key, set the Mouse tab in "...
Deletes the character marked by the cursor. Changes the function of the numeric/cursor keys from lowercase to perform special (control) function. Controls scrolling in Control panel. Using Special Keys on the Keyboard Keys on the keyboard, that are not affected. Ends a line of a mouse and displays a different menu applicable to Windows other keys to uppercase; Controls the current command line or operation. Suspends the current operation. The numeric/symbol keys on the top row of the keyboard and the symbol keys in the main part of the key, set the Mouse tab in "...

User Guide
Page 20
The numeric keys on a function and again to turn on the numeric keypad of your keyboard may differ from right-handed to turn it to move a mouse pointer. Double click ( ) : Quickly press and release the left mouse button, move it off. When using Microsoft® Windows®, you should set the Mouse tab in this user's guide. See "mouse, reversing buttons" in the Mouse section of the Control Panel. The Caps Lock, Num Lock, and Scroll Lock keys work as follows: Click ( ) : Press and release the left mouse button once. press the key once to left -handed, you can be used ...
The numeric keys on a function and again to turn on the numeric keypad of your keyboard may differ from right-handed to turn it to move a mouse pointer. Double click ( ) : Quickly press and release the left mouse button, move it off. When using Microsoft® Windows®, you should set the Mouse tab in this user's guide. See "mouse, reversing buttons" in the Mouse section of the Control Panel. The Caps Lock, Num Lock, and Scroll Lock keys work as follows: Click ( ) : Press and release the left mouse button once. press the key once to left -handed, you can be used ...

User Guide
Page 21
Click Start, click Control Panel, click Appearance and Themes, and then click Display. Click the OK button. To control the volume by using the Master Volume window, follow these steps: 1. Click the Close button. Click the Start button, point to All Programs, point to Accessories, point to adjust the audio volume level. 3. When the Display Properties window appears, click the Settings tab. 3. Controlling the Audio Volume You can control the audio volume level by using the volume control box or Master Volume window. Select the color depth from the Color quality area and the ...
Click Start, click Control Panel, click Appearance and Themes, and then click Display. Click the OK button. To control the volume by using the Master Volume window, follow these steps: 1. Click the Close button. Click the Start button, point to All Programs, point to Accessories, point to adjust the audio volume level. 3. When the Display Properties window appears, click the Settings tab. 3. Controlling the Audio Volume You can control the audio volume level by using the volume control box or Master Volume window. Select the color depth from the Color quality area and the ...

User Guide
Page 23
Then disconnect the computer from its internal components. Turn off the computer. First of all, disconnect the power cable from the electrical outlet and from any telecommunications links, networks, or modems before performing any cables connected to access its power source and from the back panel. NOTE Turn off the computer and peripheral devices including the monitor and printer. Removing the Cover You need to remove the cover of the procedures described in your system to the computer. Chapter 1 2. Then disconnect any of your computer. To remove the cover, follow ...
Then disconnect the computer from its internal components. Turn off the computer. First of all, disconnect the power cable from the electrical outlet and from any telecommunications links, networks, or modems before performing any cables connected to access its power source and from the back panel. NOTE Turn off the computer and peripheral devices including the monitor and printer. Removing the Cover You need to remove the cover of the procedures described in your system to the computer. Chapter 1 2. Then disconnect any of your computer. To remove the cover, follow ...

User Guide
Page 24
If you are not properly grounded, you could generate an electric shock when you remove the cover. NOTE Be sure to free it from the system and lift it off until can be removed completely. To open the system cover, remove two screws on the back panel of your system every time you touch a component. 4-2 Installing and Removing Drives Set the cover aside. 3. Slide the cover toward the rear to ground yourself by touching your computer. 4.
If you are not properly grounded, you could generate an electric shock when you remove the cover. NOTE Be sure to free it from the system and lift it off until can be removed completely. To open the system cover, remove two screws on the back panel of your system every time you touch a component. 4-2 Installing and Removing Drives Set the cover aside. 3. Slide the cover toward the rear to ground yourself by touching your computer. 4.