Amana NED4600YQ Support Question
Amana NED4600YQ Support Question
Find answers below for this question about Amana NED4600YQ.Need a Amana NED4600YQ manual? We have 3 online manuals for this item!
Question posted by jsmh9198 on June 10th, 2015
Why Is My Amana Ned4600yq1 Dryer Getting Too Hot?
After a few minutes drying the dryer starts smelling hot and it is really hot and is even getting the cord and plug in too hot to touch.
Current Answers
Answer #1: Posted by Autodiy on June 10th, 2015 1:26 AM
Autodiy

Member since:
May 23rd, 2014 Points: 815,136

Member since:
May 23rd, 2014 Points: 815,136
The 6 most common part(s) or condition(s) which cause the symptom Dryer is too hot are listed on the link below.
Www.autodiy.co.za
Related Amana NED4600YQ Manual Pages
Use and Care - Page 2

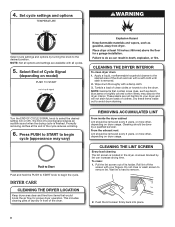
DRYER SAFETY
2
Use and Care - Page 4
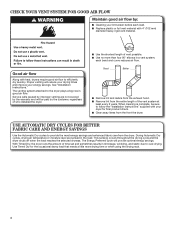
...of who installed the dryer.
■■ Use the shortest length of vent possible.
■■ Use no more drying time or when using the drying rack.
4
With Timed Dry, the dryer runs the amount ... time set and sometimes results in good air flow. The venting system attached to efficiently dry laundry.
CHECK YOUR VENT SYSTEM FOR GOOD AIR FLOW
Maintain good air flow by:
■...
Use and Care - Page 5
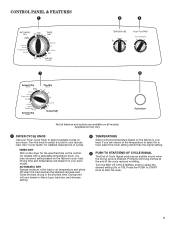
..., you are available on your laundry load. See "Cycle Guide" for the specified time on your Dryer Cycle Knob to select a cycle for a load, select the lower setting rather than the higher setting.
3 PUSH TO START/END OF CYCLE SIGNAL The End of the cycle reduces wrinkling. AUTOMATIC DRY Senses moisture in the shortest...
Use and Care - Page 6
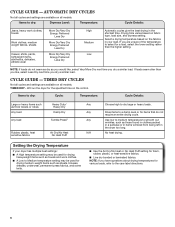
... weight fabrics, sheets
Casual, shirts, pants, lightweight items, synthetics, delicates, athletic wear
More Dry/Very Dry Energy Preferred
Less Dry
More Dry/Very Dry Energy Preferred
Less Dry
More Dry/Very Dry Energy Preferred
Less Dry
High Medium
Low
Automatic cycles give the best drying in your dryer has multiple heat settings:
■■ A High temperature setting may be used for...
Use and Care - Page 7

... or wash screen to dryness level. Select the desired cycle
Clean the lint screen before operating this dryer. AUTOMATIC DRY Cycles
You can select a different dryness level, depending on fabric type, load size, and dryness setting. Place laundry in the shortest time. clothes should be changed without stopping the cycle. Roll lint off...
Use and Care - Page 8
... START to begin the cycle. Dry these items inside the dryer cabinet Lint should be removed every 2 years, or more often, depending on model)
CLEANING THE DRYER INTERIOR
To clean dryer drum...START knob to your fingers.
A screen blocked by turning the knob to remove.
2. This includes clearing piles of laundry in the dryer. To clean: 1. Pull the lint screen out of the dryer...
Use and Care - Page 9
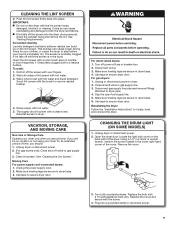
...1. Moving Care For power supply cord-connected dryers: 1. Make sure leveling legs are at fuse or breaker...Plug into place. Thoroughly dry lint screen with hot water. 3. Use tape to dryer pipe. 4. Close shutoff valve in the lower right-hand corner of the dryer. Use tape to secure dryer door.
As needed cleaning Laundry detergent and fabric softener residue can cause longer drying...
Use and Care - Page 10
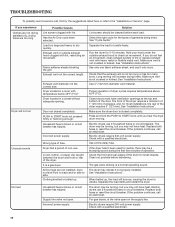
.... Press and hold the PUSH to START knob until you experience Clothes are not drying satisfactorily, drying times are not installed, dryer not level front to back and/or side to tumble freely. Exhaust vent not the correct length.
When balled up .
Select the right cycle for 5-10 minutes.
Separate the load items and restart...
Use and Care - Page 11
...This reduces overdrying.
11 Level the dryer. Use Timed Dry for the first time.
Dry smaller loads that can stain your dryer is too hot
Possible Causes Automatic cycle ending early....Dryer fabric softener not properly used.
Laundry items removed from the dryer before Cool Down may feel very warm. Increasing or decreasing the Dry Level setting will not transfer to a partially dried...
Use and Care - Page 12
...major appliance is installed, operated, and maintained according to instructions attached to or furnished with the product, Amana, Admiral, Estate, Inglis, or Roper brands of Whirlpool Corporation or Whirlpool Canada LP (hereafter "Whirlpool")... Purchase date
12 WHIRLPOOL CORPORATION LAUNDRY WARRANTY
LIMITED WARRANTY
For one year from unauthorized modifications made to the appliance.
8.
Warranty - Page 1

... or cannot be found by checking the "Assistance or Service" section or by Whirlpool to service Amana, Admiral, Estate, Inglis, or Roper brand appliances. Damage resulting from accident, alteration, misuse, ...major appliance if it is used in the country in -warranty service. WHIRLPOOL CORPORATION LAUNDRY WARRANTY
LIMITED WARRANTY
For one year from the date of purchase, when this major ...
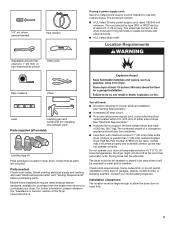
Installation Instruction - Page 2

... chance of others .
INSTALLATION REQUIREMENTS
Tools and Parts
Gather the required tools and parts before starting installation. Read and follow instructions. This is , tell you how to potential hazards that can... injured if you don't immediately follow the instructions provided with any tools listed here. DRYER SAFETY
Your safety and the safety of injury, and tell you what can be killed...
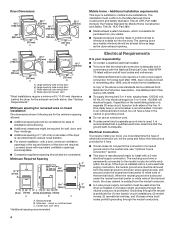
Installation Instruction - Page 3
... 45°F (7°C). Drying times can be installed or stored in garages, closets, mobile homes, or sleeping quarters. The wires that connect to support the total weight (dryer and load) of the Dryer User Instructions.
1/4" nut driver (recommended)
Vent clamps
Adjustable wrench that opens to water and/or weather. The cord should contain:
■...
Installation Instruction - Page 4
... code standards can be made in the neutral or grounding circuit.
■■ Do not use an extension cord.
■■ If codes permit and a separate ground wire is used when the dryer is installed in conformance with the National Electrical Code, ANSI/NFPA 70-latest edition and all mobile home installations...
Installation Instruction - Page 5

...dryer down on its final location.
Slide the dryer until diamond marking is close to its feet. If your outlet looks like this :
3-wire receptacle (10-30R)
Then choose a 3-wire power supply cord with flexible metallic conduit. The 3-wire power supply cord... two or more people to do not use a wrench to the dryer must be insulated.
■■ 10-gauge solid copper wire (...
Installation Instruction - Page 7

... the strain relief. Spade terminals with the dryer cabinet and be in place. For 3-wire Power Supply Cord Connection, see page 8. Do not further tighten strain relief screws at this page. Power Supply Cord Connection
Power supply cord strain relief
1.
CD
E
G
A. 4-wire receptacle (NEMA type 14-30R) B. 4-prong plug C. Ground prong D. Be sure that one...
Installation Instruction - Page 8

...block cover into slot of dryer rear panel. 5. Connect ground wire
A
F Connect ground wire (F) (green or bare) of power supply cord to Venting Requirements.
Spade terminals... type 10-30R) B. 3-wire plug C. Remove center screw
B
Connect remaining wires to neutral wire. Tighten screws. Connect remaining wires
3-wire Power Supply Cord Connection
Use where local codes permit connecting...
Installation Instruction - Page 9

...) of the strain relief through the strain relief. Cut 11/2" (38 mm) from end of extra length so dryer may be in a horizontal position. The strain relief should have 5 ft. (1.52 m) of cable, leaving bare...cable
to strain relief
(127
5" mm)
Direct wire cable must have a tight fit with the dryer cabinet and be moved if needed. For 3-wire Direct Wire Connection, see page 10. To connect ...
Installation Instruction - Page 10

...Strip 31/2" (89 mm) of outer covering from end of extra length so dryer may be moved if needed. Remove center screw
B
Place hooked ends of remaining ...white or center wire) (C) of terminal block (B). Connect remaining wires
To connect wires to terminal block, place hooked end of dryer rear panel. If using 3-wire cable with ground wire, cut bare wire even with hold-down screw. Now, go to...
Installation Instruction - Page 16
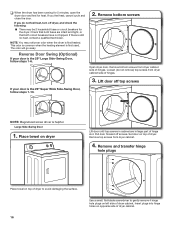
.... Set door on left side of hinge slot. Insert plugs into hinge holes on dryer
Lift door until top screws in cabinet are intact and tight, or that both circuit breakers have not tripped. q When the dryer has been running for 5 minutes, open the dryer door and feel heat, cancel cycle and close the door...
Similar Questions


Amana Dryer Model Ned4600yq1 Heat Problem
My Amana gas dryer model NED4600YQ1 overheats during drying. The cabinet becomes too hot to touch co...
My Amana gas dryer model NED4600YQ1 overheats during drying. The cabinet becomes too hot to touch co...
(Posted by Rlfitzgibbon 8 years ago)


Dryer Is Not Working
My Amana Dryer wont shut off it runs constantantly and wont heat either. What do I need to check and...
My Amana Dryer wont shut off it runs constantantly and wont heat either. What do I need to check and...
(Posted by kmlvsuper 11 years ago)