Ariens Max Zoom 60 Support Question
Ariens Max Zoom 60 Support Question
Find answers below for this question about Ariens Max Zoom 60.Need a Ariens Max Zoom 60 manual? We have 3 online manuals for this item!
Question posted by lyledrake on March 17th, 2014
Hydraulic Filters Question Left Turn Off Right Turn On
having trouble getting filters off
Current Answers
Related Ariens Max Zoom 60 Manual Pages
Owners Manual - Page 14
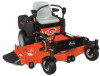
... three positions: Off (1), On (2) and Start (3).
To turn right, pull the right back or push the left back or push the right steering control lever forward or a combination of unit can scuff or damage lawns.
To obtain minimum turning radius, slowly reverse inside wheel completely stopped.
To start the engine, turn the key to start and the engine...
Owners Manual - Page 21
...-50 engine oil with an SL API classification.
1.
Tighten oil filter another 3/4 turn.
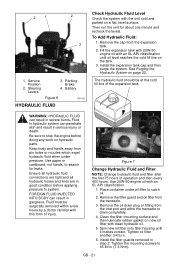
6. Install the expansion tank cap and then purge the system. Place container under pressure. Remove the filter guard and oil filter from the expansion tank.
2. Then run the unit for leaks. 2
1
2
3
4
1. Fluid in hydraulic system can result in severe burns. Ensure all...
Owners Manual - Page 22
...needed.
7. Drain Plug 2. Oil Filter 3. Turn the engine off the ground.
2....plug (about 2 quarts per transaxle). Mounting Hardware
Figure 8
Purging the Hydraulic System
CAUTION: Use sturdy gloves or padding to protect hands when working ... so that both drive wheels are off . See Moving the Unit with mower blades.
1. Filter Guard 4. Bolt
Figure 9
GB - 22 Start the engine and slowly move...
Owners Manual - Page 25

... interlock.
3
1
2
4
Axle Direction
Return to make sure controls are free. Tie-Rod Jam Nut
2. NOTE: The right and left hydraulic pumps are aligned.
5.
c. If wheel is still moving . Engage parking brake. Loosen tie rod jam nuts and turn tie rod until the
wheel stops moving , repeat steps 7 and 8.
10. Then return steering levers to...
Owners Manual - Page 26

... bolts on side unit tracks to. Jam Nut 3. Remove the ignition key.
2.
Turn the eccentric spacer until the right and left handles at the same height position.
3.
Steering
Lever
Figure 15
4. Stop Bracket
1. Handle
3. Shut OFF engine. NOTE: Position the right and left handles are the same height. Limiter Bolt 2. Increase pressure on the stop...
Owners Manual - Page 30

... engine. Remove the ignition key. Turn the blades so the blade ends point left blade (Left position in Figure 24) and on the right blade (Right position in Figure 24.
8. NOTE: Pitching the front of the blades lower than the front. GB - 30 Link Chain
3. Install link chains on the mower lift arms
in Figure 24...
Owners Manual - Page 31

...NOT place blocks under reinforcement bar. Loosen the jam nut on the deck lift bracket bolt about 1/4 turn the bolt clockwise to raise the deck or counterclockwise to lower the deck.
Tighten both jam nuts....turn to reduce clamp load on the height adjusters. Blade Side-to-Side Level
Left
Blade Front-to-Back Pitch Front
Right
Rear
Figure 24
Rear
Adjust Blade Height
Level and pitch the mower...
Owners Manual - Page 33

...; 75 Air
991087 Max Zoom 60
Courage Pro
8.0 (12.9)
4.0 (6.4) Zero
Hydro - in . (cm) Weight - in . psi (kPa) Mower Deck Mower Deck Lift Cutting Width - gal. (L) Transmission Type Transmission Oil Hydraulic Oil Filter Size and Weight Length - in . Rear Tire Size - mph (km/h) Reverse Maximum - in . (cm) Cutting Height - psi (kPa) Rear Tire Pressure - mph (km/h) Turning Radius Brakes...
Parts Manual - Page 2

...Brakes and Linkage 20
HYDRAULICS
Mechanical Lift 22
OPERATOR CONTROLS
Steering Controls 24
ELECTRICAL
Continuity Diagram 26 Wiring Diagram 27 Electrical System 29
MOWER DECKS
Deck, Discharge Chute... and Mower Blades - 52" & 60 34 Belts, Spindles, Idlers and Mower Blades - 48 36
3
© Copyright 2011 Ariens Company Safety 4 Decals - MODELS
Model 991085 Kawasaki with 48-Inch Mower Deck ...
Parts Manual - Page 21

... Arm 22 00481600 1 Weldment, Left Hand Rear Mower Lift Arm 23 05518400 4 Bushing, Flange Nylon .762 x 1.0 x .580 x 1.48 24 06413400 2 Washer, Hardened Steel .758 x 1.23 x .031 25 05714600 2 Ring, Retaining External .689 x .077 26 00481500 1 Weldment, Right Hand Rear Mower Lift Arm 27 04063000 2 Rod, Lift Assist 28 06435900 2 Washer, Flat Steel .438 x 1.00...
Operation Manual - Page 12

...stop the engine, turn right, pull the right back or push the left back or push the right steering control lever forward or a combination of unit can scuff or damage lawns. A. For reverse travel , push both wheels rotating when making sharp turns.
To stop, ... forward travel , pull both steering levers to the rear when the engine gets warm. ALWAYS keep both steering control levers forward.
Operation Manual - Page 13
... the power take off (PTO) switch to "Off" position to disengage parking brake.
Mower Lift Pedal
OF1700
Mower lift pedal raises and lowers mower deck for changing the engine oil, changing the hydraulic oil and filter and servicing the air filter. Transport: Push mower lift pedal all seat adjustments with the engine off (PTO) switch to "On...
Operation Manual - Page 15
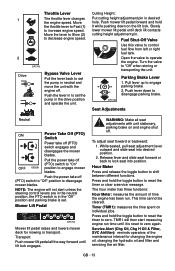
... the throttle lever to loss of steering control. Turn the ignition key to start the engine: 1. ...in the operator's position.
1. Fuel Stabilizer
Gasoline left in the fuel system for detailed instructions. 6....this time. Check Air Cleaner
Check air filter for correct tire pressure.
5. Follow Engine...'s position.
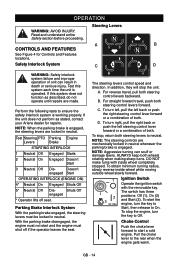
7. Check Hydraulic Fluid Level
See Check Hydraulic Fluid Level on the fuel...
Operation Manual - Page 16
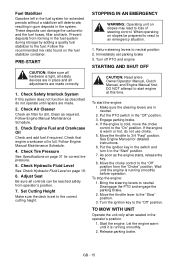
... ground speed. 8. Keep mower blades sharp. Do not travel too fast. Turn off PTO. 2. Do not set at slow speed until you know how to operate the unit,
select a speed appropriate to the electric clutch.
6. Bring the steering levers to desired location. 6. Clean after each mowing.
Pull the right and left bypass levers to...
Operation Manual - Page 19

... by a doctor familiar with clean hydraulic oil.
5.
Figure 7
Change Hydraulic Fluid and Filter
NOTE: Change hydraulic fluid and filter after the first 75 hours of operation and then every 400 hours. Use 20W-50 engine oil with an SL API classification until it makes contact. Tighten oil filter another 3/4 turn.
6. Install the filter guards removed in gangrene.
GB...
Operation Manual - Page 20

... speeds without excessive noise. Oil Filter 3. Remove the bolts, cup washer, and blades from the spark plugs.
2.
Fill with 20W-50 engine oil with mower blades.
1. Start the engine and...drive position. Follow the instructions in (20.3 N•m).
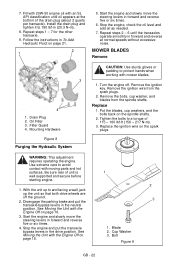
8. MOWER BLADES
Remove
3
4 1.
Replace
1. Use extreme care to 180 lbf-in To Add Hydraulic Fluid: on page 19.
2 1
5. 7. Install the...
Operation Manual - Page 23

...Tie-Rod
3. Then return steering levers to make sure controls are free. NOTE: The right and left hydraulic pumps are aligned.
5. Slowly move the speed and
direction control bracket clockwise
or counterclockwise ... to neutral mechanism on page 18).
3. Tie-Rod Jam Nut
2. Loosen tie rod jam nuts and turn tie rod until the
wheel stops moving , repeat steps 7 and 8.
10.
Shut OFF engine.
11...
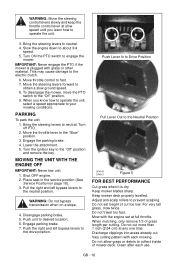
Operation Manual - Page 24

DO NOT exceed maximum recommended tire pressure (See Specifications on the stop bracket (Figure 15). Limiter Bolt 2. Eccentric Spacer
4. Turn the eccentric spacer until the right and left handles at the same height position.
3. Front bolts adjust forward and rear bolts adjust reverse. Spacer 2. Engage parking brake.
Steering
Lever
Figure 15
4. Remove the ...
Operation Manual - Page 28

... right blades at each corner of the deck to a 3 in Figure 24.
8. Install PTO mower belt (See Replacing Mower Belts on the deck lift brackets (see Figure 25).
6.
Check Blade Level and Pitch
1. Remove the ignition key.
Turn the blades so the blade ends point left blade (Left position in Figure 24).
10. After deck is...
Operation Manual - Page 32

...mowers is put to commercial use, the duration of these warranties shall be free of charge (labor and parts) to the original purchaser for two years after the date of purchase. For Ariens Max Zoom...Main Frame The main frame on zero-turn riding mowers is warranted to the original purchaser ... the date of purchase. Two-Year Limited Lawn and Garden Consumer Ride-On
Warranty
Ariens Company...
Similar Questions

Zoom 34 915157 Want Start
ostartonly idles with no throttle increase. Replaced fuel filter air filter fuel pump and carb. Stil...
ostartonly idles with no throttle increase. Replaced fuel filter air filter fuel pump and carb. Stil...
(Posted by romero1028 2 years ago)

What Size Of Oil Filter Should I Buy For Ariens 34 Zero Turn Zoom Lawn Mower?
(Posted by Hshu 3 years ago)

Mower Wont Start
mower died after to passes and wont start back up wont even turn over
mower died after to passes and wont start back up wont even turn over
(Posted by amandaishot1 6 years ago)


Removal Of Blades On Airens Max Zoom 60
How do I block the blades from turning to remove them for replacement?
How do I block the blades from turning to remove them for replacement?
(Posted by sheilaramer 10 years ago)