
Asko T712 Support Question
Asko T712 Support Question
Find answers below for this question about Asko T712.Need a Asko T712 manual? We have 4 online manuals for this item!
Question posted by georgefarley on August 3rd, 2018
Remove The Rear Panel
How do I remove the rear panel
Current Answers
Answer #1: Posted by Ayesha11 on August 4th, 2018 5:52 AM
Ayesha11

Member since:
July 27th, 2018 Points: 2,180
Member since:
July 27th, 2018 Points: 2,180
Remove the right rear access panel to replace the hard drive and the optical drive. This panel is on the left side of the computer as you face the back of the unit.
WARNING:Make sure the computer is disconnected from power before starting.
Removing the right rear access panel
Use the following steps to remove the right rear access panel.
Step 1To remove the right rear access panel, flip up the access cover on the stand.
Step 2
Remove the screw for the right rear access panel.
Step 3
Slide the panel out and pull it off the computer.
Replacing the right rear access panel
Use the following steps to replace the right rear access panel:
Step 1Find the two small plastic tabs on the right rear access panel.
Step 2
Find the two slots on the back of the computer.
Step 3
Align the tabs on the panel with the slots on the back of the computer.
Step 4
Slide the panel into place.
Related Asko T712 Manual Pages
User manual 80 811 93 Asko T712 EN - Page 1

... information on how to feel assured that you read the operating instructions before using the machine. ASKO T712 We want you to avoid damaging the environment. To ensure that you get the most out of ... we recommend that the inside of pleasure. Operating Instructions
Tumble dryer
Save these instructions for future reference
Dear ASKO Customer, Thank you for choosing this quality product from it...
User manual 80 811 93 Asko T712 EN - Page 2
...will not start
16
3
Overheating cut-off
16
4
Drying takes too long
16
4
The laundry does not dry, or is too
5
dry
16
Interrupting a program
5 Technical information
17...to contact the ASKO
Description of the tumble dryer
7
Appliances Inc.
19
Front panel
8
Installation instructions
20
Options button
8
Positioning the tumble dryer
20
Advice and tips before you
Adjusting the...
User manual 80 811 93 Asko T712 EN - Page 3
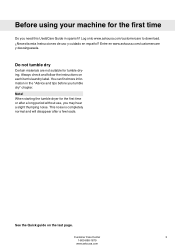
... y cuidado en español? Always check and follow the instructions on the last page. Note! When starting the tumble dryer for tumble drying.
See the Quick guide on each item's laundry label. You can find more information in spanish? Customer Care Center
3
1-800-898-1879
www.askousa.com Entre en www...
User manual 80 811 93 Asko T712 EN - Page 4

... To reduce the risk of fire, electric shock, or injury to persons when using your dryer. Children should be done by a certified professional. • Provide sufficient ventilation, otherwise smoke... • Do not heat dry items that have been drycleaned. • The dryer is removed from service or discarded, remove the door to the drying compartment. • Do not reach into the room.
...
User manual 80 811 93 Asko T712 EN - Page 7

Description of the tumble dryer
1
2 3
4
5
1. Lint filter holder
4. Lint filter
96
Customer Care Center
7
1-800-898-1879
www.askousa.com Outer door
5. Serial number tag and rating plate 3. Fan (behind the front plate) 6. Panel
2.
User manual 80 811 93 Asko T712 EN - Page 9
... dry
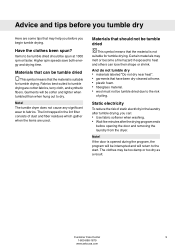
Here are some tips that may help you before opening the door and removing the laundry from the dryer.
Higher spin speeds save both energy and drying time. Certain materials may be ...dry. If the door is suitable for tumble drying.
Have the clothes been spun? The tumble dryer does not cause any significant wear to tumble drying are cotton fabrics, terry cloth, and synthetic ...
User manual 80 811 93 Asko T712 EN - Page 12
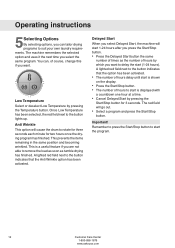
... red field next to start 1-24 hours after you want . Delayed Start
When you want to suit your own laundry requirements. The red field will start the program.
12
Customer Care Center
1-800-898-1879
www.askousa.com Remember ....
Important! Once Low Temperature has been selected, the red field next to remove the load as soon as the number of times as tumble drying has finished.
User manual 80 811 93 Asko T712 EN - Page 13
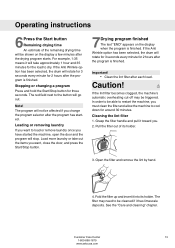
... a program Press and hold the Start/Stop button for 2 hours after the program is finished.
Loading or removing laundry If you want , close the door, and press the Start/Stop button.
7Drying program finished The text ... holder. The filter may be able to load or remove laundry once you change the program selector after each load. For example, 1:35 means it has limescale deposits...
User manual 80 811 93 Asko T712 EN - Page 14
Remove the clothes and close the door to prevent small children from climbing into the machine.
14
Customer Care Center
1-800-898-1879
www.askousa.com Operating instructions
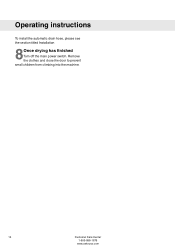
To install the automatic drain hose, please see the section titled Installation
8Once drying has finished Turn off the main power switch.
User manual 80 811 93 Asko T712 EN - Page 15
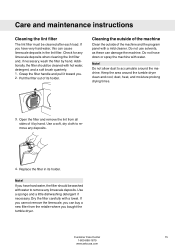
...of the machine
Clean the outside of its holder. Open the filter and remove the lint from the retailer where you bought the tumble dryer. If you . 2. Customer Care Center
15
1-800-898-1879
www.... Pull the filter out of the machine and the program panel with a mild cleaner. Keep the area around the machine. If you cannot remove the limescale, you have hard water, the filter should be...
User manual 80 811 93 Asko T712 EN - Page 16
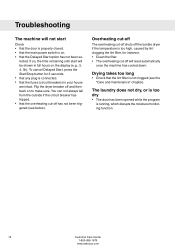
...off will be shown in your house are intact.
Flip the dryer breaker off has not been triggered (see the "Care and maintenance" chapter).
The laundry does not dry, or is too dry
• The door... if the circuit breaker has tripped. • that the overheating cut -off shuts off the tumble dryer if the temperature is too high, caused by lint clogging the lint filter, for 3 seconds. &#...
User manual 80 811 93 Asko T712 EN - Page 21
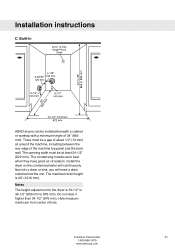
... height of 34" (864 mm). Hole measurements are from center of the machine top panel and the back wall. Installation instructions
C. Built-in
ASKO dryers can be a gap of about 1/2" (12 mm) all around the machine, including between the rear edge of hole. Do not raise it higher than 34-1/2" (876 mm). The...
User manual 80 811 93 Asko T712 EN - Page 22

... positioned on the washing machine. Push the tumble dryer in the picture.
7. Attach the plastic cups for the stacking bracket to the washing machine's top cover. At the same time, keep the front edge raised by 0,4" (10mm) to assemble the stacking kit: 1. Then remove the paper from the self-adhesive surface under...
User manual 80 811 93 Asko T712 EN - Page 24

... the equivalent. Use the exhaust outlet cover you removed from the rear exhaust outlet and place it must be increased to cover the rear exhaust outlet. And make any excess exhaust duct ... is used, it in the outlet you push the dryer into place, check for kinks in warm climates (77° F and above) with a clamp. 5.
Remove the exhaust outlet cover. 3.
Subject 2158A and maximum ...
User manual 80 811 93 Asko T712 EN - Page 25
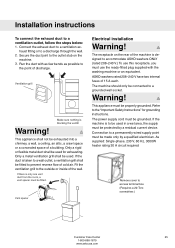
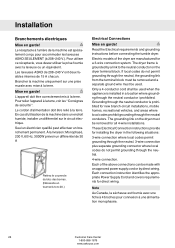
...space or a concealed space of a building. Fit the ventilation grill to the outlet stub on the rear of the machine is designed to a discharge through the wall. 2.
This appliance must be made only... As supplied: Single-phase, 230 V, 60 Hz, 3000W heater rating 30 A circuit required
Remove cover to be used for grounding instructions. Ventilation grill
Make sure nothing is taken to a ...
User manual 80 811 93 Asko T712 EN - Page 26

... not permit grounding through the neutral conductor is delivered ready-fitted with a four-prong plug intended for connection to the neutral conductor on the dryer must be removed for new branch-circuit installations, mobile homes, recreational vehicles, and areas where local codes prohibit grounding through the neutral, the grounding link from the...
User manual 80 811 93 Asko T712 EN - Page 27
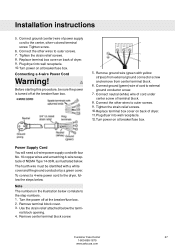
... terminal block screw. Before starting this procedure, be identified with yellow stripes) from external ground connector screw and remove from center terminal block.
6. Plug dryer into wall receptacle. 10.
Remove terminal block cover. 3. Tighten the strain relief screws. 8. Connect ground (green) wire of power supply cord to external ground conductor screw.
7. The fourth...
User manual 80 811 93 Asko T712 EN - Page 28
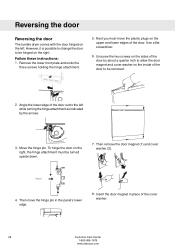
...6. Then remove the door magnet (1) and cover washer (2).
1
2
Hinge pin
4. Angle the lower edge of the door out to the left . Hinge attachment
3. Move the hinge pin. Insert the door magnet in the panel's lower...upper and lower edges of the door.
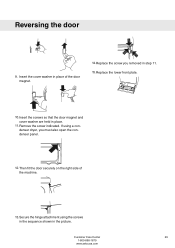
Reversing the door
Reversing the door
The tumble dryer comes with the door hinged on the left while turning the hinge attachment as indicated by...
User manual 80 811 93 Asko T712 EN - Page 29
... the door
9. Replace the lower front plate.
3
10. Secure the hinge attachment using a condenser dryer, you removed in place of the machine.
13. Customer Care Center
29
1-800-898-1879
www.askousa.com Replace... the condenser panel.
12. Insert the screws so that the door magnet and cover washer are held in the picture. Insert the cover washer in step 11. 15. Remove the screw ...
User manual 80 811 94 Asko T712 FR - Page 26
... with an approved power supply cord or by a link to the neutral conductor on the dryer must be removed for installing the dryer in a location where grounding through the neutral, the grounding link from the terminal block must be removed and a separate ground wire must be used when the applience is prohibited for direct...
Similar Questions


My Asko T744c Laundry Dryer Is Taking Much Longer. See Details.
My Asko T744C Laundry Dryer is taking 2 hours for Auto Normal selection. I think its taking too much...
My Asko T744C Laundry Dryer is taking 2 hours for Auto Normal selection. I think its taking too much...
(Posted by parujani 8 years ago)


Hi How Do I Remove The Front Door Of My Dryer To Replace Belt On T711
(Posted by Teddies 9 years ago)
My Asko Dryer Runs, But No Longer Heats, Why?
It tumbles fine but has no heat at all.
It tumbles fine but has no heat at all.
(Posted by lisagriebel71 10 years ago)