Bernina 215 Support Question
Bernina 215 Support Question
Find answers below for this question about Bernina 215.Need a Bernina 215 manual? We have 1 online manual for this item!
Question posted by Jmbsews on January 26th, 2013
Oiling My Bernina 215 Machine
I want to effectively maintain my bernina 215. Other than the bobbin area, is there any other place that needs oil? Thank you
Current Answers
Related Bernina 215 Manual Pages
User Guide - Page 1
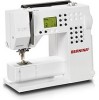
... has concentrated on providing complete satisfaction to our customers. The new BERNINA 215 are assured of years of rewarding sewing. H.P. And it is combined with a range of added value features to give you, dear Customer, more sewing pleasure than ever before. Enjoy modern, creative sewing with BERNINA: our wide range of accessories as well as our...
User Guide - Page 2

... is not in the needle area of the sewing computer by or near children and infirm persons.
Do not allow the sewing computer to be used by a person responsible for use the BERNINA original stitch plate. Children must be disconnected from the electricity supply by removing the plug from the electrical outlet
immediately after...
User Guide - Page 3
...the original parts in the needle area, such as changing the needle or...double insulated product is committed to the national directive.
Always unplug the sewing computer from misuse of doubt, please contact your household waste. Please ... product nor should only be marked on the product. Environmental Protection
BERNINA is marked with double insulation (except USA and Canada). In case...
User Guide - Page 4
... to unannounced changes and alterations at any time. 4
Imprint
Imprint Typesetting, Layout, DTP: Silvia Bartholdi Graphics: Müller-Melzer ID, Kreuzlingen
© copyright 2010 BERNINA International AG, Steckborn
All rights reserved For technical and product improvement reasons, the sewing computer's features, parts and accessory are subject to country.
User Guide - Page 5
Important safety Instructions
2
Details of the sewing computer
6
Standard Accessories
8
Feet selection
9
Optional Accessories
10
Setting up the sewing computer
12
Operating instructions
20
Stitch overview
23
Selected practical stitches
24
Sewing Needles
31
Maintenance
33
Troubleshooting
34
Index
35
Contents
5
User Guide - Page 6

6
Details of the sewing computer
Details of the sewing computer
12
11 13
10
14
8 7
5
2
15 16 9 6
3
1
17
18 19
23 20
22 21
4
13 12 30
23
24 28 27
29
25 26
Front view
Right end
User Guide - Page 7
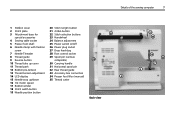
...the sewing computer
7
1 Bobbin cover
20 Stitch length button
2 Stitch plate
21 clr/del-button
3 Attachment base for
22 Stitch selection buttons
special accessories
23 Handwheel
4 Sewing table ... up cover
30 Carrying handle
11 Thread path
31 Horizontal spool pin
12 Bobbin pre-tension
32 Rear thread guide
13 Thread tension adjustment 33 Accessory box ...
User Guide - Page 8
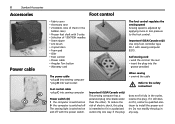
...Power cable
D
C
A B
• Fabric cover • Accessory case • 2 bobbins (one of them in the
bobbin case) • Presser feet shaft with 5 soles • Selection of electric shock, this...USA/Canada only) Use only foot controller type SR-1 with the power switch. If the plug
When sewing • unwind the cable
Refer to install the proper outlet.
If it still does not fit, ...
User Guide - Page 9

Standard snap-on soles
Presser foot shaft for snap-on soles
1 Reverse pattern sole for practical and decorative stitches
4 Zipper sole for sewing in zippers
2 Overlock sole Overlock seams, hems, oversewing edges, narrow satin stitches
5 Blind stitch sole Blind hems, edge stitching
Feet selection
9
3 Buttonhole sole for ...
User Guide - Page 10

...with your heel
10
Optional accessories
Sewing table
To attach • raise the needle and presser
foot • place the table over the free
arm and...sewing table • «0» corresponds to
the left
Scale of the table Note: Remove the presser foot or the presser foot shaft when attaching the seam guide!
Lens Set
We recommend the use of the BERNINA Lens Set for sewing...
User Guide - Page 11
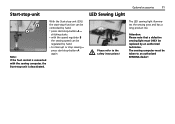
... be replaced by hand • to interrupt or stop sewing = press start -stop-button A =
stitching starts • with the sewing computer, the Start-stop -button A again
Optional accessories
11
LED Sewing Light
The LED sewing light illuminates the sewing area and has a long product life.
The sewing computer must ONLY be taken to the safety instructions...
User Guide - Page 12
...
Setting up the sewing computer
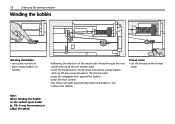
Winding the bobbin
Winding the bobbin • turn power switch on • place empty bobbin on
spindle
• following the direction of the arrow take thread through the rear guide and round the pre-tension stud
• wind the thread two to three times around the empty bobbin and cut off...
User Guide - Page 13
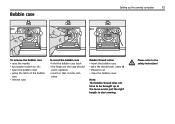
... finger on the case should
point upwards • insert so that it clicks into
place
Bobbin thread cutter • insert the bobbin case • take the thread over cutter A • thread is cut • close the bobbin cover
Note: The bobbin thread does not have to be brought up as the loose end is just...
User Guide - Page 14
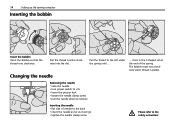
The bobbin must turn power switch to «0» • lower the presser foot • loosen the needle clamp ...; raise the needle • turn clock wise when thread is pulled.
14
Setting up the sewing computer
Inserting the bobbin
Insert the bobbin Insert the bobbin so that the thread runs clockwise. Pull the thread counter clock wise into the slot. it will go...
User Guide - Page 15

... will click into its vertical position
• when using large reels, add the foam pad A for sewing with more than one thread, i.e. double
A
needle work
• raise the pin until it clicks ... sole
Attaching the presser foot sole • place the presser foot sole
under the shaft so that the peg sits under the opening of the sewing computer behind the
handwheel
• essential aid ...
User Guide - Page 16
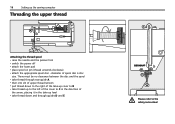
... E
C
D
B
E
Please refer to C in the direction of spool disc is disc
size. diameter of
the arrow, placing it in the take-up level • take thread down to the right of the take-up the sewing computer
Threading the upper thread
A
Attaching the thread spool • raise the needle and the presser...
User Guide - Page 31
... on the needle. Needle
70
80
90
100 110-120
Needle and thread The most commonly sold needles are nos. 70 -120.
Sewing needles
31
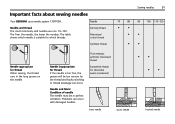
Important facts about sewing needles
Your BERNINA uses needle system 130/705H. Needle and fabric Condition of needle The needle must be too narrow for thread When...
User Guide - Page 32
... the appropriate needle is used. 32
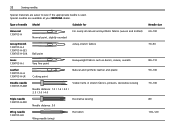
Sewing needles
Special materials are available at your BERNINA dealer. Type of needle Model
Suitable for
Universal 130/705 H
Normal point, slightly rounded
For nearly all natural and synthetic fabrics (woven and knitted)
Jersey/...
User Guide - Page 33
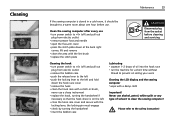
...machine for a short time without
thread to prevent oil soiling your work
Cleaning the LCD display and the sewing computer • wipe with the
locking lever, the locking pin must engage • check by turning the handwheel • insert the bobbin...down at the back right
corner, lift and remove • clean the area with the lint brush • replace the stitch plate
CAUTION
Disconnect plug ...
User Guide - Page 34
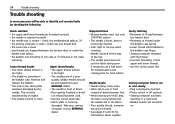
... presser foot. • When sewing over thick area,
the fabric was pushed with foot down. • Incorrect threading. Take your sewing computer to the top. •...BERNINA dealer. brush out any threads are of thread under
the bobbin case spring. • Lower thread still threaded in
the bobbin case finger. • Sewing computer threaded
with the needle still in a cold room. • Bobbin...
Similar Questions


My Machine Will Not Wind Thread Onto A Bobbin.
I recently had my machine serviced and it seemed to be working fine. Now it will not wind thread ont...
I recently had my machine serviced and it seemed to be working fine. Now it will not wind thread ont...
(Posted by dhwlf 10 years ago)
Bernina 215 Jammed
My Bernina 215 suddenly completely jammed up for no reason when sewing a normal seam. No visble reas...
My Bernina 215 suddenly completely jammed up for no reason when sewing a normal seam. No visble reas...
(Posted by majesticlunacy 11 years ago)

