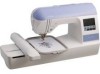
Brother International PE770 Support Question
Brother International PE770 Support Question
Find answers below for this question about Brother International PE770 - Computerized Embroidery Machine.Need a Brother International PE770 manual? We have 3 online manuals for this item!
Question posted by immc1 on July 30th, 2014
How To Machine Embroider 2 Applique Numbers On One Item
The person who posted this question about this Brother International product did not include a detailed explanation. Please use the "Request More Information" button to the right if more details would help you to answer this question.
Current Answers
Related Brother International PE770 Manual Pages
Users Manual - English - Page 1
GETTING READY EMBROIDERY APPENDIX
Computerized Embroidery Machine
Operation Manual
Users Manual - English - Page 5

...Embroidery Step by Step 14 Attaching the Embroidery Unit 15
Embroidery unit precautions ...15 Attaching the embroidery unit ...15 Removing the embroidery unit ...16
Turning the Machine On/Off 18
Power supply precautions ...18
Turning on the machine ...19 Turning off the machine... needle ...35 Replacing the needle...36
EMBROIDERY
39
Embroidering Neatly ...40
What to prepare ...40
Preparing the ...
Users Manual - English - Page 6

Using an embroidery card (sold separately) ...55
Embroidering ...56
Embroidering attractive finishes...56
Embroidering a pattern ...57 Appliquéing ...59
Editing and Saving Patterns 61
Adjusting the layout ...61 Storing patterns ...63 Adjusting the thread tension ...64 Resewing ...65 Thread runs out partway through a design...65 Stopping while embroidering ...66
Bobbin Case Adjustment 68
...
Users Manual - English - Page 7
... can quickly and easily be wound with thread (page 24).
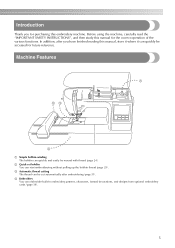
Machine Features
1
23
4
a Simple bobbin-winding The bobbin can embroider built-in embroidery patterns, characters, framed decorations, and designs from optional embroidery cards (page 39).
5 c Automatic thread cutting The thread can start embroiderying without pulling up the bobbin thread (page 28).
b Quick-set bobbin You...
Users Manual - English - Page 8

...-021
6 Part Name
10 Spool net
11 Operation manual
12 Quick reference guide
13
Embroidery foot "Q" (on machine)
Embroidery set
4 Cleaning brush 5 Screwdriver (large) 6 Screwdriver (small) 7 Spool cap ...accessories
After opening the box, check that the following accessories are included.
If any item is missing or damaged, contact your retailer.
1.
2.
3.*
4.
5.
6.
7.
8.
9.
10...
Users Manual - English - Page 11
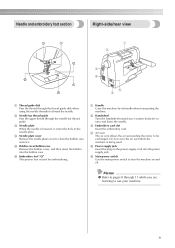
... the motor to clean the bobbin case and race.
c Needle plate When the needle is being used for embroidering.
f Embroidery foot "Q" This presser foot is used .
Do not cover the air vent while the machine is lowered, it enters the hole in the needle plate. Memo
z Refer to pages 8 through 11 while you...
Users Manual - English - Page 12

... button twice sews one stitch. Red:
The machine can not embroider.
Orange:
The machine is winding the bobbin thread, or the bobbin winder shaft is lowered in the fabric.
Note
z Do not press the thread cutter button if there is no fabric under the presser foot or while the machine is pressed. The machine embroiders at a slow...
Users Manual - English - Page 13
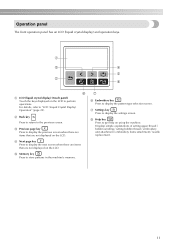
...(liquid crystal display) and operation keys.
h Help key Press to store patterns in the machine's memory. e Memory key Press to get help on the LCD to display the pattern ...winding / setting bobbin thread / embroidery unit attachment / embroidery frame attachment / needle replacement.
11
d Next page key Press to display the next screen when there are items that are not displayed on the ...
Users Manual - English - Page 15

...
The various preparations to start embroidering are described in this chapter. Embroidery Step by Step 14 Attaching the Embroidery Unit 15
Embroidery unit precautions 15 Attaching the embroidery unit 15 Removing the embroidery unit 16 Turning the Machine On/Off 18 Power supply precautions 18 Turning on the machine 19 Turning off the machine 19 LCD (Liquid Crystal Display...
Users Manual - English - Page 23
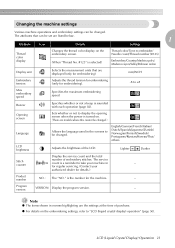
... items shown in the screens to display the opening screen when the power is sounded with each operation (page 82). The service count is the number for the machine.
-
Buzzer
Specifies whether or not a beep is turned on the embroidering settings, refer to +8
Max embroidery speed
Specifies the maximum embroidering speed. Changing the machine settings
Various machine operations...
Users Manual - English - Page 24

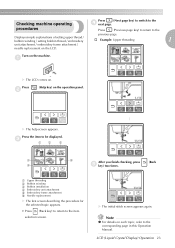
Press b panel.
(Settings key) on the machine. c Switch screens using
(Previous page key)
and
(Next page key).
† Example: Changing the maximum embroidering speed
When settings are not lost when the power is turned off.
22
GETTING READY Turn on the operation
X The settings screen appears.
Press the item to be set. Note
z Settings...
Users Manual - English - Page 25
...: Upper threading
1
unit attachment / embroidery frame attachment /
needle replacement on the machine.
a
X The LCD comes on the operation panel. Press
b
(Help key) on .
c
1
2
3
4
6
After you finish checking, press
(Back
5
e key) two times.
X The help screen appears.
procedures
Press
(Previous page key) to return to the item
selection screen. LCD (Liquid Crystal...
Users Manual - English - Page 36
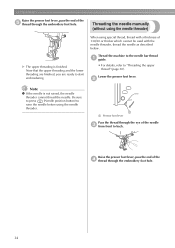
..., thread the needle as described below. Thread the machine to the needle bar thread a guide.
• For details, refer to start embroidering. Be sure to press (Needle position button) to... raise the needle before using the needle threader.
1
a Pressor foot lever
Pass the thread through the eye of the e thread through the embroidery...
Users Manual - English - Page 38

... force when loosening or tightening the needle clamp screw, otherwise certain parts of the machine may occur if (Start/stop button) is accidentally pressed and the machine starts embroidering. GETTING READY
Replacing the needle
Place fabric or paper under the embroidery d foot to be damaged.
1
a Presser foot lever
36 Replace the needle as described...
Users Manual - English - Page 51

.../numbers/ symbols.
• For details, refer to "Selecting characters" (page 52).
The patterns stored in the machine's memory
■ Embroidery patterns (Embroidery patterns/ Additional embroidery ...can be stored in the machine's
memory to be selected from an embroidery card can be
embroidered. Any public or commercial use only.
Selecting Embroidery Patterns
This section provides ...
Users Manual - English - Page 58

...7).
This section describes the steps for use with this machine. Thread
Upper thread Bobbin thread
Use embroidery thread, or country embroidery thread intended for use with this machine. Use embroidery bobbin thread intended for embroidering and appliquéing. Note
z Before embroidering, check that go into sewing beautiful embroidery. The frame may not yield optimum results...
Users Manual - English - Page 61

Select an appliqué pattern.
Embroidering 59 Appliquéing
Prepare the base fabric and the appliqué fabric
(appliqué piece).
a
2
• If it is not cut -out for the appliqué piece is sewn, and the machine stops.
1
1
2
a Appliqué position b Base fabric
X "APPLIQUE" will be displayed on the embroidery frame.
Set up the thread for the appliqué is...
Users Manual - English - Page 66

...embroider the recalled pattern.
1
2
a Right side b Wrong side
■ Upper thread is just visible on the front of the fabric.
X The stored pattern is too loose The upper thread has slack. Note
z Characters saved from an embroidery card must have the embroidery card inserted in the machine...to retrieve the memory saved from the
total number of pages
X The selected pattern is difficult...
Users Manual - English - Page 67

... machine stops.
Restart the embroidery. e
Editing and Saving Patterns 65 c
Press
. Press (Start/stop the a machine.
Set up the upper or bobbin thread. Move the needle back about 10 stitches.
(Forward one stitch) to stop button) to move the
d needle back about 10 stitches and resume embroidering. Press
(Back one stitch) increases the stitch
number...
Users Manual - English - Page 85
... thread 7
buzzer 82
machine settings 21
, main power switch 9 19
C
characters 52
maintenance 70
manual needle threading 34
, memory key 11 63
cleaning 70
cleaning brush 6
N
D
dust cover 6
E
, embroidery card 7 55
embroidery card slot 9
, Embroidery foot "Q 6 9
embroidery foot attachment 72 embroidery frame 43 embroidery frame attachment 47 embroidery frame removal 48...
Similar Questions

Pe 770 Embroidery Machine Will Not Applique
(Posted by alarealr 9 years ago)

How To Embroider Two Rows Of Letters On Embroidery Machine
(Posted by Buttron 9 years ago)

Can't Do Applique On Pe 770
(Posted by MarinUzpia 9 years ago)

How To Applique On A Brother Embroidery Machine Pe-750d
(Posted by d03jphel 10 years ago)

What Is The Model Number Of Brother Xl 2600i Sewing Machine Motor?
What is the model number of brother XL 2600i sewing machine motor ?is it AC or DC?
What is the model number of brother XL 2600i sewing machine motor ?is it AC or DC?
(Posted by Harizeal 10 years ago)