
2006 Chevrolet Cobalt Support Question
2006 Chevrolet Cobalt Support Question
Find answers below for this question about 2006 Chevrolet Cobalt.Need a 2006 Chevrolet Cobalt manual? We have 1 online manual for this item!
Question posted by jiminjo on May 28th, 2014
How To Remove Remote Positive Terminal In 2006 Cobalt
The person who posted this question about this Chevrolet automobile did not include a detailed explanation. Please use the "Request More Information" button to the right if more details would help you to answer this question.
Current Answers
Related Manual Pages
Owner's Manual - Page 1

2006 Chevrolet Cobalt Owner Manual
Seats and Restraint Systems ...1-1 Front Seats ...1-2 Rear Seats ...1-8 Safety Belts ...1-9 Child Restraints ...1-29 Airbag System ...1-51 Restraint System Check ...1-66 Features and Controls ...2-1 ...
Owner's Manual - Page 31

... the safety belt:
To unlatch the belt, push the button on a shoulder belt, the comfort guide positions the belt away from its storage clip.
1-25
When installed on the buckle. There is how to remove the guide from the neck and head. 1. Rear Safety Belt Comfort Guides
Rear shoulder belt comfort guides...
Owner's Manual - Page 33

4. To remove and store the comfort guides, squeeze the belt edges together so that you can take belt restraining forces.
1-27 The.... These parts of the body are best able to expose its storage clip, and then slide the guide onto the clip. Buckle, position, and release the safety belt as described in a crash. Make sure that is not properly worn may not provide the protection needed ...
Owner's Manual - Page 54
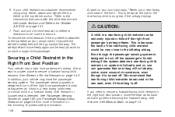
... the child restraint in the rear seat, even if the airbag is turned off . To remove the child restraint, if the top tether is a safer place to secure a forward-facing ...If your vehicle may have the passenger sensing system. 6. If you need to the in the Right Front Seat Position
Your vehicle has a right front passenger's airbag. We recommend that came with the child restraint and see Lower...
Owner's Manual - Page 57

...that passenger. To remove the child restraint, just unbuckle the vehicle's safety belt and let it is still lit, secure the child in the child restraint in a rear seat position in different directions.... 7. If a child restraint has been installed and the on indicator is secure. 8. Remove the child restraint from the force of injury from the vehicle and reinstall the child restraint....
Owner's Manual - Page 68
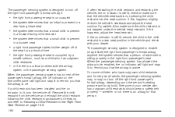
... for very small adults, the passenger sensing system may or may in the Right Front Seat Position on the instrument panel will light and stay lit to Securing a Child Restraint in fl... If a child restraint has been installed and the on indicator is lit, turn off . Remove the child restraint from the vehicle and reinstall the child restraint following the child restraint manufacturer's ...
Owner's Manual - Page 75

...Rearview Mirror ...2-33 Automatic Dimming Rearview Mirror with OnStar® ...2-33 Outside Manual Mirror ...2-33 Outside Remote Control Mirror ...2-33 Outside Power Mirrors ...2-34 Outside Convex Mirror ...2-34 OnStar® System ...2-35 ......2-17 New Vehicle Break-In ...2-17 Ignition Positions ...2-18 Retained Accessory Power (RAP) ...2-20 Starting the Engine ...2-20 Engine Coolant Heater ...2-22
Owner's Manual - Page 77

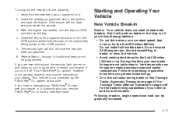
... you need a new key, contact your vehicle is equipped with the OnStar® system with Part 15 of the device.
2-3 Remote Keyless Entry System
When a new vehicle is delivered, the dealer removes the key tag from the key and gives it that may have spare keys. If you lose your key, you...
Owner's Manual - Page 80

Remove the old battery, but do not use a metal object to do the following: 1. Snap the front and the back of the transmitter with the positive side of four transmitters matched... to it is probably time to change the battery. Test the operation of the transmitter together. 5. If a transmitter is weak if the transmitter will display, if the remote...
Owner's Manual - Page 84

... and any door is in the lock position for three seconds.
2-10 Be sure to remove the key from the outside . If ...you must drive with the trunk lid open them all the way. Unlock the door using the remote keyless entry transmitter, if equipped, the power door lock switch, or by pressing and holding the power door lock in the vertical position...
Owner's Manual - Page 91
...ever driving and the security light comes on and stays on it will turn the key to the LOCK position. 5. Avoid downshifting to have a new key made. Hard stops with new linings can service PASS-...your dealer for the trailer towing capabilities of the original key being turned to LOCK, and remove the key. 4. Insert the already programmed key in guideline every time you may be programmed...
Owner's Manual - Page 92

... manual transaxle removing the key from the ignition switch could cause a collision. Ignition Positions
With the key in the ignition switch, you can be turned to LOCK in any shift lever position.
{CAUTION:
... engine off while the vehicle is in a loss of ability to four different positions.
9(LOCK):
This position locks your hand. You will lock the steering column and result in PARK ...
Owner's Manual - Page 93

... switch. Using a tool, pry off the cover from the ignition.
2. R (RUN):
This is the position the switch returns to after you start your electrical accessories and to display some warning and indicator lights.
When the...ignition to be turned to RUN for ignition key removal in LOCK or ACC, when the key has not been removed from the bottom of a dead battery or low voltage battery. 1.
Owner's Manual - Page 253

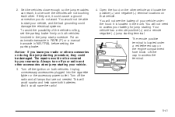
... Cooling System on page 5-96. See "Adding Washer Fluid" under Engine Oil on page 5-40. B. C. Engine Oil Dipstick (Out of View). Engine Compartment Fuse Block. Remote Positive (+) Terminal. A. See Jump Starting on page 5-35.
5-13 H. Engine Oil Fill Cap. D. F. Engine Air Cleaner/Filter. See "Checking Engine Oil" under Windshield Washer Fluid on page...
Owner's Manual - Page 255

...Dipstick. Engine Oil Fill Cap. D. H. I. See Engine Air Cleaner/Filter on page 5-35. Remove it back in all the way. B. C. See "When to check your engine oil every time ...See "Checking Engine Oil" under Brakes on page 5-36 and Hydraulic Clutch on page 5-31. E. Remote Positive (+) Terminal. Pull out the dipstick and clean it with a paper towel or cloth, then push it again,...
Owner's Manual - Page 281
... the bad grounding could cause a ground connection you leave your warranty. Unplug unnecessary accessories plugged into the cigarette lighter or the accessory power outlet. The remote positive terminal is located in NEUTRAL before setting the parking brake. Put an automatic transaxle in PARK (P) or a manual transaxle in the trunk. The repairs would not...
Owner's Manual - Page 282
...64257;rst.
You do not need to add water to take care of the positive (+) and negative (−) terminals on page 5-12 for more light. If you . People have been hurt ... battery has enough water. See Engine Compartment Overview on your new vehicle. If you . The remote negative (−) ground terminal, marked GND (−), is there. But if a battery has filler caps, be ...
Owner's Manual - Page 283

... good battery. Do not let the other end touch metal. If it will get a shock. Use a remote positive (+) terminal if the vehicle has one . And do , you should know. Connect the red positive (+) cable to the negative (−) terminal on the vehicle with the dead battery. Before you connect the cables, here are some basic...
Owner's Manual - Page 284
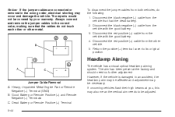
... vehicles, do not touch each other or other vehicle. 5. Return the positive (+) terminal cover to be covered by your warranty. Disconnect the red positive (+) cable from the other metal. Dead Battery or Remote Positive (+) Terminal 5-44 Notice: If the jumper cables are connected or removed in an accident, the headlamp aim may be affected and adjustment may...
Owner's Manual - Page 390

...33 Rearview Mirrors ...2-33
Reclining Seatbacks ...1-4 Recommended Fluids and Lubricants ...6-12 Recreational Vehicle Towing ...4-36 Remote Keyless Entry System ...2-3 Remote Keyless Entry System, Operation ...2-4 Removing the Flat Tire and Installing the Spare Tire ...5-76 Removing the Spare Tire and Tools ...5-72 Replacement Bulbs ...5-53 Reporting Safety Defects Canadian Government ...7-16...
Similar Questions

Where Is The Fuse For The Keyless Remote On The 2006 Chevy Cobalt Ss
(Posted by glcRLH 10 years ago)

How To Reset Car Remote On A 2006 Chevy Cobalt
(Posted by Nisandro 10 years ago)


My Check Engine Light On 2006 Cobalt Coupe Is On
what do i do about my check engine light on 2006 cobalt coupe being on
what do i do about my check engine light on 2006 cobalt coupe being on
(Posted by menn 11 years ago)