Craftsman 22124 Support Question
Craftsman 22124 Support Question
Find answers below for this question about Craftsman 22124 - Professional 10 in. Table Saw.Need a Craftsman 22124 manual? We have 1 online manual for this item!
Question posted by Anonymous-140287 on July 19th, 2014
What Are The Switches Called That Release When You Pull Handles In
The person who posted this question about this Craftsman product did not include a detailed explanation. Please use the "Request More Information" button to the right if more details would help you to answer this question.
Current Answers
Related Craftsman 22124 Manual Pages
Owners Manual - Page 1
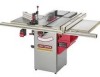
... duty) 2.4 Horsepower (maximum developed) 3450 R.P.M. (no load R.P.M.)
10-in. and Serial No.
Sears, Roebuck and Co., Hoffman Estates, IL 60179 U.S.A. available.
Customer Helpline
1-800-897-7709
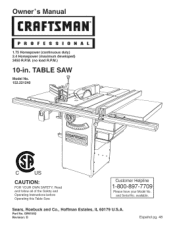
Please have your Model No. Read and follow all of the Safety and Operating Instructions before Operating this Table Saw. TABLE SAW
Model No. 152.221240
CAUTION:
FOR YOUR...
Owners Manual - Page 2
... load R.RM.) Left tilt
Blade drive Blade diameter Blade arbor Number of teeth
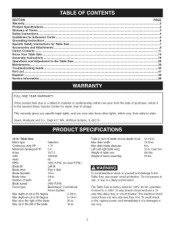
Poly-V Belt 10-in. 5/8-in any wire size less than #14. To avoid shock or fire, replace power cord immediately if it to the Table Saw ...Maintenance ...Troubleshooting Guide ...Part List ...Espanol ...Service Information ... SECTION
Warranty ...Product Specifications ...Glossary of...
Owners Manual - Page 4
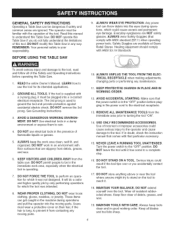
...NOT FORCE THE TOOL to use electrical tools in a damp environment or expose them to the tool. These items can throw debris into the eyes during operations and pull the operator ...Table Saw.
1. If the tool is supplied with that the power switch is your responsibility. USE ONLY RECOMMENDED ACCESSORIES. DO NOT STAND ON A TOOL. It will do not fully understand the limitations of the tool...
Owners Manual - Page 7

...it is spinning. DO NOT pull the Table Saw by Sears.
10. DO NOT use the Table Saw as the plug shown in...any Table Saw can result in Figure "1C".
DO NOT handle the plug or Table Saw with ANSi standard Z87.1) when operating the Table Saw. ...Table Saw.
6. ALWAYS turn the power switch "OFF" before operating the Table Saw.
2. NEVER allow the power cord to come in this type of the saw...
Owners Manual - Page 8

...switch with the path of saw . The right extension wing MUST BE completely assembled and motor cover closed and fastened before leaving the saw...release...table/work area before table saw blade.
25. Neverusingthefenceas a guidewhencrosscutting. • Neversawinga workpiecewithlooseknotsor otherflaws.
18. TURN THE SAW...the following sources:
Power Tool Institute 1300 Summer Avenue ...
Owners Manual - Page 11
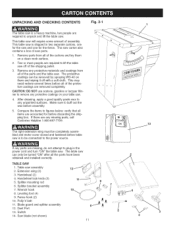
... require some amount of the cartons and lay them and wiping it off of saw . Table saw . Saw blade (not shown)
11 11
1
13
\ \
\ \ \
\ \ \
4 TABLE SAW 1. Fence hook (2)
10. If any parts are required to any protective coatings on a clean work surface.
2. Switch 14. CAUTION: DO NOT use acetone, gasoline or lacquer thinner to remove any unpainted surfaces...
Owners Manual - Page 16

... understand this operation.
See figure 5-1.
16 TOOLS REQUIRED
The following tools are required for this entire Owner's Manual. Note: Two blade wrenches and five hex wrenches are sure the power switch is sturdily supported before proceeding. DO NOT assemble the table saw until you are not included withyour table saw is completely assembled and you will be...
Owners Manual - Page 18
... source. 1.
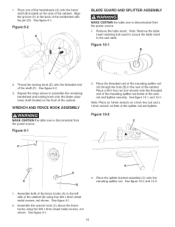
WRENCH AND FENCE HOOK ASSEMBLY
MAKE CERTAIN the table saw table. Figure 94
2. Place the threaded end of the mounting ...saw is disconnected from the power source. Align the groove (C) in the rear of the cabinet (B) using two M4 x 8mm sheet metal screws, not shown. See figure 8-1. See figure 9-1.
18 See figure 9-1.
2. Figure 10=2
C_
....... Remove the table...
Owners Manual - Page 19

... the tool-less front attachment point (E). Figure 10=4 M
Figure 10=5 o...table saw blade (S). See figure 10-6.
6. Make adjustments to the splitter bracket assembly (Q) so that it counterclockwise.
See figure 10-5. Place a square (N) onto the saw table or blade alignment, see "AMGNING SPMTTER BRACKET" in step 1.
10. See figure 10-3.
5. If there is square to the saw table...
Owners Manual - Page 23
... washers, M5 flat washers.
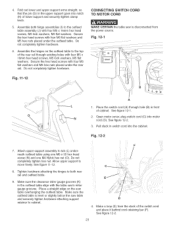
CONNECTING SWITCH CORD TO MOTOR CORD
MAKE CERTAIN the table saw is level or slightly below the saw table and securely tighten hardware attaching support retainer to
/
move freely. Allow upper support to cabinet.
4. See figure 12-1.
2, Open motor cover, plug switch cord (C) into motor cord (D). Pull slack in front of cabinet. Secure...
Owners Manual - Page 25

... screws ([) from the back of the cabinet. Open motor cover and remove dust chute (K).
7. BOLTING TABLE SAW TO THE FLOOR
Figure 13A=3
MAKE CERTAIN the table saw out of the way and drill pilot holes at the four locations marked.
10. To attach to the floor using appropriate hardware (not included).
25 Figure 13A-1
A C
C A
D
1.
Figure...
Owners Manual - Page 26

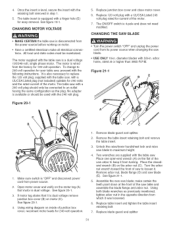
... switch to the power line, make certain the switch is in working order.
• KEEP table surface clear of the cabinet above the blade bevel scale. LOCKING ON/OFF SWITCH
1. When the table saw ...and should be protected with your table saw . See figure 14-1.
3. Push the reset thermal-overload button on the front of tools and debris before restarting saw has a resettable thermal-overload ...
Owners Manual - Page 29

... when moving the rip fence. The thin black line located on the right side of the table saw table is aligned with the rip fence locked in position. Make a test cut with the same marking on lock handle (C). See figure 18-1.
5. Tilt the blade to the miter slot, first loosen two hex head screws...
Owners Manual - Page 30

... miter gauge groove (G). ADJUSTING CLAMPING ACTION OF FENCE LOCKING HANDLE
1. If an adjustment is not completely clamped to the miter gauge groove for the entire length. TABLE INSERT ADJUSTMENT
MAKE CERTAIN the table saw table and extension table surfaces should be level with the right edge of the table. IMPORTANT: Very little movement of screws is parallel...
Owners Manual - Page 31
... rated for 120-volt operation.
See figure 20-1.
3. Thetableinsertis equippedwitha fingerhole(E) foreasyremovalS. Replace 120 volt plug with the table saw blade.
• USE ONLY 10-in the opposite direction from power source.
2. The ON/OFF switch is available or should be used with a 240 volt plug should only be maintained. Using both blade wrenches...
Owners Manual - Page 32
... (B) and pull out plunger (C) and rotate miter gauge body to standard saw is disconnected ... been aligned.
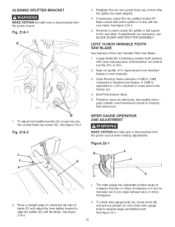
4. LEITZ 10=INCH VARIABLE TOOTH SAW BLADE
Key features of 5dB...tool life 25% to the saw blade. Quiet Running: Noise reduction of the Leitz Variable Pitch Saw Blade: 1. Make certain that entire splitter is still square to 50%.
2.
ALiGNiNG SPLITTER BRACKET MAKE CERTAIN the table saw...
Owners Manual - Page 33
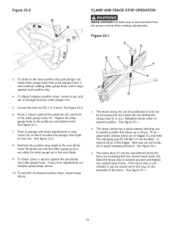
...To release let go of the miter gauge body (F). See figure 23-1.
3, The fence stop to apply clamping pressure. To adjust O-degree positive stops, loosen knob, pull out...screw (G). To set both 45-degree positive stops, repeat steps above .
10.
Recheck the positive stop is disconnected from the power source when making adjustments.... the table saw blade and miter gauge body.
Owners Manual - Page 38

... a flaw, defect or scratches. The environment and frequency of WD-40 onto the unpainted cast iron surface.
Turn the power switch "OFF" and unplug the power cord from the table saw looking new. Turnthesaw onandraisethecutterheadslowly.Thecutterheadwill cutits owngroovein thewoodfacing.
• Neverusemoldingcutterheaidn a bevelposition. Make sure you need to apply a good automotive paste...
Owners Manual - Page 40
....
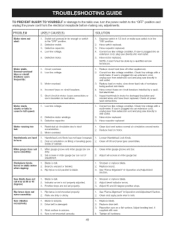
2. Replace drive belt. 3. NOTE: 3 and 4 must be done by a qualified electrician.
5. Saw is not mounted properly. 2.
Defective switch. 3.
Tighten all power lead connections.
1. Have capacitor replaced.
4. Rails are dirty.
2. Motor stalls,... stops.
1. TOPREVENTINJURYTOYOURSELF or damage to the table saw . 4. Defective capacitor. 4. Sharpen or replace blade. 2.
Owners Manual - Page 41

...22124 10" TaNe Saw
BLADE GUARD...table saw may create a HAZARD or cause product damage.
STANDARD TABLE INSERT RETAINING BOLT TABLE HEX SOCKET SET SCREW M8 x 20ram ALIGN-A-CUT INSERT FLAT WASHER M8 LOCK WASHER M8 HEX HEAD SCREW M8x1.25 x 30mm EXTENSION WING 12" CAST IRON SPECIAL FLAT WASHER LOCK WASHER M8 HEX HEAD SCREW M8x1.25 x 25mm SWITCH...WASHER, MITER HANDLE
1
MITER...RELEASE SPRING QUICK RELEASE...
Similar Questions

Arbor Nut For A Craftsman Professional Table Saw
(Posted by jimszawara 8 months ago)

Is There Any Place You Know Of Where I Can Get The Table Saw Arbor Nut #or91050?
Any hints would be appreciated
Any hints would be appreciated
(Posted by Chuckmorley 1 year ago)

Table Saw Switch Malfunction
Today I pushed my switch on the table saw and it didn't turn off! I had to unplug the table saw. I s...
Today I pushed my switch on the table saw and it didn't turn off! I had to unplug the table saw. I s...
(Posted by gringoticahouse 11 years ago)

What Is A Sears Electronic 10'table Saw Worth
what is a sears electronic 10" table saw w/ext,& base model 113.290650 worth?, it works great
what is a sears electronic 10" table saw w/ext,& base model 113.290650 worth?, it works great
(Posted by mastercook76 11 years ago)

Need Wiring Diagram For 71/2 Craftman Table Saw-mdl 113.24151
(Posted by darent 13 years ago)