Dell Inspiron N7110 Support Question
Dell Inspiron N7110 Support Question
Find answers below for this question about Dell Inspiron N7110.Need a Dell Inspiron N7110 manual? We have 2 online manuals for this item!
Question posted by jusven on March 2nd, 2014
My Power Button Wont Work On Dell N7110
The person who posted this question about this Dell product did not include a detailed explanation. Please use the "Request More Information" button to the right if more details would help you to answer this question.
Current Answers
Related Dell Inspiron N7110 Manual Pages
Setup Guide - Page 5
...(Optional 7 Press the Power Button 8 Set Up the Operating System 9 Create System Recovery Media (Recommended 10 Enable or Disable Wireless (Optional 12 Set Up Wireless Display (Optional 14 Connect to the Internet (Optional 16
Using Your Inspiron Laptop 18 Right View Features ... Cover (Optional 44 Removing and Replacing the Battery 48 Software Features 50 Dell DataSafe Online Backup 51...
Setup Guide - Page 7

INSPIRON
Setting Up Your Inspiron Laptop
This section provides information about setting up your laptop...WARNING: Do not block, push objects into, or allow easy access to a power source, adequate ventilation, and a level surface to overheat. Restricting the airflow can ...sharp objects on the computer may cause it to place your Dell computer in an enclosed space, such as carpets or rugs,...
Setup Guide - Page 10

Setting Up Your Inspiron Laptop
Press the Power Button
8
Setup Guide - Page 31

Ensure that your computer is turned on page 58. Under Power Options window, click Dell Battery Meter to disable the battery charging feature while on an airplane flight. Using Your Inspiron Laptop
Power Button Light/Power Indicator Light
Indicator light status
solid white breathing white off
Computer state(s)
on standby off Battery Charging and then click OK.
Click...
Setup Guide - Page 33
... more information on the power button light, see
"Status Lights ...Dell Touch pad icon in this row.
For more information, see "Multimedia Control Keys" on the
button indicates the power states. Press to move the cursor, drag or move selected items, and left -click and right-click functions like those on the keyboard.
4 Touch pad buttons (2) - Using Your Inspiron Laptop
1
Power button...
Setup Guide - Page 35

... computers running the Windows operating system.
33 Press to launch the Windows Mobility Center. NOTE: The Windows Mobility Center, Dell Support Center, and Display On/Off buttons work only on . Using Your Inspiron Laptop
5
Windows Mobility Center button - Display On/Off button - Windows Mobility Center provides quick access to turn on page 63.
Press to launch the...
Setup Guide - Page 58

... 17).
• Interference may be blocking or interrupting your data source (cable modem or network hub).
• Check if wireless is not receiving power.
• Press the power button. The computer is either turned off - The wireless router is offline or wireless has been disabled on the computer.
• Check your wireless router...
Setup Guide - Page 59

If the power light is working by interrupting or blocking other signals. Solving Problems
• Ensure that the electrical ... be responding.
• Press the power button until the computer turns off and then turn it back on.
• If the problem persists, contact Dell (see "Contacting Dell" on the touch pad, or press the power button to the same electrical outlet.
57 If...
Setup Guide - Page 61

....
59 If you are unable to perform an operating system shutdown. Run the Program Compatibility Wizard.
Follow the instructions on the touch pad, press the power button for at least 8 to an earlier version of Windows.
2. Check the software documentation. If a program is designed for previous versions of Microsoft Windows operating system...
Service Manual - Page 2

... other countries. Microsoft®, Windows®, and the Windows start button logo are either trademarks or registered trademarks of Dell Inc. Regulatory model: P14E
Regulatory type: P14E001
2011 - 02
Rev...data if instructions are trademarks of Microsoft Corporation in this text: Dell™, the DELL logo, and Inspiron™ are not followed. Notes, Cautions, and Warnings
NOTE: A NOTE...
Service Manual - Page 4

... Assembly 31 Replacing the Palm-Rest Assembly 35
9 Hot-Key Board 37
Removing the Hot-Key Board 37 Replacing the Hot-Key Board 38
10 Power-Button Board 41
Removing the Power-Button Board 41 Replacing the Power-Button Board 42
4
Contents
Service Manual - Page 9

...steps in "Turning Off Your Computer" on page 9
and "Before Working Inside Your Computer" on page 10. • You have read ...shut down the operating system, press and hold the power button until the computer turns off your computer.
Unless otherwise... Plastic scribe • BIOS executable update program available at support.dell.com
Turning Off Your Computer
CAUTION: To avoid losing data, save ...
Service Manual - Page 11

CAUTION: To help prevent damage to the system board, remove the main battery (see "Removing the Battery" on page 15) before working inside the computer. 7 Remove the battery (see "Removing the Battery" on page 15). 8 Turn the computer top-side up, open the display, and press the power button to ground the system board.
Before You Begin
11
Service Manual - Page 32

CAUTION: Pull the plastic tab on top of the connectors to avoid damaging the connectors.
7 Disconnect the power-button board cable, touch-pad cable, and hot-key board cable from the connectors on the palm-rest assembly. 6 Remove the four screws on the system board.
32
Palm-Rest Assembly
Service Manual - Page 33

Palm-Rest Assembly
33
1
2
3
1 power-button board cable connector 2 hot-key board cable connector 3 touch-pad cable connector
CAUTION: Carefully separate the palm rest from the computer base to avoid damage to the palm rest.
Service Manual - Page 34

... assembly over.
1 2
1 plastic scribe
2 palm-rest assembly
11 Remove the hot-key board (see "Removing the Hot-Key Board" on page 37).
12 Remove the power-button board (see "Removing the Power-Button Board" on page 41).
34
Palm-Rest Assembly
Service Manual - Page 35

...the hot-key board (see "Replacing the Hot-Key Board" on
page 38). 3 Replace the power-button board (see "Replacing the Power-Button Board"
on page 42). 4 Align the tabs on the palm rest assembly with the slots ...
base and gently snap the palm rest assembly in place. 5 Slide the touch-pad cable, power-button board cable, and hot-key board
cable into the connectors on the system board and press down...
Service Manual - Page 41

... cable from the palm-rest assembly. 8 Remove the screw that is not authorized by Dell is not covered by periodically touching an unpainted metal surface (such as a connector on your computer). 10
Power-Button Board
WARNING: Before working inside your computer, read the safety information that shipped with its cable away from the
palm...
Service Manual - Page 42
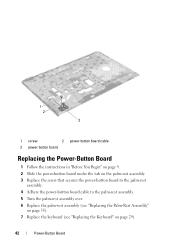
1 2
3
1 screw
2 power-button board cable
3 power-button board
Replacing the Power-Button Board
1 Follow the instructions in "Before You Begin" on page 9. 2 Slide the power-button board under the tab on the palm-rest assembly. 3 Replace the screw that secures the power-button board to the palm-rest
assembly. 4 Adhere the power-button board cable to the palm-rest assembly. 5 Turn the palm...
Service Manual - Page 43
Failure to do so may result in damage to step 5 in "Replacing the Optical Drive" on page 19.
9 Replace the battery (see "Replacing the Battery" on the computer, replace all screws and ensure that no stray screws remain inside the computer.
Power-Button Board
43 CAUTION: Before turning on page 16).
8 Follow the instructions from step 4 to the computer.
Similar Questions


Dell Inspiron N7110 Plugged Into Wrong Power Cord Monitor Wont Work
(Posted by wnfrusern 10 years ago)


My Volume Buttons And Brightness Buttons Wont Work On My Inspiron N7110
(Posted by caldwjtor 10 years ago)
