Dell Latitude E6230 Support Question
Dell Latitude E6230 Support Question
Find answers below for this question about Dell Latitude E6230.Need a Dell Latitude E6230 manual? We have 3 online manuals for this item!
Question posted by notcosm on October 24th, 2013
How To Remove Display Dell Latitude E6230
The person who posted this question about this Dell product did not include a detailed explanation. Please use the "Request More Information" button to the right if more details would help you to answer this question.
Current Answers
Related Dell Latitude E6230 Manual Pages
User Manual - Page 1

Dell Latitude E6230/E6330
Setup and Features Information
About Warnings
WARNING: A WARNING indicates a potential for property damage, personal injury, or death. camera status light (optional)
4. camera (optional) 3. display 5. Front View
1. power button 6. Latitude E6230 Front and Back View
Figure 1. microphone 2. HDMI connector
Regulatory Model: : P14T, P19S Regulatory Type: : P14T001...
User Manual - Page 3

... on the fan when the computer gets hot. Front view
1. power button 6. fingerprint reader (optional) 13. Latitude E6330 Front and Back View
Figure 3. display 5. contactless smart card reader
(optional)
3 eSATA/USB 2.0 connector 7. Do not store your Dell computer in the air vents.
camera status light 4. volume control buttons 9. Fan noise is running. microphone...
User Manual - Page 7

... inch to 1.19 inches) 335.00 mm (13.19 inches) 223.30 mm (8.79 inches) 1.65 kg (3.64 lb)
Environmental Operating Temperature:
Latitude E6230 Latitude E6330
10 °C to 35 °C (50 °F to 95 °F) 0 °C to 35 °C (32 °F to...this document in compliance with your computer and the regulatory compliance website at www.dell.com/regulatory_compliance for more information on:
7
User Manual - Page 8

...by Dell Inc. All rights reserved. disclaims any proprietary interest in the U.S. Information in this text: Dell™, the DELL logo, Dell Precision™, Precision ON™, ExpressCharge™, Latitude™, Latitude ON... • Safety best practices • Regulatory certification • Ergonomics See www.dell.com for use of such mark by the Blu-ray Disc Association (BDA) and...
Owner's Manual - Page 2

... trademarks of VMware, Inc. Novell® and SUSE® are registered trademarks or trademarks of Microsoft Corporation in this text: Dell™, the Dell logo, Dell Precision™ , OptiPlex™, Latitude™, PowerEdge™, PowerVault™, PowerConnect™, OpenManage™, EqualLogic™, Compellent™, KACE™, FlexAddress™, Force10™ and...
Owner's Manual - Page 4

... Smart Card Cage...39 Installing the Smart Card Cage...40 Removing the Display Bezel...40 Installing the Display Bezel...41 Removing the Display Panel...41 Installing the Display Panel...42 Removing the Display Assembly...42 Installing the Display Assembly...44 Removing the Camera...45 Installing the Camera...46 Removing the LVDS and Camera Cable...47 Installing the LVDS and Camera Cable...
Owner's Manual - Page 7

...and simple repairs as authorized in your computer (see the Regulatory Compliance Homepage at www.dell.com/ regulatory_compliance
CAUTION: Many repairs may appear differently than shown in this type of ...to a docking device (docked) such as a processor by its edges, not by performing the removal procedure in Working on Your Computer. • You have connectors with care. NOTE: The color of...
Owner's Manual - Page 8

... down your computer.
1. Connect any external devices, cards, and cables before opening the display. Remove the main battery. 8. CAUTION: To guard against electrical shock, always unplug your computer,...8594; Turn Off Computer → Turn Off .
Do not use only the battery designed for other Dell computers.
1. Turn the computer top-side up. 9. The computer turns off . CAUTION: To avoid...
Owner's Manual - Page 33

Remove the screws that secure the system board to the computer.
33 Disconnect the WiFi-switch board cable.
4. Disconnect the ExpressCard cage cable.
5. Disconnect the power-connector cable.
6. f) keyboard g) bluetooth module h) heat-sink fan i) heat sink module j) speakers k) display assembly l) chassis base 3.
Owner's Manual - Page 34

Remove the system board. Installing the System Board
1. Place the system board in its compartment. 2. Install the: a) chassis base b) display assembly c) speakers d) heat-sink fan e) heat sink f) bluetooth module 34 Lift the left edge of the system board and raise it to the computer. 3. Connect ...
Owner's Manual - Page 39

... base cover h) battery i) ExpressCard j) SD card 5. Remove the smart card cage.
39 Follow the procedures in Before Working Inside Your Computer. 2.
Remove the:
a) SD card b) ExpressCard c) battery d) base cover e) palmrest f) keyboard g) heat-sink fan h) bluetooth module i) speakers j) display assembly k) lower chassis l) system board 3. Remove the screw that secures the smart card cage to...
Owner's Manual - Page 40

... module f) heat-sink fan g) keyboard h) palmrest i) base cover j) battery k) ExpressCard l) SD card 4. Follow the procedures in its compartment. 2.
Remove the battery. 3. Pry the top edge of the display bezel.
5. Remove the display bezel from the display assembly.
40 Work your way along to the computer. 3. Place the smart card cage in After Working Inside Your...
Owner's Manual - Page 41
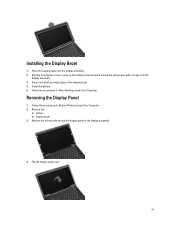
... procedures in Before Working Inside Your Computer. 2. Press on the display bezel and work around the entire bezel until is snaps onto the
display assembly. 3. Removing the Display Panel
1. Remove the screws that secure the display panel to the display assembly.
4. Install the battery. 5. Installing the Display Bezel
1. Follow the procedures in After Working Inside Your Computer.
Flip...
Owner's Manual - Page 42

... Inside Your Computer. 2. Follow the procedures in After Working Inside Your Computer.
Tighten the screws that secure the display panel to the display panel. 2. Remove the:
a) SD Card b) ExpressCard c) battery d) base cover e) palmrest f) keyboard 3. Remove the display panel from the bottom of the chassis
42 Affix the LVDS cable connector tape and connect the LVDS...
Owner's Manual - Page 51

...51 Down arrow
Moves to the previous field. During the Power-on Self Test (POST), when the Dell logo appears, you can:
• Access System Setup by pressing key • Bring up the...time boot menu by pressing key
The one-time boot menu displays the devices that you can :
• Change the NVRAM settings after you add or remove hardware • View the system hardware configuration • ...
Owner's Manual - Page 68

... E6330 Network adapter USB
Memory card reader Docking port Subscriber Identity Module (SIM) card
Contactless Smart Card Supported Smart Cards/Technologies
Display Type Size
Latitude E6230 Latitude E6330
microphone-in -1 memory card reader one one eSATA/USB 2.0 compliant- connector one 8-in /stereo headphones/external speakers connector two 1 W (RMS) per channel keyboard function ...
Owner's Manual - Page 69

Display Dimensions: Latitude E6230
Height Width Diagonal Active area (X/Y) Latitude E6330 Height Width Diagonal Active area (X/Y) Maximum resolution Maximum Brightness Operating angle Refresh rate Minimum Viewing angles: Horizontal Vertical Pixel pitch
Keyboard Number of keys
...
Owner's Manual - Page 71

... 30.10 mm (1 inch to 1.19 inches) 335.00 mm (13.19 inches) 223.30 mm (8.79 inches) 1.65 kg (3.64 lb)
Environmental Temperature: Operating
Latitude E6230 Latitude E6330 Storage Relative humidity (maximum): Operating Storage Altitude (maximum): Operating Non-Operating Airborne contaminant level
10 °C to 35 °C (50 °F to 95 °...
Statement of Volatility - Page 1

... Dell Latitude™ E6230/E6330/E6430/E6430ATG/E6530 contains both modules
will be populated. Non-volatile (NV) components continue to retain their data immediately after power is removed ...SoDIMM. Stores panel
assembly
manufacturing information
and display configuration
data. Volatile components lose their data even after power is removed from the component.
System BIOS U52,U53...
Statement of Volatility - Page 3

... affiliates. The OS does not save any component on which clears all the states supported by Dell Latitude™ E6230/E6330/E6430/E6430ATG/E6530
Model Number Dell Latitude™ E6230 Dell Latitude™ E6330 Dell Latitude™ E6430 Dell Latitude™ E6530 Dell Latitude™ E6430 ATG
S0
S1
S3
S4
S5
X
X
X
X
X
X
X
X
X
X
X
X
X
X
X
X
X
X
X
X
© 2012...
Similar Questions

Why Dell Latitude E6230 Fell To Turn On
Why dell latitude e6230 fell to turn on
Why dell latitude e6230 fell to turn on
(Posted by kellywizkingb 2 years ago)


How To Remove Memory From Dell Laptop Latitude E6430
(Posted by kjcGBor 10 years ago)

Dell Latitude E6230 Hard Drive Caddy
I am trying to source a caddy and connector for a dell latitude e6230. If you know of any links or p...
I am trying to source a caddy and connector for a dell latitude e6230. If you know of any links or p...
(Posted by bcrosbie74 10 years ago)
