Dell V515W Support Question
Dell V515W Support Question
Find answers below for this question about Dell V515W.Need a Dell V515W manual? We have 1 online manual for this item!
Question posted by papasyner on January 14th, 2014
How Do I Remove The Printhead From My Dellv515 Printer So I Can Reinsert It
properly
Current Answers
Related Dell V515W Manual Pages
User's Guide - Page 7

...the power cord. Inspect the power cord regularly for signs of such problems. Remove the power cord from the printer before inspecting it. SAVE THESE INSTRUCTIONS. Use only the power supply and ... cord, or telephone, during a lightning storm.
Safety information
Connect the power cord to a properly grounded electrical outlet that is near water or wet locations. Do not place or use of...
User's Guide - Page 9
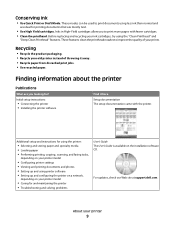
... of throwing it here Setup documentation The setup documentation came with fewer cartridges. • Clean the printhead. Recycling
• Recycle the product packaging. • Recycle your old printer instead of your printer model
• Caring for using the printer:
• Selecting and storing paper and specialty media • Loading paper • Performing printing, copying...
User's Guide - Page 12

... this port if you do not have a dedicated fax line for the printer, and if this connection method is supported in or removing a USB cable or installation cable. Install, replace, or remove ink cartridges.
• Access the ink cartridges and printhead. • Remove paper jams.
About your country or region. Use the
To
1 Top cover...
User's Guide - Page 13

...1 Licensed for remanufacturing, refilling, or recycling.
Ordering and replacing supplies
13 For best results, use only. Note: The printhead moves to Dell for a single use only Dell ink cartridges.
Ordering and replacing supplies
Ordering ink cartridges
Page yields available at... about recycling Dell products, visit www.dell.com/recycling.
2 Available only on your printer. 2 Open the...
User's Guide - Page 15

Note: Install the new ink cartridges immediately after removing the protective cap to avoid exposing the ink to Dell for recycling:
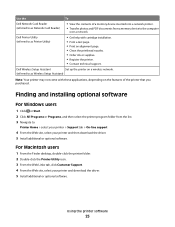
1 Click or Start. 2 Click All Programs or Programs, and then select the printer program folder from the list. 3 Select Printer Home. 4 Choose your printer from the printer drop-down list. 5 Click Order supplies in the...
User's Guide - Page 19

... revert to the default settings after two minutes of inactivity or after the printer is turned off the printer, but they will return to the factory default settings when a memory card or flash drive is removed.
• Photo Effects • Photo Size • Layout • Quality
To change the temporary settings into new...
User's Guide - Page 22

....dell.com. Using the printer software
22
Using the printer software
Minimum system requirements
The printer software requires up the printer using the installation software CD, all the necessary software was installed. You may be available at support.dell.com. Using the Windows printer software
Software installed during initial installation, then reinsert the installation software CD...
User's Guide - Page 25
... device to the computer
over a network. Using the printer software
25
Use the
To
Dell Network Card Reader (referred to as Wireless Setup Assistant)
Note: Your printer may not come with cartridge installation. • Print a test page. • Print an alignment page. • Clean the printhead nozzles. • Order ink or supplies. •...
User's Guide - Page 26

... folder from the list. 3 Select the uninstall option. 4 Follow the instructions on the computer screen. Reinstalling the printer software
When you send a print job, then try removing and reinstalling the printer software.
Updating the printer software (Windows only)
Checking for software updates
1 Click or Start. 2 Click All Programs or Programs, and then select the...
User's Guide - Page 41

... proof sheet, or print pre-selected photos from a digital camera using the printer control panel
1 Load photo paper. 2 From the printer control panel, press .
3 Insert a memory card, flash drive, or ...Photo or Print Photos, and then press .
Notes:
• If the printer does not recognize the memory device, then remove and reinsert it. • If a flash drive or a digital camera set to ...
User's Guide - Page 85

... telephone into the wall jack. 2 Listen for you set the ringer volume loud enough for a dial tone through the telephone handset. Make sure the printer is connected properly to the telephone line
1 While the printer is working .
Make sure that you to hear it. If you can I adjust the speaker volume on the...
User's Guide - Page 114

... your printer from the list. 4 Select Printer Home. 5 Select your prints. Clean the printhead nozzles to clogged printhead nozzles. Maintaining the printer
114
Using the printer control panel
1 From the printer control panel, press . 2 Press the arrow buttons to scroll to Align Printer, and then press . 5 Press again. If you can clean the printhead nozzles. Note: Do not remove the...
User's Guide - Page 115

...-Potential Damage: Do not use household cleaners or detergents, as they may cause damage to remove any ink residue that the printer is turned off and unplugged from the wall outlet and disconnect all cables to clean the printhead nozzles.
Warning-Potential Damage: Using a damp cloth to clean the interior may damage the...
User's Guide - Page 118

REMOVE AND REINSERT THE PRINTHEAD
1 Open the printer and lift the latch.
2 Remove the printhead. Warning-Potential Damage: Do not touch the printhead ink filter or the printhead nozzles.
3 Wipe the contacts using a clean, lint-free cloth. • On the printhead
Troubleshooting
118
User's Guide - Page 119

Note: If removing and reinserting the printhead does not resolve the error, then contact customer support. Troubleshooting
119
• On the printhead carrier
Warning-Potential Damage: Do not touch the printhead ink filter or the printhead nozzles.
4 Reinsert the printhead, and then close the latch until it clicks. 5 Close the printer.
User's Guide - Page 120

...port is damaged, then use a new one or more of the printhead.
3 Close the printer. Software did not install
If you reinstall the software, do the following ...PRINTER IS SET AS THE DEFAULT PRINTER
Troubleshooting
120 RECONNECT THE PRINTER POWER SUPPLY
1 Turn off the printer, and then unplug the power cord from the wall outlet. 2 Gently remove the power supply from the printer, and then reinsert...
User's Guide - Page 121

... computer.
REINSTALL THE INK CARTRIDGES AND DEEP CLEAN AND ALIGN THE PRINTHEAD
1 Reinstall the ink cartridges.
RECONNECT THE PRINTER POWER SUPPLY
1 Turn off the printer, and then unplug the power cord from the wall outlet. 2 Gently remove the power supply from the printer, and then reinsert it. 3 Plug the power cord into the USB port of...
User's Guide - Page 122

... NOT IN POWER SAVER MODE
If the power light is blinking on and off the printer, and then unplug the power cord from the wall outlet. 2 Gently remove the power supply from the printer, and then reinsert it. 3 Plug the power cord into the wall outlet, and then turn on the computer. Press to...
User's Guide - Page 126

... a paper size that has "(Borderless)" in its name. SELECT A HIGHER PRINT QUALITY FROM THE PRINTER SOFTWARE
MAKE SURE THE INK CARTRIDGES ARE PROPERLY INSTALLED
ALIGN THE PRINTHEAD
CLEAN OR DEEP CLEAN THE PRINTHEAD NOZZLES
Note: If these solutions do not remove the streaks or lines on printed image
If the "Before you troubleshoot" checklist does...
User's Guide - Page 136

...Remove and then reinsert the memory card quickly. The USB port is marked with a
USB symbol. Note: If you continue to have problems, then try another USB port on the computer. Select the printer from the computer or the computer from the printer... checklist" does not solve the problem, then try the following :
REINSERT THE MEMORY CARD
The memory card may have connected to a defective port...
Similar Questions


