Dynex DX-L19-10A Support Question
Dynex DX-L19-10A Support Question
Find answers below for this question about Dynex DX-L19-10A - 19" LCD TV.Need a Dynex DX-L19-10A manual? We have 5 online manuals for this item!
Question posted by Anonymous-21073 on January 1st, 2011
Cannot Get Tv To Go To Computer Mode To Use As Monitor
The person who posted this question about this Dynex product did not include a detailed explanation. Please use the "Request More Information" button to the right if more details would help you to answer this question.
Current Answers
Related Dynex DX-L19-10A Manual Pages
User Manual (English) - Page 1

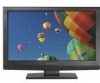
15", 19", and 22" LCD TVs
DX-L15-10A/DX-L19-10A/DX-L22-10A
USER GUIDE
User Manual (English) - Page 2

...DX-L15-L19-L22-10A
15", 19", and 22" LCD TVs
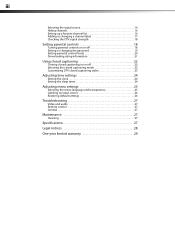
Contents
Child Safety 1
Important safety instructions 2
Warnings 2 Cautions 2
Installing and removing the stand 3
Installing the stand 3 Adjusting the viewing angle of the TV 4 Removing the stand 4 Installing a wall-mount bracket 4
TV components 5
Front 5 Side 5 Back 5 Remote control 6
Using...13
Adjusting the TV picture 13 Adjusting Advanced ...
User Manual (English) - Page 3
... controls 18
Turning parental controls on or off 18 Setting or changing the password 19 Setting parental control levels 20 Downloading rating information 21
Using closed captioning 22
Turning closed captioning on or off 22 Selecting the closed captioning mode 22 Customizing DTV closed captioning styles 23
Adjusting time settings 24
Setting the...
User Manual (English) - Page 4

... into safety
• One size of wall mount does not fit all. • Follow all enclosed instructions for proper use your flat panel display
As you enjoy your TV.
• Carefully read and understand all instructions supplied by curious children. At least two people are not always supported on dressers, bookcases, shelves, desks, speakers...
User Manual (English) - Page 5
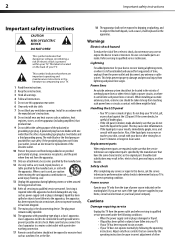
...should not be careful of broken glass.
• If the LCD panel is broken, make sure that the service technician uses replacement parts specified by following conditions:
• When the ... ELECTRIC SHOCK
DO NOT OPEN
This symbol indicates that dangerous voltage constituting a risk of your TV. Class I apparatus.
Safety check
After completing any heat sources such as power-supply cord...
User Manual (English) - Page 6

...TV has been dropped or damaged in any damages or injuries that you are not considered defects. In such cases, change in performance. Disposal of cable entry as a fixed blue, green, or red point. Non-active pixels
The LCD panel...stand upright on a wall or other flat surface. Occasionally, a few non-active pixels may also form during the summer if the TV is not covered by the manufacturer's...
User Manual (English) - Page 7

... four M4*10 screws provided with the bracket.
Note: The appearance of hazards, do not perform any servicing other than that your TV is for use caution to 10°.
To reduce the risk of this product in the operating instructions unless you put down a soft cushion or cloth so that ...
User Manual (English) - Page 8

... audio) to these jacks. Connect an antenna, cable TV, or a satellite box to this jack. TV components
5
TV components
Back
Front
Model DX-L15-10A is used in this manual for audio left). Do not block.... an audio signal, so you do not need to the AV1 audio jacks.
Lights red when your TV in standby mode.
## Component 1 Service port 2 HDMI jack
3 VGA AUDIO/ VGA PIC jacks
4 RS-232 jack...
User Manual (English) - Page 9
...to select the picture mode. For more information, see "Displaying additional information" on page 13.
17 EXIT
Press to close the on-screen menu.
18 SLEEP 19 CH-LIST 20 PICTURE
...Press to select the aspect ratio. 6
TV components
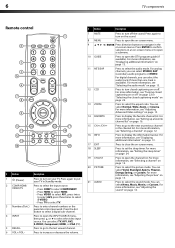
Remote control
INFO
# Button
Description
1
(Power)
Press to turn on your TV in Standby mode.
2 COMP/HDMI/ VIDEO/TV
Press to select the input source.
...
User Manual (English) - Page 10
... compartment with a new or existing universal remote control. For more help, call the Dynex Customer Care Center at which you must use the remote control for your TV. Using the remote control
7
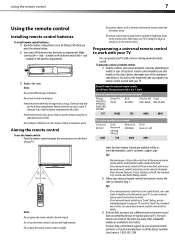
Using the remote control
Installing remote control batteries
To install remote control batteries: 1 Open the battery compartment cover by identifying its model...
User Manual (English) - Page 11
...illustrations may be operated from radio waves.
Notes:
Your TV should only be different from your equipment.
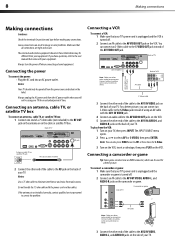
For a better picture, you can be using an AV cable with the power cord or other ...the cable to the S-Video jack instead of using your TV for a better picture.
Always unplug the AC power cord from the VCR:
1 Turn on your TV. Notes:
Use a 75 ohm cable to the AV2 IN ...
User Manual (English) - Page 12
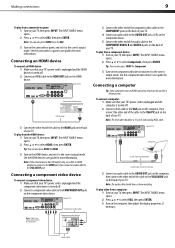
...device.
To play from a component device: 1 Turn on your TV, then press INPUT. Note: If the external device has DVI output only, use a DVI-to-HDMI adapter to connect to the HDMI jack,... 2 Connect an HDMI cable to the correct output mode.
The INPUT SOURCE menu opens. 2 Press or to select Component, then press ENTER.
Back of TV
Device with HDMI output
HDMI cable
3 Connect the other...
User Manual (English) - Page 13
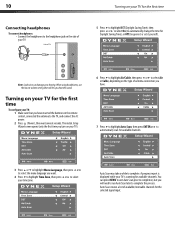
...), then press or to select On (to automatically change the time for Daylight Saving Time), or Off (to the TV, and connect the AC power. 2 Press (Power), then wait several seconds. When using headphones, use the lowest volume setting that you want.
4 Press to highlight Time Zone, then press or to complete. You...
User Manual (English) - Page 14

... still receiving power. You can also select the input source using the following remote control buttons:
• COMP-Press to select Component. • HDMI-Press to select HDMI. • VIDEO-Press once to select TV. The illustrations and screens shown in TV mode. On-screen menu overview
Picture menu
Notes:
Depending on the signal...
User Manual (English) - Page 15
...variety of your selection or enter a sub-menu.
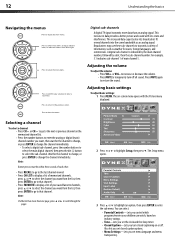
Press to enter the sub menu. Broadcasters may use these sub-channels to highlight Setup, then press .
Selecting a channel
To select a channel: &#...to select menu items, to change the channel immediately. Digital sub-channels
A digital TV signal transmits more than an analog signal. The increased data capacity also lets broadcasters fit...
User Manual (English) - Page 16
...-Displays channel number, station name, channel label (if preset), broadcast program name, TV rating, signal type, audio information, resolution, CC mode, current time, and current program start and end times. • Analog mode information-Displays channel number, channel label (if preset), signal type, audio information, and resolution. 2 Press GUIDE to show the digital...
User Manual (English) - Page 17

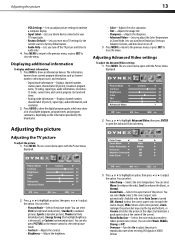
... then press . Adjusting the computer image
To adjust the computer image: 1 Make sure that your TV is in VGA mode. H-Position V-Position
5 Press or to highlight an option, then press or to close the menu... the picture display for a more vivid image.
• Auto Zoom-In TV mode, setting Auto Zoom to On lets you set the Zoom Mode to Auto.
4 Press MENU to return to the previous menu, or press...
User Manual (English) - Page 18

... scan.
The on -screen menu opens.
2 Press or to highlight Channel, then press . To exit Audio Only mode, press any button. To select an audio track for channels: 1 Press MENU. To play only the TV audio:
1 Press MENU. The on -screen menu opens. The Channel menu opens.
2 Press or to highlight Auto...
User Manual (English) - Page 25

... MENU. The rating information is broadcast by another program, your TV downloads the new rating information. Parental Controls
Parental Controls Tip: You can be used for parental controls. Selecting the closed captioning mode
To select the closed caption menu opens.
6 Press or to highlight RRT Setting, then press ENTER. The on -screen menu...
User Manual (English) - Page 30

.... TV type LCD TV panel 15-inch (DX-L15-10A) TFT LCD
19-inch (DX-L19-10A) TFT LCD
TV system Channels
22-inch (DX-L22-10A) TFT LCD NTSC-M, ATSC VHF: 2 - 13 UHF: 14 - 69
CATV: 1 - 125
CADTV: 1-135
DTV: 2 - 69 Audio multiplex BTSC system
Audio output 3W × 2
Power requirement AC 120 V, 60 Hz
For more information, see "Selecting the audio mode" on page 13...
Similar Questions


How Do I Change The Tv Source On My Dynex 19' Lcd Tv From Antenna To Cable Box?
(Posted by caroltiff1 11 years ago)

I Have Checked Updated Drivers And Everything Yet My Monitor Has No Sound.
The mixer shows sound and everything I check seems good but my monitor is quiet.
The mixer shows sound and everything I check seems good but my monitor is quiet.
(Posted by billing24806 11 years ago)

Can't Hook Up To Cable
We have a Dynex DX LCDTV 19 and we can't get the cable tv to work.
We have a Dynex DX LCDTV 19 and we can't get the cable tv to work.
(Posted by carolebertowski 12 years ago)

Computor Hookup
I am trying to use this TV as a monitor for my comp but I cant even get the VGA selection to comeup....
I am trying to use this TV as a monitor for my comp but I cant even get the VGA selection to comeup....
(Posted by drivefme1 13 years ago)