Dynex DX-L42-10A Support Question
Dynex DX-L42-10A Support Question
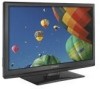
Find answers below for this question about Dynex DX-L42-10A - 42" LCD TV.Need a Dynex DX-L42-10A manual? We have 5 online manuals for this item!
Question posted by darkhalo2008 on December 10th, 2010
Pluged In No Green Light Could Not Get It On Tried Many Differnt Outlets
The person who posted this question about this Dynex product did not include a detailed explanation. Please use the "Request More Information" button to the right if more details would help you to answer this question.
Current Answers
Related Dynex DX-L42-10A Manual Pages
Warranty (English) - Page 1

...replaced under this warranty that provides the same amount of the product • Plasma display panel damaged by this warranty become the property of Dynex and are required after the Warranty Period ... the Warranty Period of a defect covered by static (non-moving) images applied for a television with new or rebuilt comparable products or parts. This warranty lasts as long as the original...
User Manual (English) - Page 1

37" and 42" LCD TVs
DX-L37-10A/DX-L42-10A
USER GUIDE
User Manual (English) - Page 2

ii
Dynex DX-L37-10A/DX-L42-10A
37" and 42" LCD TVs
Contents
Child Safety 1
Important safety instructions 2
Warnings 2 Cautions 2
Installing and removing the stand 3
Installing the stand 3 Installing a wall-mount bracket 4
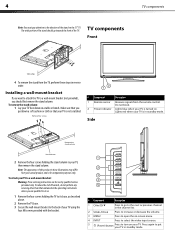
TV components 4
Front 4 Side 4 Back 5 Remote control 5
Using the remote control 6
Installing remote control batteries 6 Aiming the remote control 6 Programming a ...
User Manual (English) - Page 4

... in mind
The issue
The home theater entertainment experience is appropriate.
Wall mounting
If you decide to wall mount your TV, always: • Use only a wall mount rated for proper use your flat panel display
As you are committed to the manufacturer's recommendations. If you enjoy your ability to walls backed with entertainment...
User Manual (English) - Page 5

...fire, electric shock, personal injury, or other . Handling the LCD panel
• Your TV's screen is present within your TV.
If you do not remove any service or repair to
avoid...,
such as radiators, heat
registers, stoves, or other electric light or power circuits, or where it from the power outlet and refer servicing to qualified service personnel under the following conditions:...
User Manual (English) - Page 6

... TV also contains material that you must install your TV, make sure that can cause damage to your TV into a warm room or if the temperature of other flat surface. Non-active pixels
The LCD panel .... Installing and removing the stand
3
• If your TV by the speaker.
When using a table or bench as a fixed blue, green, or red point. To prevent this installation. This can ...
User Manual (English) - Page 7
... stand on .
Note: The appearance of the stand should first remove the stand column. To attach your TV is turned on the 37" TV. The wide portion of this product in standby mode. Lights red when your TV to a wall-mount bracket: Warning: These servicing instructions are qualified to do not perform any servicing...
User Manual (English) - Page 8

...IN jack
Connect an AV device (video and audio) to these jacks.
8 RF jack
Connect an antenna, cable TV, or a satellite box to this jack. For more
information, see "Connecting a camcorder or game" on page ..., then connect audio cables to the
audio jacks.
# Button
1
(Power)
2 COMP/HDMI/ VIDEO/TV
INFO
Description Press to turn on page 7.
9 S-VIDEO 1 IN jack Connect an S-Video device to...
User Manual (English) - Page 9

...in an area with a cloth. Chemicals may leak into the battery compartment. Do not dispose of your TV.
16.4 ft (5m)
Notes: Do not expose the remote control to use the remote control for ...mode. You can select STEREO, SAP (secondary audio program), or MONO. Remove the batteries if you can select TV, AV1, AV2, S-VIDEO1, S-VIDEO2, Component1, Component2, HDMI1, HDMI2, HDMI3, or VGA (PC).
5 ...
User Manual (English) - Page 10

... may be different from the AC power outlet when you must use a different universal remote control that came with your equipment.
Always turn the power off when connecting external equipment. Connecting an antenna, cable TV, or satellite TV box
To connect an antenna, cable TV, or satellite TV box: 1 Connect one at : www.dynexproducts.com...
User Manual (English) - Page 11

... connectors.
Connecting a component video device
To connect a component video device: 1 Make sure that your TV's power cord is unplugged and the component video device is turned off. 2 Connect an AV cable... on the VCR. 8
Making connections
Connecting a VCR
To connect a VCR: 1 Make sure that your TV's power cord is unplugged and the VCR is turned off. 2 Connect a component video cable to the ...
User Manual (English) - Page 12
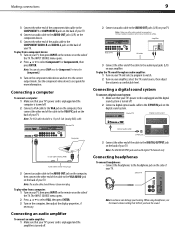
... and set it to the COMPONENT AUDIO-R and AUDIO-L jacks on the back of your TV. Back of TV
Computer
D-Sub cable (analog RGB)
Audio cable (stereo mini plugs)
3 Connect an audio...
To play from a computer: 1 Turn on your hearing.
Note: The DIGITAL OUTPUT jack works with digital TV channels only. Note: The VGA cable should have a stereo mini plug. Making connections
9
3 Connect the...
User Manual (English) - Page 13
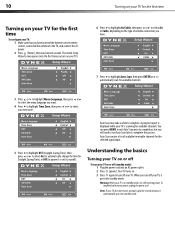
... AC power.
2 Press (Power), then wait several minutes, it automatically goes into standby mode. When you turn off your TV, it goes into an AC power outlet. 2 Press (power).
Understanding the basics
Turning your TV. Auto Scan creates a list of antenna connection you have .
7 Press to highlight Auto Scan, then press ENTER or...
User Manual (English) - Page 14

... for explanation purposes and may see different options on your TV, then press INPUT on the remote or on the side of the TV. Press three times to select AV1. Press once to select... select the input source using the following remote control buttons: • COMP- Press once to select TV.
The INPUT SOURCE menu opens. Press to select HDMI1. Audio menu
Setup menu
2 Press or to...
User Manual (English) - Page 15

MENU-Press to return to restore the sound. Digital sub-channels
A digital TV signal transmits more than an analog signal. The increased data capacity also lets broadcasters fit several channels into the same bandwidth as weather forecasts, foreign ...
User Manual (English) - Page 16

...Digital mode information-Displays channel number, station name, channel label (if preset), broadcast program name, TV rating, signal type, audio information, resolution, CC mode, current time, and current program start and... center of available programs, program times, and program summaries, depending on or off the TV picture and listen to audio only.
4 Press MENU to return to the previous menu,...
User Manual (English) - Page 17

...(for movies), or Custom (for a customized sound mode). For more vivid image.
• Auto Zoom-In TV mode, setting Auto Zoom to On lets you set the Zoom Mode to Auto.
4 Press MENU to return to...levels for all channels. Adjusting the computer image
To adjust the computer image: 1 Make sure that your TV is in VGA mode. Adjusting the sound
Adjusting the sound
To adjust the sound: 1 Press MENU.
...
User Manual (English) - Page 18

...STEREO-Select this option for analog channels. You can turn off the picture on your TV is TV and your TV and listen to highlight Auto Scan, then press ENTER. Changing channel settings
Automatically scanning for... Press or to select Air or Cable.
4 Press or to only the program audio.
Playing TV audio only
You can select: • MONO-Select this option to listen to highlight Setup, then...
User Manual (English) - Page 30

... on page 20 or "Turning parental controls on or off your TV, then turn it is plugged into an AC power outlet. You can add the channel back to watch may have been ...a power outlet.
• Press (power) on an LCD screen is not correct Only noise (snow) appears on page 7.
• Try another channel. For more information, see "Connecting an antenna, cable TV, or satellite TV box" on...
User Manual (English) - Page 31

TV type TV panel
TV system Channels
LCD 37-inch (DX-L37-10A) TFT LCD 42-inch (DX-L42-10A) TFT LCD NTSC-M, ATSC VHF: 2 - 13 UHF: 14 - 69 CATV: 1 - 125
Audio multiplex Audio output
Power requirement Power consumption
Dimensions
Weight Input terminals
CADTV: 1-135 DTV: 2 - 69 BTSC system
10 W × 2
AC 120 V, 60 Hz
140W (37") 180W (42") 35.4 × 25 × 11.8 inches...
Similar Questions

Tv Won't Turn On....the Green Light Comes On When You Try To Turn On Tv But Noth
TV won't turn on..Green light comes on but no TV Pic or Volume
TV won't turn on..Green light comes on but no TV Pic or Volume
(Posted by Anonymous-115417 10 years ago)

Trying To Mount 42' Dynex Lcd To Wall But There Are No Screw Holes On Back Of Tv
for wall bracket, just 4 screws that appear to be holding the tv together. Do these screws come out ...
for wall bracket, just 4 screws that appear to be holding the tv together. Do these screws come out ...
(Posted by layup15 11 years ago)
Green Light Blinks At Top Of Screen
(Posted by ramonleon03 12 years ago)

My Picture Drops Out On My Tv. Sound Stays On Just No Picture. 42' Dynex Lcd Tv
(Posted by elmateo27 12 years ago)

Hooking Up Surround Sound To Dynex Lcd Tv?
I have tried hooking up my surround sound to my dynex tv in several different manners now. To no s...
I have tried hooking up my surround sound to my dynex tv in several different manners now. To no s...
(Posted by jacobthammond 13 years ago)