Electrolux EW30DS65GS Support Question
Electrolux EW30DS65GS Support Question
Find answers below for this question about Electrolux EW30DS65GS - 30" Slide-In Dual Fuel Range.Need a Electrolux EW30DS65GS manual? We have 4 online manuals for this item!
Question posted by shellyyakus on August 17th, 2019
Electrolux Ew30ds65gs
I have an F 15 error code in my Electrolux dual fuel slide in oven. I have turned off the power to try to reset it I have tried to set the clock nothing is working so far .This message appeared as I was wiping the glass display to clean it and I can't get it to go away and reset it what should I do? Thank you, Shelly
Current Answers
Answer #1: Posted by Odin on August 17th, 2019 5:04 PM
Odin

Member since:
April 10th, 2010 Points: 41,236,630

Member since:
April 10th, 2010 Points: 41,236,630
See the answer by 16345Ed at https://appliantology.org/topic/59724-dreaded-electrolux-ew30es65gsg-range-e15-error/.
Hope this is useful. Please don't forget to click the Accept This Answer button if you do accept it. My aim is to provide reliable helpful answers, not just a lot of them. See https://www.helpowl.com/profile/Odin.
Answer #2: Posted by Troubleshooter101 on August 20th, 2019 10:42 AM
Troubleshooter101

Member since:
September 30th, 2015 Points: 2,927,030
Member since:
September 30th, 2015 Points: 2,927,030
F15 Controller self check failed or terminal cutoff open. 1) An F15 error code on the oven controller may indicate the oven controller is not receiving a synchronization signal from the relay board. One easy way to determine this is to power off the unit, power it on and start a Timer for 1 minute before the F15 error code appears. If the timer counts-down normally then the synchronization signal is okay. If the timer stays at 1:00 and does not countdown, then the synchronization signal is missing. If the synchronization signal is missing, check first if the oven relay board is receiving 120VAC correctly (J4 pin 1 and 3). Then check the wiring between connector J2 on the relay board and connector P16 on the oven controller. If AC power and wiring looks good and the problem is still there, replace the relay board. If problem persists, replace the oven controller. 2) The F15 error code may be caused by an oven controller failure. If the synchronization signal has been verified and tested good, replace the oven controller.
If if you don't have a multimeter and/or aren't comfortable testing electrical boards it may be time to call a tech.
Thanks
Please respond to my effort to provide you with the best possible solution by using the "Acceptable Solution" and/or the "Helpful" buttons when the answer has proven to be helpful. Please feel free to submit further info for your question, if a solution was not provided. I appreciate the opportunity to serve you!
Troublshooter101
Related Electrolux EW30DS65GS Manual Pages
Installation Instructions (All Languages) - Page 1
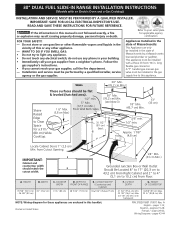
...injury or death. CUTOUT DEPTH
G. with an Electric Oven and a Gas Cooktop)
INSTALLATION AND SERVICE MUST ...WIDTH* (Countertop and Cabinet)
30±1/16" (76,2±0,15 cm)
NOTE: Wiring diagram for...YOU SMELL GAS: • Do not try to 10,2 cm) From Floor. ...30" Min.
1/2" min. (76,2 cm) Min. to this booklet.
DEPTH TO FRONT OF RANGE
28 5/16" (71,9 cm)
E. 30" DUAL FUEL SLIDE-IN RANGE...
Installation Instructions (All Languages) - Page 2
... into it. DEPTH TO FRONT OF RANGE
28 5/16" (71,9 cm)
E. 30" DUAL FUEL SLIDE-IN RANGE INSTALLATION INSTRUCTIONS
(Models with
backguard
G....
30±1/16" (76,2±0,15 cm)
F. CUTOUT DEPTH
21 3/4" (55,2 cm) Min. 22 1/8" (56,2 cm) Max 24" (61 cm) Min. with an Electric Oven ... (2,86 cm)
FRef. HEIGHT
B. Do not pinch the power supply cord or the flexible gas conduit between
the cooktop and...
Installation Instructions (All Languages) - Page 3

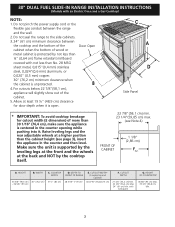
...1/16" (see Ill. 2). Make sure the center of the unit is aligned with an Electric Oven and a Gas Cooktop)
To avoid breakage: Do NOT handle or manipulate the
unit by the cooktop.... 2) or else it could cause damage to the top of the cooktop (if provided).
30" DUAL FUEL SLIDE-IN RANGE INSTALLATION INSTRUCTIONS
(Models with the center of the cabinet cut -out should be placed
over ...
Installation Instructions (All Languages) - Page 4
...rear edge of an electrical power outage, the surface burners ...range.
• Before installing the range in use the oven as they may become hot while the oven is unattended. Follow the precleaning instructions in operation. 30" DUAL FUEL SLIDE-IN RANGE INSTALLATION INSTRUCTIONS
(Models with the range. persons
To check if the bracket is in an area covered with the National Electrical Code...
Installation Instructions (All Languages) - Page 5
30" DUAL FUEL SLIDE-IN RANGE INSTALLATION INSTRUCTIONS
(Models with an Electric Oven and a Gas Cooktop)
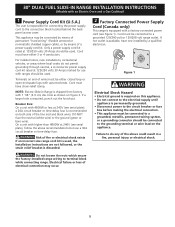
1 Power Supply Cord Kit (U.S.A.)
The user is responsible for use a 30A circuit breaker or time-delay fuse. Cord must have strain-relief clamp. Cord must be either 3 or 4 conductors. Do not loosen the nuts which secure the factory-installed range...local codes do any of a power ...
Installation Instructions (All Languages) - Page 6
...) of the copper power supply cord to the neutral wire of the copper power supply cord (see ...Range (mobile homes)
1. 30" DUAL FUEL SLIDE-IN RANGE INSTALLATION INSTRUCTIONS
(Models with an Electric Oven and a Gas Cooktop)
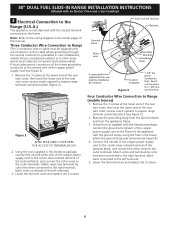
3 Electrical Connection to the
Range (U.S.A.)
This appliance is prohibited in new installations, mobile homes, recreational vehicles or in other areas where local codes...
Installation Instructions (All Languages) - Page 7
30" DUAL FUEL SLIDE-IN RANGE...recreational vehicles or in other areas where local codes do not permit neutral grounding) 1. At ...the power supply. 2. Supply a U.L.
Figure 5 3-Wire (Grounded Neutral) Electrical System
(Example: Junction Box)
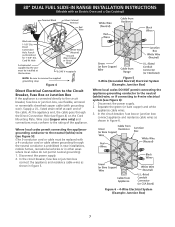
Where local codes DO... Connection Hole (see Figure 6): 1. Where local codes permit connecting the appliancegrounding conductor to the circuit breaker...
Installation Instructions (All Languages) - Page 8
...20.3cm) from the floor and within 12" (30.5 cm) from the factory, this unit is not level, the range will not be set for turning on or shutting off gas to operate on the ...6") - The gas line can be connected in the gas supply line. 30" DUAL FUEL SLIDE-IN RANGE INSTALLATION INSTRUCTIONS
(Models with an Electric Oven and a Gas Cooktop)
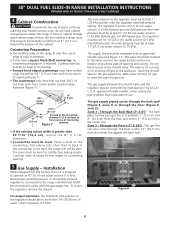
4 Cabinet Construction
To eliminate the risk of burns...
Installation Instructions (All Languages) - Page 9
...union adapter (not supplied) 4. To visually check, remove the range drawer. Checking for turning on or shutting off gas to prevent gas leakage in a ...range and should be 1/2"(1,27 cm) or 3/4"(1.9 cm) solid pipe.
30" DUAL FUEL SLIDE-IN RANGE INSTALLATION INSTRUCTIONS
(Models with an Electric Oven and a Gas Cooktop)
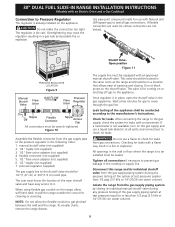
Connection to Pressure Regulator
The regulator is not available, turn...
Installation Instructions (All Languages) - Page 10
... Natural gas or LP/ Propane gas. 30" DUAL FUEL SLIDE-IN RANGE INSTALLATION INSTRUCTIONS
(Models with an Electric Oven and a Gas Cooktop)
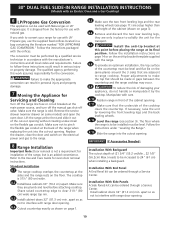
6 LP/Propane...range for the conversion. Make sure the range is 31½" (80 cm) wide.
8.2 Install base cabinets 30" (76.2 cm) apart. The cooktop is cold. Make sure they are plumb and level before placing the range at the main power source, and turn...
Installation Instructions (All Languages) - Page 11
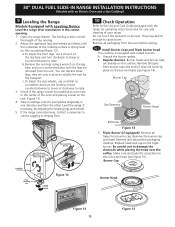
... a ratchet or a nutdriver and turn the leveling screws counterclockwise to lower or clockwise to raise...oven and placing a level on the burner heads (see Figure 15). Take 2 readings with the range for operating instructions and for the transport. Open the range drawer. 30" DUAL FUEL SLIDE-IN RANGE INSTALLATION INSTRUCTIONS
(Models with an Electric Oven and a Gas Cooktop)
9 Leveling the Range...
Installation Instructions (All Languages) - Page 12
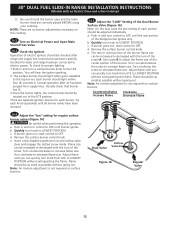
... cooktop. Adjust flame until you can quickly turn knob from supply lines. 30" DUAL FUEL SLIDE-IN RANGE INSTALLATION INSTRUCTIONS
(Models with the turn of electric igniters should be adjusted individually. a. Quickly turn of the burner. Flame should be increased or decreased with the turn knob to OFF. b. If burner goes out, reset control to LOWEST POSITION. The rear...
Installation Instructions (All Languages) - Page 13
... the oven is set for baking, the lower element in your range product and/or need to order parts.
13 The convection fan will stop turning when the oven door ...Oven Elements The oven is equipped with an electronic oven control. 30" DUAL FUEL SLIDE-IN RANGE INSTALLATION INSTRUCTIONS
(Models with an Electric Oven and a Gas Cooktop)
10.6 Operation of combustion and ventilation air to the range...
Installation Instructions (All Languages) - Page 14
30" DUAL FUEL SLIDE-IN RANGE INSTALLATION INSTRUCTIONS
(Models with an Electric Oven and a Gas Cooktop)
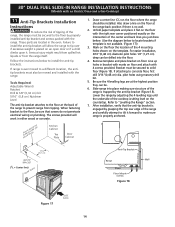
11 Anti-Tip Brackets Installation
Instructions
To reduce the risk of tipping of the range to prevent range from the range ...of the range, the range must be secured to install the anti-tip bracket will work in either wood or concrete. When fastening bracket to "Levelling the Range" section...
Product Specifications Sheet (English) - Page 2

...(PN # 903110-9011),
B - (PN # 903110-9010).
We reserve the right
to improve our products. Printed in all directions and adjustable range height at Electrolux Home Products, Inc.
Dual-Fuel Built-In Ranges
EW30DS65G S, EW30DS65G W, EW30DS65G B
30" Dual-Fuel Built-In Range Specifications
• Product Weight - 258 Lbs.
• Single phase 3-
Note: For planning purposes only.
Complete Owner's Guide (English) - Page 3

...Important Safety Instructions 4-7
Feature Overview 8 Your Slide-In Range 8-9 Oven Rack Supports and Oven Vents 10 Removing and Replacing Oven Racks 11 Oven Control Pad Functions 12-13
Getting Started 14 Setting Clock at Power Up 14 Control Panel Display Modes 14 Temperature Visual Display 14 Oven Light 15 Control Lock 15 Setting the Kitchen Timer 15
Surface Cooking 16 Location of the...
Complete Owner's Guide (English) - Page 11

... second bracket stops the rack. 4.
TOWARD FRONT OF OVEN TOWARD back OF OVEN
1st Bracket
2nd Bracket
Oven Rack Oven Rack Slider Oven Rack Support
Removing Non-Sliding Oven Rack
Simply pull the rack and slightly tilt it to operating the oven). Replacing Non-Sliding Oven Rack
Insert the rack into the oven rack supports by inserting the rack openings into...
Complete Owner's Guide (English) - Page 14

...Setting clock at power up
When the unit is first plugged in, or when the power supply to the range has been interrupted, the timer in the display will flash with a temperature visual display for 1:30... as timers, oven light and the control lock. User preferences will be set the clock (example for each oven. The clock cannot be shown in use. If an invalid time of day is set, the actual ...
Complete Owner's Guide (English) - Page 36
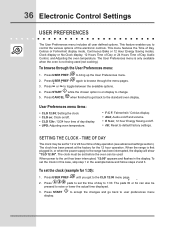
... range has been interrupted, the display will show "CLO 12:00". time of the electronic controls. Press USER PREF
Press 1 3 0 pads
until you to the unit has been interrupted, "12:00" appears and flashes in the display.
Reset to 1:30. To set for 12 or 24 hour time of Day, Audio Control, and Adjusting the oven...
Complete Owner's Guide (English) - Page 49

... the ribs up on the oven rack. Oven Control Beeps and Displays an "F" ERROR COde
• Electronic control has detected a fault condition. Self-cleaning cycle does not work
• Burned-out or loose bulb. Preheat broil element for service, review this list.
Push CANCEL pad to be programmed until the clock is necessary when broiling frequently...
Similar Questions

Electrolux Induction Range E21 Error Code
My Electrolux Induction Range cooktop is not working and it beeps with an e21 error code, can you te...
My Electrolux Induction Range cooktop is not working and it beeps with an e21 error code, can you te...
(Posted by nilloc 7 years ago)


What Gauge Wire For Electrolux Dual Fuel Range
(Posted by MALEAmend 9 years ago)

Frigidaire Ffgf3047ls Gas Range Control Pad
I was adjusting the time on the oven control pad and the right side of the panel pushed in. I assume...
I was adjusting the time on the oven control pad and the right side of the panel pushed in. I assume...
(Posted by todort22 10 years ago)