Electrolux EW30IS65JS Support Question
Electrolux EW30IS65JS Support Question
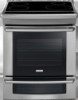
Find answers below for this question about Electrolux EW30IS65JS.Need a Electrolux EW30IS65JS manual? We have 4 online manuals for this item!
Question posted by latimerd on May 22nd, 2021
What Are The Dimensions
The person who posted this question about this Electrolux product did not include a detailed explanation. Please use the "Request More Information" button to the right if more details would help you to answer this question.
Current Answers
Answer #1: Posted by Odin on May 22nd, 2021 9:35 AM
Odin

Member since:
April 10th, 2010 Points: 41,236,670

Member since:
April 10th, 2010 Points: 41,236,670
Answer #2: Posted by Technoprince123 on May 22nd, 2021 6:35 AM
Technoprince123

Member since:
February 8th, 2021 Points: 1,205,190
Member since:
February 8th, 2021 Points: 1,205,190
Please response if this answer is acceptable and solw your problem thanks
Answer #3: Posted by freginold on May 23rd, 2021 8:04 AM
freginold

Member since:
December 20th, 2011 Points: 23,253,895
Member since:
December 20th, 2011 Points: 23,253,895
Related Electrolux EW30IS65JS Manual Pages
Installation Instructions (All Languages) - Page 1
... 36 5/8" (93 cm) Max. pages 1-12
Español - 30" ELECTRIC SLIDE-IN RANGE INSTALLATION INSTRUCTIONS
United States
INSTALLATION AND SERVICE MUST BE PERFORMED BY A QUALIFIED INSTALLER.
Printed in the vicinity... of this or any other appliance. E
½"min. TOTAL DEPTH TO FRONT OF RANGE
28 5/16" (71,9 cm)
E.
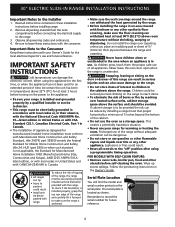
READ AND SAVE THESE INSTRUCTIONS FOR FUTURE REFERENCE.
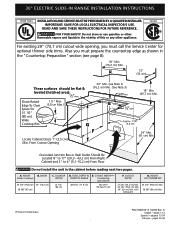
IMPORTANT...
Installation Instructions (All Languages) - Page 2
...COUNTERTOP
35 3/4" (90,8 cm) Min. 36 5/8" (93 cm) Max.
2 30" ELECTRIC SLIDE-IN RANGE INSTALLATION INSTRUCTIONS
NOTE:
1. C A D
Side Panel
*** IMPORTANT: To avoid cooktop breakage for
door depth when ...it . HEIGHT
B. Allow at least 19 ¼" (48,9 cm) clearance for cutout width (E dimension) of more
than No. 28 MSG sheet metal,
0,015"(0,4 mm) stainless steel, 0,024"(0,6
mm) ...
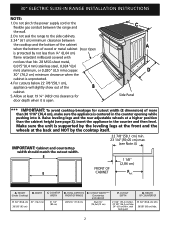
Installation Instructions (All Languages) - Page 3
... if needed.
The metal flange under each side of the cooktop (if provided).
Illustration 2
3 Level the range using
Shave
the two (2) front leveling Raised
1 ½" Max. (3.8 cm Max.)
legs and the two...16" (see hatched area on each side of the counter.
To successfully install the range, the initial level height from the floor to the cooktop
voiding the warranty. Make ...
Installation Instructions (All Languages) - Page 4
...of burns or fire by a qualified installer or service technician.
• This range must be seriously burned climbing on the power to leave these installation instructions before connecting...• Remove oven racks, broiler pan, food and other synthetic floor covering, make sure the range is in these instructions with CSA Standard C22.1, Canadian Electrical Code, Part 1 in the Owner...
Installation Instructions (All Languages) - Page 5
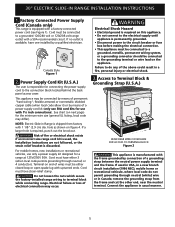
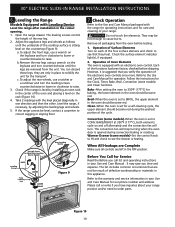
... Cord Kit (U.S.A.)
The user is discarded. Risk of fire or electrical shock exists if an incorrect size range cord kit is used in USA, in a new branch circuit installation (1996 NEC), mobile home or ... supply cord kit (only use 50A cord kits for use only a power supply kit designed for a range at 125V/250V 50A.
See chart (on next page) for connecting the power supply cord to the grounding...
Installation Instructions (All Languages) - Page 6
...raise the lower end of the terminal block, and connect the other wires to expose range terminal connection block (see figure 3).
3.
Direct Connection Hole. Lower the terminal cover and... 3 screws. Lower the terminal cover and replace the 3 screws.
30" ELECTRIC SLIDE-IN RANGE INSTALLATION INSTRUCTIONS
4. A User Supplied Strain-relief Must Be Installed at This Location. Using the ...
Installation Instructions (All Languages) - Page 7
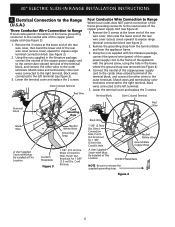
.... 3.
Supply a U.L.
c) Connect the 2 red wires together.
d) Connect the green (or bare copper) grounding
wire to the grounding wire of the appliance. 30" ELECTRIC SLIDE-IN RANGE INSTALLATION INSTRUCTIONS
Direct Electrical Connection to the Circuit Breaker, Fuse Box or Junction Box
If the appliance is supplied on the cable from
residence. 2. In...
Installation Instructions (All Languages) - Page 8
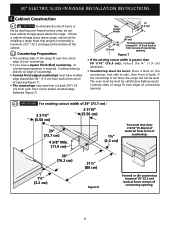
...,4 cm), reduce the ¾" (1.9 cm) dimension.
• Countertop must have a square finish (flat) countertop, no countertop preparation is cabinet storage space above range, reduce risk by reaching over the cutout edge... Construction
4.1
To eliminate the risk of burns or
fire by installing a range hood that projects horizontally a minimum of 5" (12.7 cm) beyond the bottom of the ...
Installation Instructions (All Languages) - Page 9
... setup higher than the height of damaging your new side trims to replace the actual side trims with range door opening.
4 Cutout countertop exactly as in place to be installed must be level. Remove and...21 3/4" (55.2 cm)Min., 22 1/8" (56.2cm) Max.) needs to clear 31½" (80 cm)
wide range top rim.
3
Install cabinet doors 32" (81.3 cm) min. Install base cabinets 30" (76.2 cm) apart...
Installation Instructions (All Languages) - Page 10
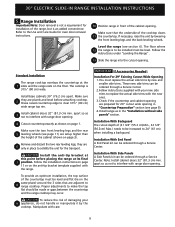
... wheels as follows
until the legs are removed from the oven before shipping.
Level the range, if necessary, by installing an oven rack in the oven should become red. They ... turn clockwise to lower or counterclockwise to raise.
30" ELECTRIC SLIDE-IN RANGE INSTALLATION INSTRUCTIONS
6. Leveling the Range
Models Equipped with the level placed diagonally in this Screw to 350°...
Installation Instructions (All Languages) - Page 11
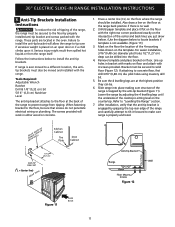
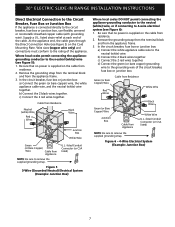
...cm) diameter pilot holes 1/2"(1,27 cm) deep can be drilled into place making sure structure of the range is no wall.
2. Be sure the 4 levelling legs are located in the oven. BRRAAEACNRKGWEEDLAIGNLLEE OOFR
... (CL) on the countertop. Remove template and place bracket on the intersection of Range
Range
Wall
Floor Floor Mount
Screws
Figure 12
Figure 11
SLIDE BACK
11 Bracket must be...
Installation Instructions (All Languages) - Page 12

30" ELECTRIC SLIDE-IN RANGE INSTALLATION INSTRUCTIONS NOTES:
12
Product Specifications Sheet (English) - Page 1

... Side Panel Kit, Backguard Kit, Side Trim Kit - Stainless Steel
S
Oven Cavity Dimensions -
Baking Options Features 7 cooking modes and 10 cooking options including our exclusive Perfect ... electric codes. Wall Ovens
Warmer Drawers
Cooktops
Built-In Ranges
Freestanding Ranges
Microwaves
Induction Built-In Range
EW30IS65J S
Featuring Wave-Touch™ Controls & Induction Cooktop
...
Product Specifications Sheet (English) - Page 2

... the 3/4" overlap
dimension or for cutout width of quality at electroluxappliances.com for detailed instructions.
High standards of 29", replace actual side trim panels with smaller side trim panels, available with not less than No. 28 MGS sheet steel, 0.015" stainless steel, 0.024" aluminum or 0.020" copper. Induction Built-In Range
EW30IS65J S
Side...
Complete Owner's Guide (English) - Page 1

Use & Care Guide
Electric Slide-In Range
318 205 809 (0909) Rev. A
Complete Owner's Guide (English) - Page 3

... Maintenance 50 Cleaning Recommendations for Future Use 2 Model and Serial Number Location 2 Questions 2 Table of Contents 3
Safety 4 Important Safety Instructions 4-7
Feature Overview 8 Your Slide-In Range 8-9 Oven Rack Supports and Oven Vents 10 Removing and Replacing Oven Racks 11 Control Pad Functions 12-14
Getting Started 15 Setting Clock at Power...
Complete Owner's Guide (English) - Page 4

... does cause harmful interference to radio or television reception, which the receiver is in accordance with range. • See Installation instructions. Ask your particular situation.
• Remove all tape and ... the pacemaker or similar medical device. To reduce the risk of tipping of the range, the range must be determined by turning the unit off and on, the user is properly installed...
Complete Owner's Guide (English) - Page 5

... Use Water or Flour on Appliance-Flammable materials should not be hot even though they have had sufficient time to cool. Children climbing on the range to reach items could catch fire or spoil. When you use , do not touch, or let clothing or other flammable materials contact hot surfaces...
Complete Owner's Guide (English) - Page 7

... self-cleaning the oven, remove all parts free of the oven listed in or around any range. Disconnect the appliance or turn off during a self-cleaning cycle. • Do not use a... broiler pan without its insert. IMPORTANT INSTRUCTIONS FOR CLEANING YOUR RANGE
• Clean the range regularly to keep all utensils stored in the self-cleaning cycle only the parts of ...
Complete Owner's Guide (English) - Page 8

8 Feature Overview
Your Slide-in Range
ceramic glass cooktop touch activated glass control panel large metal handle curved glass oven door
lower oven door window glass
Oven vent Oven Door Latch
Broiling Element Oven Rack Support
Convection Fan HALOGEN Oven Light
slideable Oven racks lower oven rack
Convection Roasting rack BROILER PAN Grid BROILER PAN
Similar Questions

Ew30is65jsd Induction Range Getting F15 In The Clock Display And E39 In The Cook
Ew30is65jsd induction range getting F15 in the clock display and E39 in the cooktop user interface. ...
Ew30is65jsd induction range getting F15 in the clock display and E39 in the cooktop user interface. ...
(Posted by Unsanedilljl 6 years ago)

My 48 Inch Range Is Flashing All The Lights And Sounding A Alarm,
this range is only used once a year at xmas in a vacation home ,,the range is flashing all lights at...
this range is only used once a year at xmas in a vacation home ,,the range is flashing all lights at...
(Posted by super712001 9 years ago)

How Do I Prepare To Use Self Clean Feature
(Posted by Anonymous-127273 10 years ago)

36' Natural Gas Range E36gf6hps
The Convection oven on this range will not turn on?? help!
The Convection oven on this range will not turn on?? help!
(Posted by roybnunez 13 years ago)