
Frigidaire FFMV1645TS Support Question
Frigidaire FFMV1645TS Support Question
Find answers below for this question about Frigidaire FFMV1645TS.Need a Frigidaire FFMV1645TS manual? We have 4 online manuals for this item!
Question posted by JRTROYWILLIAMS on April 22nd, 2021
Template For Installing Model # Ffmv1645ts
Im Missing The Template And Screws For Hanging My Oven, How Can I Get A Replacement?
Current Answers
Answer #1: Posted by Odin on April 26th, 2021 5:20 PM
Odin

Member since:
April 10th, 2010 Points: 41,236,630

Member since:
April 10th, 2010 Points: 41,236,630
Your best bet is to call Frigidaire. Use the contact information at https://www.contacthelp.com/frigidaire/customer-service.
Hope this is useful. Please don't forget to click the Accept This Answer button if you do accept it. My aim is to provide reliable helpful answers, not just a lot of them. See https://www.helpowl.com/profile/Odin.
Related Frigidaire FFMV1645TS Manual Pages
Installation Instructions - Page 1

... of this appliance requires basic mechanical and electrical skills.
• Proper installation is the responsibility of the installer.
• Product failure due to Installer - READ CAREFULLY.
Installation Instructions
Over the Range Microwave Oven
Questions? Call 1-800-944-9044(US) or 1-800-265-8352(Canada)
BEFORE YOU BEGIN
Read these instructions for future reference.
•...
Installation Instructions - Page 2

... Outside Back Exhaust 17-18
Mount the Microwave Oven 19
C Recirculating 20 -22
Attach Mounting Plate to Wall 20 Preparation of Top Cabinet 21 Check Blower Plate 21 Mount the Microwave Oven ..........21-22 Installing or Change the Charcoal Filter 22 Before You Use Your Microwave 23 Template Information 24
EN-2 Installation Instructions
CONTENTS
General information
Important Safety...
Installation Instructions - Page 3

... personal safety, remove house fuse or open circuit breaker before beginning the installation to the National Electrical Code or the prevailing local code.
IMPORTANT - The outlet box should be capable of supporting the cabinet load, in the cabinet above the microwave oven.
FOR PERSONAL SAFETY, THIS APPLIANCE MUST BE PROPERLY GROUNDED TO AVOID...
Installation Instructions - Page 5

...; If you are going to vent your microwave oven
to the outside, see Hood Exhaust Section for
exhaust duct preparation.
• When installing the microwave oven beneath
smooth, flat cabinets, be careful to follow the
instructions on the top cabinet template for
power cord clearance.
• As a guide to installation, see page 24 for top cabinet spacing...
Installation Instructions - Page 6
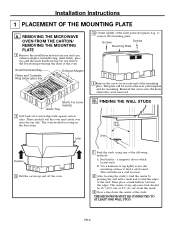
... mounting plate
Screws
Screws
Mounting Plate
5 Remove the screws from this mark.
3 Draw a line down the center of the mounting plate.
Do not remove the Styrofoam protecting the front of the following methods:
A. B. This will be resting in the Styrofoam. REMOVING THE MICROWAVE
OVEN FROM THE CARTON/
REMOVING THE MOUNTING
PLATE
1 Remove the installation instructions,use...
Installation Instructions - Page 9
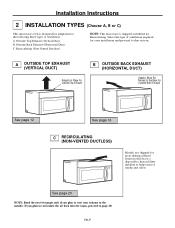
... Back Exhaust (Horizontal Duct) C. If you plan to vent your installation and proceed to the following three types of ventilation required for adaptation to that section. Some models have a disposable charcoal filter installed to the outside.
EN-9 Installation Instructions
2 INSTALLATION TYPES (Choose A, B or C)
This microwave oven is shipped assembled for recirculating exhaust.
Installation Instructions - Page 12
...and blower plate are securely tightened when they are not pinched. Mount Microwave Oven A6. This will help to Wall A2. Attach Mounting Plate to prevent excessive vibration.
• Make sure the motor wiring has
been properly routed and secured, and that
the
template
is
positioned
0lo3s2ocf..c1rtDLaartaehhiocgt6rwesaiiccholtt'luaumtnmdhrtdss
eaioooc,iIdttfluraedeoneoinnslrsroywitodltte...
Installation Instructions - Page 14

... filler blocks if the cabinet front hangs below the cabinet bottom shelf.
Make sure the screw is installed so that the damper swings freely.
EN-14 Adaptor
Guide
Back of Microwave
Locking Tab
Push in bottom of the blower plate by sliding it is tight.
6 Replace blower plate with the screw removed in Step 1.
IMPORTANT: Do...
Installation Instructions - Page 15

... the cardhoard spacers between heat shield and door. EN-15 A6. Blower Plate
Damper
Back of the microwave oven. (While tightening screws, hold the microwave oven in place against the wall and the top cabinet.)
8 Install grease filters. MOUNT THE MICROWAVE OVEN (cont.)
Cabinet Front Cabinet Bottom Shelf Filler Block
Equivalent to Depth of Cabinet Recess
Self-Aligning...
Installation Instructions - Page 16

...Microwave Oven
IMPORTANT NOTES:
• Make sure the screws for your
DvearrsleióvnueenltaEasplaañhoolj.a para consultar la
Locate and mark holes to align with holes in the
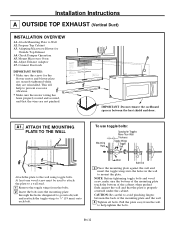
mounting plate. Trim the rear wall template...are reinstalled. Remove Blower Plate B3. Installation Instructions B OUTSIDE BACK EXHAUST (Horizontal Duct)
INSTALLATION OVERVIEW
B1. IMPORTANT: LOCATE AT LEAST...
Installation Instructions - Page 18

... other side of the oven. Installation Instructions
B5. Reroute the wires through grooves on each knockout panel and remove the metal knockouts for rear airflow.
NOTE: The blower unit exhaust openings should match exhaust openings on rear of microwave oven.
9 Secure the blower unit to the rear of Microwave
Blower Motor Screw
10 Replace the blower plate...
Installation Instructions - Page 19

... the handle or heat shield during installation. Do not pinch cord or lift oven by turning the screw at back bottom edge onto four lower tabs of Cabinet Recess Self-Aligning Screw Microwave Oven Top
4 Attach the microwave oven to the top of the microwave oven. (While tightening screws, hold the microwave oven in bottom of cabinet.
8 Install grease filters. IMPORTANT: Remove the cardhoard...
Installation Instructions - Page 20
... sure the screws for your
Darle vuelta a la hoja para consultar la versión en Español. IRRBNmTNhoEEEOiusTFAAnTRtHORDiEenaEgR:rW ApIWEITlNaNAatPeDIlSLlSaTRTLnFeVOdAmTOEtLpCoELlLaRlEMLotAeYcOEPaTstDeW IeLIMrOvItAhNePNTeTsGOHhtEoIoNER.rW pizoSToDsInTiTAtIitoaRRHNnl UEeTtThxCCheHTaTbTOuIoSsIItOOttomNNSS
outlet. 1.
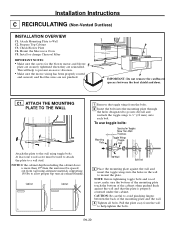
Mount the Microwave Oven C5. Trim the rear wall template along the...
Installation Instructions - Page 21

... drill holes for the top support screws and a hole large enough for the power cord to see that the blower plate is correctly
installed on the TOP CABINET
TEMPLATE.
• Tape it tight throughout Steps
1-3.
Installation Instructions
C2. CHECK BLOWER PLATE
Blower Plate
FOR EASIER INSTALLATION AND PERSONAL
SAFETY, WE RECOMMEND THAT TWO PEOPLE
INSTALL THIS MICROWAVE OVEN.
Installation Instructions - Page 22

... is factory installed in some models. Lift out to the top of the microwave using a #1 Phillips screwdriver.
ocated on top of the
vent into place. Refer to the Use and Care to replace or install a charcoal filter.
1 Unplug microwave oven or disconnect power.
3 Tip forward. C5. Installation Instructions
C4. MOUNT THE MICROWAVE OVEN (cont.)
5 Insert 2 self-aligning screws through...
Complete Owner s Guide - Page 2
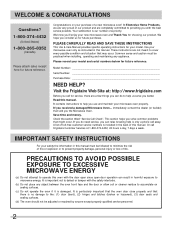
... not be practiced when installing, operating and maintaining any object between the oven front face and the door or allow soil or cleaner residue to operate this manual. Check the section titled "Service Call Check". If you do to help you can result in the back of a new microwave oven! WELCOME & CONGRATULATIONS
Questions? 1-800...
Complete Owner s Guide - Page 5
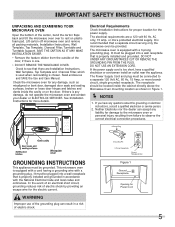
... to see that there are a 120 volt 60 Hz, AC only, 15 amp. Lift carton off microwave oven and remove all packing materials, Installation Instructions, Wall Template, Top Template, Charcoal Filter, Turntable and Turntable Support.
If there is properly installed and grounded.
or more branch circuit, single grounded receptacle.
It must be located inside the cabinet...
Complete Owner s Guide - Page 23
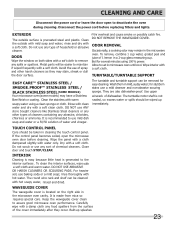
... warm water. CLEANING AND CARE
Disconnect the power cord or leave the door open the microwave oven door before replacing filters and lights. DO NOT REMOVE THE WAVEGUIDE COVER. ODOR REMOVAL
Occasionally, a cooking...; STAINLESS STEEL /
BLACK STAINLESS STEEL (SOME MODELS)
Your microwave oven(some models) may remain in the microwave oven cavity. Do not use baking soda or a mild soap;
Complete Owner s Guide - Page 25

... the new charcoal filter into the correct position.
4. Reinstall the vent grille screws.
25 Charcoal Filter when installed in your microwave oven,is used for nonvented, recirculated Installation. Disconnect power to place it forward out from the unit.
6. Disconnect the power cord before replacing filters and lights. P ull the vent grill away from the unit.
7.
the...
Complete Owner s Guide - Page 27
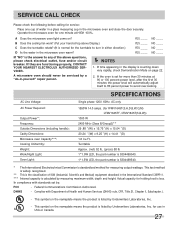
...:
Output Power*: Frequency: Outside Dimensions (including handle): Cavity Dimensions: Microwave oven Capacity***: Cooking Uniformity: Weight: Work/Night Light: Oven Light:
SPECIFICATIONS
Single phase 120V, 60Hz, AC only
1550W 14.0 amps. (for holding food is listed by :
FCC
- Actual capacity for FFMV1645T(S,H,D,B,W,Q,M) LFMV1645TF, CFMV1645T(S,B,W))
1000 W 2450 MHz (Class B/Group2)** 29 .88...
Similar Questions


Is A Grease Filter Important In A Microwave Oven
(Posted by Jdeander 10 years ago)

How Do You Set Clock On Frigidaire Model Fgmv174kf Microwave
(Posted by jstlori3 10 years ago)

Frigidaire Microwave Oven Model Fgmv174kfa Door Wont Latch
(Posted by dpellhutchi 10 years ago)

Microwave Oven Not Working Unless I Hold & Push Up The Door. What's Wrong?
Model FMV156DSB. I had both switches checked & are OK. Now it does not work any more even when ...
Model FMV156DSB. I had both switches checked & are OK. Now it does not work any more even when ...
(Posted by xjtran87 12 years ago)