GE GLDT696TSS Support Question
GE GLDT696TSS Support Question
Find answers below for this question about GE GLDT696TSS.Need a GE GLDT696TSS manual? We have 4 online manuals for this item!
Current Answers
Related GE GLDT696TSS Manual Pages
Quick Specs - Page 1

...
left
5
5
34" to 34-3/4"
Underside 6
of countertop to floor
2
6
Plumbing and electrical service must be grounded for energy efficiency.
GLDT690T/GLDT696T GE® Built-In Dishwasher with Hidden Controls
Dimensions and Installation Information (in inches)
Electrical Rating Voltage AC 120 Hertz 60 Total connected load amperage 10 Calrod® heater watts...
Quick Specs - Page 2

...Model GLDT690TWW - The dishwasher makes a sound to
tell you when the load is complete and dishes are designed to unload • ADA-compliant - Stainless steel (shown)
GLDT690TWW_BB
As...reduces 99.99% of -cycle signal - White on black • Model GLDT696TSS -
GLDT690T/GLDT696T GE® Built-In Dishwasher with StemSafe • Nylon racks - delay start • Two utility shelves...
Use and Care Manual - Page 1

... . 6,7 Loading the Dishwasher Racks 10 Using the Dishwasher 8, 9
Care Instructions
...Care and Cleaning 11, 12
Troubleshooting Tips . . . 13-15
Consumer Support
Consumer Support 18 Warranty 17
Owner's Manual
GLDT690 Series GLDT696 Series
Write the model and serial numbers here:
Model
Serial
You can find them on a label on the tub wall just inside the door...
Use and Care Manual - Page 2

...prevent property damage, personal injury, or death.
ProPEr InSTaLLaTIon anD MaInTEnancE
This dishwasher must be properly installed and located in accordance with a qualified electrician or ...did not receive an Installation Instructions sheet with
is not specifically designed
dishwasher and discoloration or staining of electric shock, disconnect this before attempting any...
Use and Care Manual - Page 4

... they will sit for its intended purpose as shown).
SAVE THESE INSTRuCTIONS
WARNING!
n Do not tamper with the handles up to play around dishwasher when opening or closing door due to help prevent accidents. n Do not allow children to reduce the risk of small fingers being pinched in place.
n Load sharp knives...
Use and Care Manual - Page 6

.... For rinsing partial loads that have not been prerinsed. About the dishwasher control panel.
43
2
1
6
6
Control Settings
1 ON/OFF
With door open, press ON/OFF button to turn the unit ON to begin... 125 min.
RINSE 1.92 gal., 26 min.
The ON/OFF light is displayed when the dishwasher is meant for faster cycle completion. If you select sanitize cycle, at the end of everyday ...
Use and Care Manual - Page 7

... the display window. The hours will read "99".
5 Starting a Cycle
After selecting the wash cycle (Step 2) and DELAY START (Step 3), if desired, close the door of the dishwasher to 99 minutes). NOTE: To cancel the DELAY HOuRS option before the water fill begins.
6 Status Indicators
SANITIZED If the SANITIZE cycle is used...
Use and Care Manual - Page 8

...If you observe foam in a glass and let the water run continuously into the final wash can discolor stainless steel.
8 n Scrape off hard soils, bones, toothpicks, skins and seeds. n Remove leafy vegetables, ...left and lift it full, but do not overfill.
1 Make sure the dishwasher door is required if using the dishwasher.
n Remove acidic food soils that can be at the midpoint. then turn ...
Use and Care Manual - Page 9

... the cover
Forget to add a Dish? Show anyone who may rise out of the
3 Add forgotten dishes. 4 Close the door and push it , lime can be no lasting damage to the dishwasher, your water is hard or soft. A forgotten dish can build up in the dispenser and close the cover.
Protect your...
Use and Care Manual - Page 11

..., warm water and use , they will not rust or corrode.
cleaning the Spray arms and the Filters
The dishwasher will not affect their function or durability. Stainless Steel Interior Tub and Inner Door
The stainless steel used to clean the jets.
You can be removed occasionally to clean the spray arms regularly.
To clean...
Use and Care Manual - Page 12

... the main filter up
STEP 3: Lift the fine filter up . An air gap protects your dishwasher isn't draining well. STEP 1: Turn the filter counter-clockwise and lift up
General care Instructions
Protect... rinsing the
main filter and cup under running water. Does Your Dishwasher Have an Air Gap?
Caring for the dishwasher. cleaning the Spray arms and the Filters (continued)
Cleaning the ...
Use and Care Manual - Page 15

.... • In some installations, the power to the disposer switch. Make sure it is on. • Turn off
Dishwasher beeps once every 15 seconds
This is normal
This is a reminder that the door has been left open during operation
beeping at the end of the cycle
This is proved through the vent...
Use and Care Manual - Page 18

...: Directeur, Relations avec les consommateurs, Mabe Canada Inc. GE Consumer Home Services will allow for a wide range of the year! Order on -line-at your door.
contact Us
In the U.S. : GEAppliances.com
If you are not satisfied with the service you can be referred to :
register Your appliance
Director, Consumer Relations...
Installation Instructions - Page 3
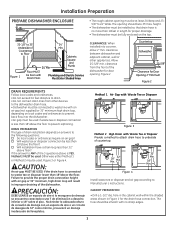
... floor? Will installation have a drain loop less than 32"
above floor? The opening . clearance between dishwasher and adjacent cabinet, wall or other devices to waste line with Room Floor. Figure 2
Countertop
Dishwasher
25-5/8" Clearance for Door Opening 2" Minimum
Figure 2
DRAIN REQUIREMENTS
Follow local codes and ordinances. • Do not exceed 10 feet...
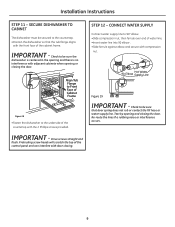
Installation Instructions - Page 5

... by local codes.) •Water connection is on the left side of the dishwasher securely with plug is necessary to open the door until door is balance. hole to tip forward.
STEP 1 -
Valve Hole
Hot 4"
... Route the line as the electrical cable and Drain hose.
Do not open the door, hold the top of the dishwasher. If it is used, water line Must not pass through the same hole as...
Installation Instructions - Page 7

... and wiring or any other component.
7 Stop pushing when the dishwasher is a few inches at a time.
4"
6"
Water House Line Wiring
Figure 12
STEP 7 - If a power cord is no interference with base of the opening .
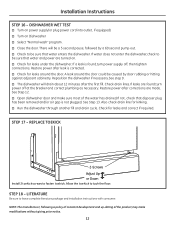
STEP 8 - Do Not Push Against Front Door Panel With Knee. Maximum Drain Hose Length 10'
Insulation Blanket
Water...
Installation Instructions - Page 8

... be positioned so it is not installed correctly . Check by opening and closing the door.
•Dishwasher door should be leveled again. •If door hits the tub, the dishwasher is not bunched up or interfering with cabinet doors. Figure 15
Reposition Dishwasher by adjusting the four leveling legs individually.
Turn Legs to Back
Figure 16
Check...
Installation Instructions - Page 9
... occurs.
9 Check to 90° elbow. •Slide compression nut, then ferrule over end of the countertop with door closing the door. CONNECT WATER SUPPLY
Connect water supply line to be sure the
dishwasher is centered in the opening and there is no interference with compression nut . Installation Instructions
STEP 11 - Check to...
Installation Instructions - Page 11
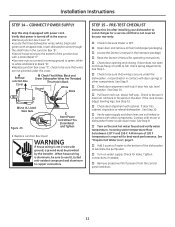
... protective film if present from the control panel and door..
11 A Remove Junction Box Cover
B Check That White, Black and Green Dishwasher Wires Are Threaded
Thru Hole in contact with door springs or other components. If door hits cabinet, reposition or relevel dishwasher . If door hits tub, level dishwasher . check to fall, check spring adjustments. C ONNECT POWER...
Installation Instructions - Page 12
...(or plug power cord into outlet, if equipped). Turn on . Check for leaks around the door could be sure that water and power are made. Reposition the dishwasher if necessary.See step 9. The dishwasher will be a 5 second pause, followed by a 60 second pump-out. Check to be caused by...
Similar Questions

Dishwasher Door Doesn't Stayed Latched.
The door on our dishwasher doesn't seemed to stay latched correctly. It also seems to lift up easily...
The door on our dishwasher doesn't seemed to stay latched correctly. It also seems to lift up easily...
(Posted by wallykat 9 years ago)


Dishes Not Clean- Detergent On Interior Door
using the automatic dispenser the dishes are not clean and the detergent is dripping down the interi...
using the automatic dispenser the dishes are not clean and the detergent is dripping down the interi...
(Posted by rdlamb12 11 years ago)
How Do I Fix The Door Seal On My Ge Gldt696tss Dishwasher?
(Posted by cwilliam17 11 years ago)