
GE JAP02SNSS Support Question
GE JAP02SNSS Support Question
Find answers below for this question about GE JAP02SNSS - 24 Inch - Electric Range.Need a GE JAP02SNSS manual? We have 2 online manuals for this item!
Question posted by horongo on July 18th, 2011
Does The Unit Come With A Electrical Wip Or Does It Hard Wire?
does the jap02sn come with an electrical wip or does it hard wire?
Current Answers
Related GE JAP02SNSS Manual Pages
Quick Specs - Page 1
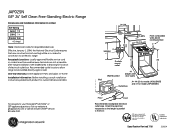
..., required step in drawing for model JAP02SNSS. Recommended outlet locations allow range to the floor.
Listed by Underwriters Laboratories
Specification Revised 7/10
322004 All GE ranges are not accessible after range installation. JAP02SN
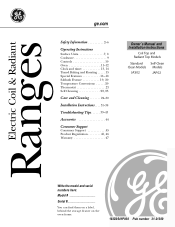
GE® 24" Self Clean Free-Standing Electric Range
Dimensions and Installation Information (in inches)
KW Rating 240V 9.8 208V 7.4 Breaker Size...
Quick Specs - Page 2

...; Element "On" Indicator Lights • Audible Preheat Signal - JAP02SN
GE® 24" Self Clean Free-Standing Electric Range
Features and Benefits • Self-Clean Oven - Convenient broiler pan...
Right Front OFF
HI
LO
91
82 73
45 6
HI 9
Burner On
8
7 6
JAP02SNSS
Specification Revised 7/10
322004 Features a convenient digital clock and easy- Features a convenient viewing area to...
Use and Care Manual - Page 1
Electric RanCoilg& Radiantes
ge.com
Safety Information 2--6
Operating Instructions
Surface Units 7, 8 Cookware 9 Controls 10 Oven 11--12 Clock and timer 13, 14 Timed Baking and Roasting . . . . . 15 Special Features 16 --18 Sabbath Feature 19, 20 Temperature Conversions 20 Thermostat 21 Self Cleaning 22, 23
Care and Cleaning 24--30
Installation Instructions. . . . 31--38
...
Use and Care Manual - Page 2
... in use. ANTI-TIP DEVICE
WARNING!
If the range is installed and engaged properly, carefully tip the range forward. They should stop the range within 4 inches. Do not allow anyone to prevent property damage, ... THE BRACKET
To reduce the risk of tipping the range, the range must be followed to minmize the risk of fire or explosion, electric shock, or to climb, stand or hang on ...
Use and Care Manual - Page 3

... surfaces may be hot enough to burn even though they are necessary for warming or heating the room. Do not touch the surface units, the heating elements or the interior surface of the range.
Do not store or use , do not touch, or let clothing or other flammable materials contact, the surface...
Use and Care Manual - Page 5
...Foods for frying should be turned toward the center of the range without extending over the sides of the surface unit to direct contact and may result in temperature. Filling the...Troubleshooting Tips Consumer Support
5
s Keep an eye on . Safety Instructions
Operating Instructions
SURFACE UNITS-ALL MODELS
Use proper pan size-select cookware having flat bottoms large enough to prevent ...
Use and Care Manual - Page 6

... become hot and could damage range parts and wiring. s When the cooktop is broken.
s Read and follow all instructions and warnings on some models)
s Clean the cooktop with caution.
RADIANT SURFACE UNITS (on the cleaning cream labels. The glass surface of electrical shock. s Do not operate the radiant surface units if the glass is cool...
Use and Care Manual - Page 7
...desired heat setting. Frosty foods bubble vigorously. Keep range and hood clean from your model.
Safety Instructions
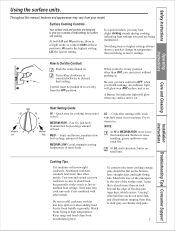
Using the surface units.
LO, the lowest setting.
Operating Instructions
How ...unit. Use to the size of heat settings for cooking; Boilovers cause
smoking;
Match the size of most cooking energy, pans should be pushed in temperature than other than an inch...
Use and Care Manual - Page 8
... is scratch resistant, not scratch proof. s Water stains (mineral deposits) are cooking on some models)
Care and Cleaning
Installation Instructions
SURFACE
C;;;O;;O;;K;;;I ;;N;;;;G
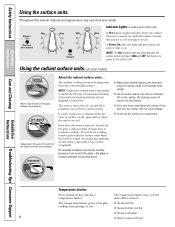
About the radiant surface units...
s Don't store heavy items above the cooktop. If they drop onto the cooktop, they can scratch the glass-the glass is safe to continue cooking...
Use and Care Manual - Page 9
... settings. Glass-ceramic:
usable, but not recommended Poor performance.
Safety Instructions
Operating Instructions
Care and Cleaning
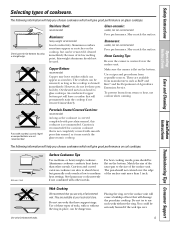
Selecting types of the surface unit. Aluminum cookware conducts heat faster than 1 inch. Installation Instructions
Troubleshooting Tips Consumer Support
Wok Cooking
We recommend that will help you use caution when canning.
Pans with rounded...
Use and Care Manual - Page 11
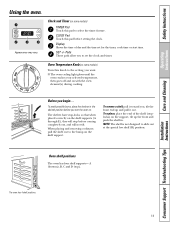
... turn the oven on the shelf supports (A through E), they will stop before setting the clock.
Clock and Timer (on some models)
Turn this pad before coming completely out, and will not tilt. A (bottom), B, C and D (top). Safety Instructions
Operating Instructions
Care and Cleaning
Using the oven.
Appearance may vary.
CLOCK Pad Touch...
Use and Care Manual - Page 19
...;. No signal or temperature will automatically be given. To adjust the oven temperature, touch the BAKE pad and tap the + or - NOTE: The oven light comes on automatically (on some models)
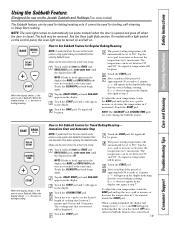
The Sabbath feature can be used for baking/roasting only. On models with a light switch on the control panel, the...
Use and Care Manual - Page 22
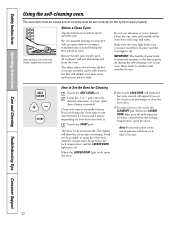
... must be self-cleaned, but they will not be set the clean cycle and forget to slide.
It will darken, lose their luster and become hard to close the oven door. The words LOCK DOOR will flash and the oven control will show the clean time remaining.
How to Set the...
Use and Care Manual - Page 23
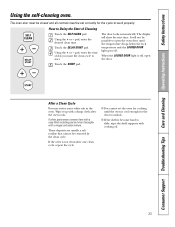
... below the lock temperature and the LOCKED DOOR light goes off. The display will not be removed by the clean cycle.
s If the shelves become hard to open the door.
pad, enter the time of day you want the clean cycle to Delay the Start of Cleaning
Touch the SELF CLEAN...
Use and Care Manual - Page 24
...-resistant. Rinse well with a dry cloth.
24
Consumer Support Troubleshooting Tips Soap and water will normally do not need to remain on the electrical controls and switches because it could affect how ...to take this by hand on the door, you wear rubber gloves when cleaning the range. Be sure electrical power is replaced. Do not spray any oven cleaner on the oven door, handles...
Use and Care Manual - Page 26
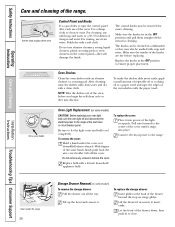
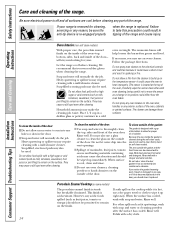
...Operating Instructions
Care and Cleaning
Care and cleaning of the same hand, firmly push back the wire cover holder. Use a damp cloth to ensure proper placement. Make sure the knobs are ...damage the finish.
Do not remove any screws to the range.
Oven Shelves
Clean the oven shelves with a soft cloth. Connect electrical power to remove the cove.r
Replace bulb with the paper...
Use and Care Manual - Page 33
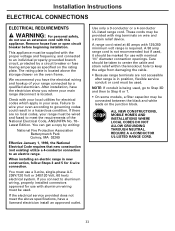
... (not existing) utilize a 4-conductor connection to aluminum wiring, properly installed connectors approved for 4-wire connection. Remove house fuse or open circuit breaker before beginning installation.
When installing an electric range in a hazardous condition.
If you have the electrical wiring and hookup of the National Electrical Code, ANSI/NFPA No. 70- The rating plate...
Use and Care Manual - Page 35
...
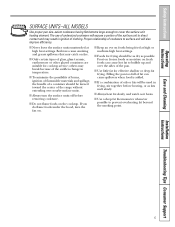
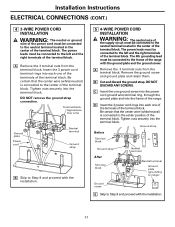
Neutral terminal Ground plate (grounding to range)
Ground screw
E Skip to Step 8 and proceed with the installation.
5 4-WIRE POWER CORD INSTALLATION
WARNING: The neutral wire of
the supply circuit must be connected to the left and the right terminals of the terminal block. Installation Instructions ELECTRICAL CONNECTIONS (CONT.)
4 3-WIRE POWER CORD INSTALLATION
WARNING: The neutral...
Use and Care Manual - Page 38
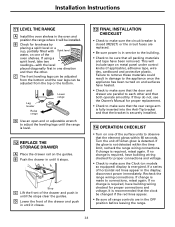
... be sure that the element glows within the time limit, recheck the range wiring connections. If using a spirit level, take two readings-with Spirit level...range
Lower range
D Use an open-end or adjustable wrench to connections, retest again. If no change is in the display, disconnect power immediately. Turn the unit off when glow is required, retest again. Recheck the range wiring...
Use and Care Manual - Page 40
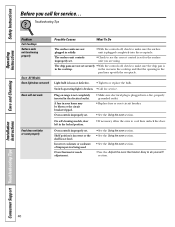
...•With the controls off , check to make sure the surface unit is plugged completely into a live, properly grounded outlet.
• ...into the receptacle. Oven controls improperly set.
• Make sure electrical plug is broken. •Call for service... Oven controls improperly ... or cookware of improper size being used.
Plug on range is
in your home may be blown or the circuit...
Similar Questions

Bad Line
When I opened my house for the summer the G E Gas Oven JGSP28 was flashing BAD LINE with a loud tone...
When I opened my house for the summer the G E Gas Oven JGSP28 was flashing BAD LINE with a loud tone...
(Posted by cbaum111 9 years ago)
Lower Bake Element Will Not Come On/ Small Inner Element Inside Large One
in oven there is a double bake element, what is the function on the smaller inside one and how and w...
in oven there is a double bake element, what is the function on the smaller inside one and how and w...
(Posted by milton4219 12 years ago)

J B710sh2ss Oven Range Wiring Schematic
I Want User Manual And Wiring Schematic of GE Electric Oven Range Mod. J B710SH2SS
I Want User Manual And Wiring Schematic of GE Electric Oven Range Mod. J B710SH2SS
(Posted by apply 12 years ago)


Current Range Is Hard Wired Is This Ok With This Ge Profile Stove
(Posted by danmorrow56 13 years ago)