Get support for Gigabyte GA-H67M-D2-B3

Gigabyte GA-H67M-D2-B3 Support Question

Gigabyte GA-H67M-D2-B3 Support Question

Find answers below for this question about Gigabyte GA-H67M-D2-B3.
Need a Gigabyte GA-H67M-D2-B3 manual? We have 1 online manual for this item!
Question posted by raycharles844 on November 7th, 2023

Porque Não Tem Tpm,só Modo Herdado E Não Tem Como Habilitar

The person who posted this question about this Gigabyte product did not include a detailed explanation. Please use the "Request More Information" button to the right if more details would help you to answer this question.

Requests for more information

Request from raycharles844 on November 8th, 2023 10:43 AM
Olha a GA H67M D2 B3 não tem TPM,só modo Herdado para habilita o modo de segurança Placa mãe Gigabytes Award V6,

no modo de segurança não não abre , é preciso para instalar o Windows 11


Current Answers

Answer #1: Posted by SonuKumar on November 7th, 2023 8:37 PM
This answer was accepted by the poster of the original question.
SonuKumar

Member since:
May 9th, 2021

Points: 16,604,810
1,100
points
A placa-mãe Gigabyte GA-H67M-D2-B3 não possui TPM 2.0 porque foi lançada em 2012, antes do lançamento do TPM 2.0. O TPM 2.0 é um requisito para instalar o Windows 11, mas a GA-H67M-D2-B3 não foi projetada para suportar esse recurso.

A placa-mãe possui um TPM 1.2, mas o modo TPM herdado não é compatível com o Windows 11. O modo TPM herdado é um recurso legado que foi projetado para ser usado com sistemas operacionais anteriores ao Windows 11. O Windows 11 requer o modo TPM 2.0 para fornecer segurança aprimorada.

Se você deseja instalar o Windows 11 em uma placa-mãe Gigabyte GA-H67M-D2-B3, você precisará substituir a placa-mãe por uma que suporte TPM 2.0. Você também pode tentar atualizar o BIOS da placa-mãe para ver se há uma atualização que habilite o modo TPM 2.0, mas isso é improvável, pois a placa-mãe foi lançada há mais de 10 anos.

Aqui estão algumas opções para substituir a placa-mãe Gigabyte GA-H67M-D2-B3:

Você pode procurar uma placa-mãe Gigabyte mais recente que suporte TPM 2.0.

Você pode procurar uma placa-mãe de outra marca que suporte TPM 2.0.

Você pode procurar uma placa-mãe usada que suporte TPM 2.0.

Ao escolher uma nova placa-mãe, é importante verificar os requisitos do Windows 11 para garantir que ela seja compatível com o sistema operacional.


Please respond to my effort to provide you with the best possible solution by using the "Acceptable Solution" and/or the "Helpful" buttons when the answer has proven to be helpful.

Regards,
Sonu
Your search handyman for all e-support needs!!

Related Gigabyte GA-H67M-D2-B3 Manual Pages

Manual - Page 1

GA-H67M-D2-B3 LGA1155 socket motherboard for Intel® Core™ i7 processors/ Intel® Core™ i5 processors/Intel® Core™ i3 processors/ Intel® Pentium® processors/Intel® Celeron® processors User's Manual Rev. 1101 12ME-H67MD2B-1101R
Manual - Page 2

Motherboard GA-H67M-D2-B3 Jan. 28, 2011 Motherboard GA-H67M-D2-B3 Jan. 28, 2011
Manual - Page 3

... means without prior notice. Disclaimer Information in the use of GIGABYTE. For example, "REV: 1.0" means the revision of this : "REV: X.X." Example: No part of the motherboard is protected by any form or by copyright laws and is the property of this manual is 1.0. Copyright © 2011 GIGA-BYTE TECHNOLOGY CO., LTD.
Manual - Page 4

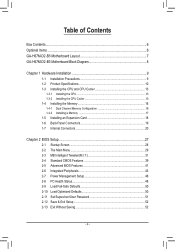
Table of Contents Box Contents...6 Optional Items...6 GA-H67M-D2-B3 Motherboard Layout 7 GA-H67M-D2-B3 Motherboard Block Diagram 8 Chapter 1 Hardware Installation 9 1-1 Installation Precautions 9 1-2 Product Specifications 10 1-3 Installing the CPU and CPU Cooler 13 1-3-1 Installing the CPU 13 1-3-2 Installing the CPU Cooler ...
Manual - Page 6

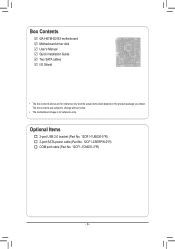
Box Contents GA-H67M-D2-B3 motherboard Motherboard driver disk User's Manual Quick Installation Guide Two SATA cables I/O Shield • The box contents above are subject to change without notice. • The motherboard image is for reference only and the actual items shall depend on the product package you obtain. The box contents are for reference only. Optional...
Manual - Page 7

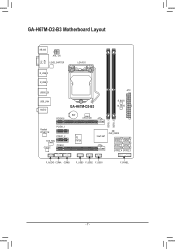
GA-H67M-D2-B3 Motherboard Layout KB_MS ATX_12V Level Shifter LGA1155 DVI VGA DDR3_1 DDR3_2 R_USB_2 R_USB_1 ATX USB30_20 USB_LAN AUDIO GA-H67M-D2-B3 PCIEX16 BAT CPU_FAN B_BIOS M_BIOS Realtek RTL8111E PCIEX1_1 PCIEX1_2 SYS_FAN CODEC PCIEX4 iTE IT8728 Intel® H67 CLR_CMOS SATA3_0 SATA3_1 SATA2_2 SATA2_3 SATA2_4 SATA2_5 F_AUDIO ...
Manual - Page 8

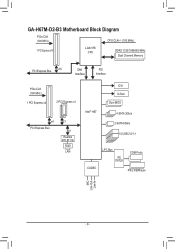
GA-H67M-D2-B3 Motherboard Block Diagram PCIe CLK (100 MHz) CPU CLK+/- (100 MHz) 1 PCI Express x16 LGA1155 CPU DDR3 1333/1066/800 MHz Dual Channel Memory PCI Express ...
Manual - Page 9

... the AC power by your dealer. Chapter 1 Hardware Installation 1-1 Installation Precautions The motherboard contains numerous delicate electronic circuits and components which can lead to damage to system components... Turning on the computer power during the installation process can become damaged as a motherboard, CPU or memory. If you are uncertain about any metal leads or connectors...
Manual - Page 12

... Center ŠŠ Support for Xpress Install ŠŠ Support for Xpress Recovery2 ŠŠ Support for EasyTune * Available functions in EasyTune may differ by motherboard model. ŠŠ Support for Smart 6™ ŠŠ Support for Auto Green ŠŠ Support for eXtreme Hard Drive (X.H.D) ŠŠ Support for ON...
Manual - Page 13

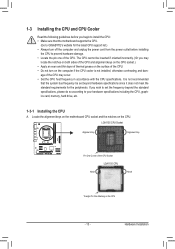
If you begin to install the CPU: •• Make sure that the motherboard supports the CPU. (Go to GIGABYTE's website for the latest CPU support list.) &#...•• Set the CPU host frequency in accordance with the CPU specifications. Locate the alignment keys on the motherboard CPU socket and the notches on the surface of the CPU. •• Do not turn off the computer...
Manual - Page 14

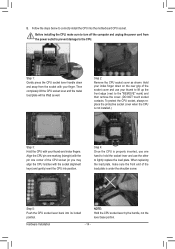
... CPU socket, always replace the protective socket cover when the CPU is under the shoulder screw. Step 5: Push the CPU socket lever back into the motherboard CPU socket. Before installing the CPU, make sure the front end of the CPU socket (or you may align the CPU notches with your finger...
Manual - Page 15

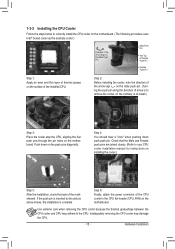
...1-3-2 Installing the CPU Cooler Follow the steps below to correctly install the CPU cooler on the motherboard. (The following procedure uses Intel® boxed cooler as the picture above shows, the installation.... Hardware Installation Step 4: You should hear a "click" when pushing down on the motherboard. If the push pin is inserted as the example cooler.) Direction of the Arrow Sign...
Manual - Page 16

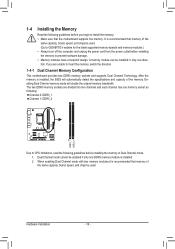
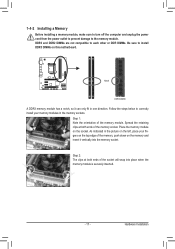
... Memory Read the following : Channel 0: DDR3_1 Channel 1: DDR3_2 Due to prevent hardware damage. •• Memory modules have a foolproof design. It is recommended that the motherboard supports the memory. If you begin to install the memory: •• Make sure that memory of the same capacity, brand, speed, and chips be...
Manual - Page 17

..., place your memory modules in the memory sockets. Spread the retaining clips at both ends of the memory module. Place the memory module on this motherboard. DDR3 and DDR2 DIMMs are not compatible to each other or DDR DIMMs. Be sure to install DDR3 DIMMs on the socket. Hardware Installation As...
Manual - Page 18

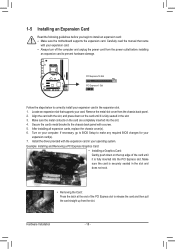
... computer. Make sure the metal contacts on the top edge of the PCI Express slot to install an expansion card: •• Make sure the motherboard supports the expansion card. Hardware Installation - 18 - Example: Installing and Removing a PCI Express Graphics Card: •• Installing a Graphics Card: Gently push down on your...
Manual - Page 19

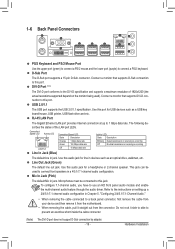
... Audio." •• When removing the cable connected to a back panel connector, first remove the cable from your device and then remove it from the motherboard. •• When removing the cable, pull it side to side to connect front speakers in jack. The following de- Line Out Jack (Green) The...
Manual - Page 20

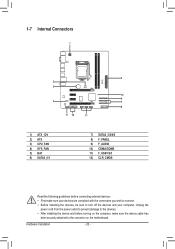
... 11 1) ATX_12V 2) ATX 3) CPU_FAN 4) SYS_FAN 5) BAT 6) SATA3_0/1 7) SATA2_2/3/4/5 8) F_PANEL 9) F_AUDIO 10) COMA/COMB 11) F_USB1/2/3 12) CLR_CMOS Read the following guidelines before turning on the motherboard. Hardware Installation - 20 - Unplug the power cord from the power outlet to prevent damage to the devices. •• After installing the device and before...
Manual - Page 21

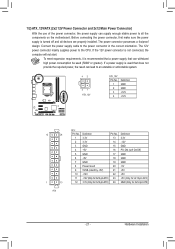
If the 12V power connector is turned off and all the components on the motherboard. The 12V power connector mainly supplies power to the power connector in the correct orientation. If a power supply is recommended that a power supply that does ...
Manual - Page 22

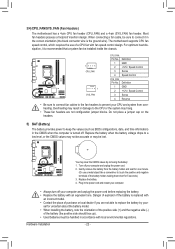
... the negative side (-) of the battery holder, making them short for one . The motherboard supports CPU fan speed control, which requires the use a metal object like a screwdriver to...dissipation, it in the CMOS when the computer is the ground wire). 3/4) CPU_FAN/SYS_FAN (Fan Headers) The motherboard has a 4-pin CPU fan header (CPU_FAN) and a 4-pin (SYS_FAN) fan header. When connecting a ...
Manual - Page 24

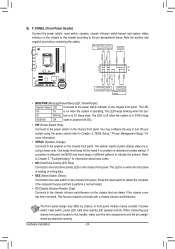
Note the positive and negative pins before connecting the cables. S1 Blinking tem is detected, the BIOS may issue beeps in S1 sleep state. If a problem is in different patterns to indicate the problem. This function requires a chassis ...

Similar Questions

En Que Plataforma
En que plataforma descargo actualizacion del Bios
(Posted by david1997 5 months ago)
How To Enable Tpm 2.0
I dont see how to enable it..
(Posted by ulzzangxiaoii 2 years ago)
Tpm Header
Is there a TPM header in this motherboard?
(Posted by tuner7 2 years ago)
Alta Temperatura En Chipset
Es nomal 63º en MCP de la m68m-s2p? Recien la recibo del RMA y me dicen que esta funcionando bi...
(Posted by adolfocss488 10 years ago)
Ask a New Question
Use the box below to post a new question about this Gigabyte product .
Points & Prizes
  • You can earn points for nearly everything you do on HelpOwl.com
  • You can trade in those points for gift cards at leading retailers such as Amazon.com and Walmart
  • It's that simple!
See How it Works
Create a Free Account

Gigabyte Manuals

Find free Gigabyte GA-H67M-D2-B3 manuals and user guides available at ManualOwl.com. Try out our unique manual viewer allowing you to interact with manuals from directly within your browser!

Gigabyte Reviews

View thousands of Gigabyte user reviews and customer ratings available at ReviewOwl.com.

Contact Information

Complete Gigabyte customer service contact information including steps to reach representatives, hours of operation, customer support links and more from ContactHelp.com.

Scoreboard Ratings

See detailed Gigabyte customer service rankings, employee comments and much more from our sister site.