Haier HLP21N Support Question
Haier HLP21N Support Question
Find answers below for this question about Haier HLP21N.Need a Haier HLP21N manual? We have 2 online manuals for this item!
Question posted by Jewel62761 on January 29th, 2021
My Washer Is Leaking From Hose Connection From Sink, ,
The person who posted this question about this Haier product did not include a detailed explanation. Please use the "Request More Information" button to the right if more details would help you to answer this question.
Current Answers
Answer #1: Posted by Odin on January 29th, 2021 7:30 AM
Odin

Member since:
April 10th, 2010 Points: 41,236,630

Member since:
April 10th, 2010 Points: 41,236,630
Hope this is useful. Please don't forget to click the Accept This Answer button if you do accept it. My aim is to provide reliable helpful answers, not just a lot of them. See https://www.helpowl.com/profile/Odin.
Related Haier HLP21N Manual Pages
Energy Guide Label - Page 1

.../appliances. Estimated operating cost based on eight wash loads a week and a 2007 national average electricity cost of 10.65 cents per therm. Clothes Washer Capacity:Compact
Model HLP21N
Estimated Yearly Operating Cost
(when used with an electric water heater)
$23
$19
$49
Cost Range of Similar Models
214KWh
Estimated Yearly Electricity Use...
User Manual - Page 3

Prepare and Sort Laundry 19 Step 2 - For future reference, record the model and serial number located on back of the washer, and the date of purchase
1
TABLE OF CONTENTS
... purchasing this manual to aid in obtaining warranty service if needed.
Connect the Water Hose 13 Step 8 - Start the Washer 20
CARE AND CLEANING GUIDE 21 Cleaning and Maintenance 21 Vacationing Precautions...
User Manual - Page 4

... instructions before it is used.
• Do not store or install this user
manual.
• Do not use the washer for commercial clothes washing. • This washer has only one water inlet hose for filling the wash basket with all of the instructions before using this appliance. • Use this appliance only for...
User Manual - Page 5

...
soaked in the wash water. SAVE THESE INSTRUCTIONS
HOUSEHOLD USE ONLY
3 GENERAL SAFETY PRECAUTIONS • Keep the area around your washer by or near
children. Always grasp
the plug firmly and pull straight out from the outlet.
• To minimize the possibility... or
explosive substances to carry out.
• Before discarding or removing from service, remove the washer door or
lid.
User Manual - Page 7

...; Pliers • Wrench • Phillips Screwdriver
• Measuring Tape • Carpenter's Level
PARTS SUPPLIED
• Drain Hose Hook
• Water Hose
(flat washers pre-installed)
FRONT FACE TO FLOOR
• Bottom Panel
• Bottom Panel
Screw (6)
• Caster (4)
• Caster Wrench
• Quick Sink Faucet
Adapter
• Cable Tie • User Manual
5
User Manual - Page 8

... it will freeze and cause damage to temperatures below 32°F (0°C). WASHER DIMENSIONS
29 76.0 cm)
17¼" (43.8 cm)
17 44.7 cm)
6
LOCATION REQUIREMENTS • The washer must be installed on the
washer.
• Only connect to cold water tap (faucet). • The water pressure should be level with maximum slope of...
User Manual - Page 9

.... (76 L). Wall
Floor
31½" - 47¼" (80 cm - 120 cm)
LAUNDRY TUB
The laundry tub must be at least 311/2" (80 cm) and no more than 471/4"(120 cm).
31...½" - 47¼" (80 cm - 120 cm)
7 The minimum diameter of the standpipe must be between 311/2" (80 cm) and 471/4"(120 cm) from the bottom of the washer...
User Manual - Page 10

... 3 prong plug adapter. • Do not use an extension cord.
8 WARNING
Improper connection of the equipment-grounding conductor can result in doubt as to a properly grounded 120 volt, ... electric shock.
or 20-amp, fused electrical supply. ELECTRICAL REQUIREMENTS
WARNING
The washer must be connected to whether the appliance is properly installed and grounded in accordance with a cord...
User Manual - Page 11

... a qualified appliance technician. Open the top lid to remove. Pull to remove the wash basket brace.
Remove all adhesive tape holding the washer accessories inside and outside temperature was below freezing, do not operate until the washer warms up to room temperature. STEP 1 - NOTE: Save the wash basket brace to install the...
User Manual - Page 12

... of cardboard or other packing material away from the bottom, left -hand side of the cardboard or protective material. STEP 2 - Lay the washer on its full length. Remove the hose clamp. WARNING
Suffocation Hazard
To avoid danger of suffocation, keep plastic bag and other protective material on top...
User Manual - Page 13
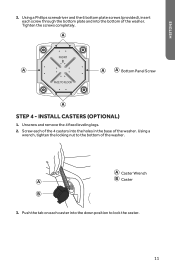
...and the 6 bottom plate screws (provided), insert each screw through the bottom plate and into the bottom of the washer.
Caster Wrench Caster
3. FRONT FACE TO FLOOR
Bottom Panel Screw
STEP 4 - INSTALL CASTERS (OPTIONAL)
1. Using....
11 Screw each caster into the holes in the base of the washer. Push the tab on each of the 4 casters into the down position to the bottom of the...
User Manual - Page 15

... counterclockwise to adjust the height. SECURE THE DRAIN HOSE
1. Put the drain hose hook end in a drain pipe or laundry tub.
2. Secure the drain hose in each end of the water
inlet hose. Raise
Lower
Locking Nut
STEP 6 - CONNECT THE WATER HOSE
IMPORTANT: Only use a new hose when installing the washer.
CASTERS
Using the caster wrench turn the locking...
User Manual - Page 16

...damage to cold. 1. Thread the grey end of the washer until snug. If there is any leaking, check for leaks. IMPORTANT: To avoid damage to the hose coupling, do not overtighten. OPTION 1 -
Then using ...the inlet hose onto the water faucet by hand onto the inlet valve on the water faucet and check for loose connections and tighten.
14 IMPORTANT: To avoid damage to the hose coupling,...
User Manual - Page 17

... the correct size.
3. Removable Washer
Secondary Washer (Do not remove)
Washer Support (Do not remove)
Silver Faucet Connector NOTE: The faucet connector (provided) is any leaking, check for loose connections and tighten. 15 Internal Threads
External Threads
Rubber Washer
Silver Faucet Connector
Quick-sink Faucet Adaptor
Water Inlet Hose
4. Attach the quick-sink faucet adaptor to the...
User Manual - Page 18

... cycle using detergent to the water faucet.
Water Inlet Hose
STEP 8 - Check that the hoses will stay in place.
Water Inlet Hose Cable Ties Drain Hose
IMPORTANT: Place the extra hose length (slack) inside the sink to avoid strain and possible damage to test and
clean the washer. D ispose of/recycle all packaging materials. 4. COMPLETE INSTALLATION
1. See...
User Manual - Page 21

...the container to achieve optimum results. STEP 2 - Follow the
detergent use a liquid
laundry detergent to determine the amount of detergent.
Pour measured liquid detergent directly into the ... cycle and allow the liquid detergent to clean well in the washer. OPERATING INSTRUCTIONS
STEP 1 - SORT LAUNDRY • Sort laundry by the type of the wash basket or clogging the drain pump...
User Manual - Page 22

... wash basket. STEP 4 -
Undissolved powered detergent may reduce
wash efficiency, cause excess wear and possibly cause creasing or wrinkling of the load.
• The washer will not pulsate or spin with a small amount of water.
Load laundry evenly and loosely in water. IMPORTANT: Be careful not to spill undiluted bleach onto the...
User Manual - Page 23

...
GENERAL CARE • Only use a damp or sudsy cloth for damage to
your home if a water hose ruptures or leaks.
• Unplug the washer from the original packing
materials back into the washer cabinet. • If moving the washer, place the wash basket brace from the electrical outlet. • Dry the wash basket. • Leave...
User Manual - Page 24

....
Water leaks:
• Check that the inlet hose connection at the faucet and washer are tight. • Check that the drain hose connection at the washer is secure and that the drain
hose is properly positioned at least 311/2" (80 cm) above the floor.
• Check that the sink or drain pipe is normal in some cycles. Laundry may need...
User Manual - Page 25

...of dyes. • Large and heavily soiled laundry may need more detergent. Do not pour detergent directly on the
floor and that the washer is level. If you are resting firmly on
garments...Bleach stains - Do not pour or splash bleach directly on clothes.
Vibration Noises:
• Washer may not completely dissolve in
the wash basket. Tie strings and sashes. FOR MORE HELP, VISIT ...
Similar Questions

My Washer Leakes Water Out The Drain Hose While Filling For Wash Cycle
(Posted by tedmccune 2 years ago)

Water Leaks Under Machine
I replace the belt end it is running better however now it is leaking water under the machin
I replace the belt end it is running better however now it is leaking water under the machin
(Posted by Snanco 3 years ago)

There's A White Hose Underneath The Washer That Ain't Hooked To Nothing And Is N
When when you're using the washing machine the water never quits running out of that hose
When when you're using the washing machine the water never quits running out of that hose
(Posted by Anonymous-168238 3 years ago)

Haier Hlp21n Washer
Haier HLP21N washer fills and drains but won't agitate or spin. Any suggestions?
Haier HLP21N washer fills and drains but won't agitate or spin. Any suggestions?
(Posted by vidyamahadeo 8 years ago)

Washer And Hose Needed For My Machine
just bought the haier hlp28E-R washer and I'm trying to wash clothes but the water is not going insi...
just bought the haier hlp28E-R washer and I'm trying to wash clothes but the water is not going insi...
(Posted by dellmullins 8 years ago)