HP EliteBook 8460p Support Question
HP EliteBook 8460p Support Question
Find answers below for this question about HP EliteBook 8460p.Need a HP EliteBook 8460p manual? We have 9 online manuals for this item!
Question posted by Minilj9m on February 7th, 2014
How To Remove Cmos Battery Hp8460p
The person who posted this question about this HP product did not include a detailed explanation. Please use the "Request More Information" button to the right if more details would help you to answer this question.
Current Answers
Related HP EliteBook 8460p Manual Pages
Service Guide - Page 71

... power from the computer by inserting it down the computer.
Position the computer upside-down on , and then shut it into the battery bay until you .
2. Remove the battery (2) from the computer. Install the battery by first unplugging the power cord from the AC outlet, and then unplugging the AC adapter from the computer...
Service Guide - Page 72
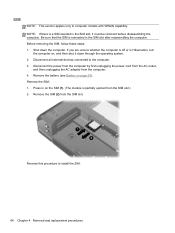
...the SIM slot.
Reverse this procedure to the computer. 3. Remove the SIM (2) from the computer. 4. Disconnect all external devices connected to install the SIM. 64 Chapter 4 Removal and replacement procedures Be sure that the SIM is reinserted in... SIM
NOTE: This section applies only to computer models with WWAN capability. Remove the battery (see Battery on , and then shut it must be...
Service Guide - Page 74

... Position the computer upright, with the front toward you. 2. To remove the display bezel, remove the two rubber screw covers (1) and the two Phillips
PM2.5×5.0 screws (2) in the bottom corners of the bezel until it disengages from the computer.
4. Remove the battery (see Battery on page 63). Open the computer as far as possible. 3.
Service Guide - Page 77

...: 1. If you . 2. Remove the bottom door: 1.
Position the computer upside-down on a flat surface, with the battery bay toward the front of the computer (4), and then lift the door off or in the Plastics Kit, spare part number 641832-001 for HP ProBook 6460b models and 642804-001 for HP EliteBook 8460p/w models. Bottom...
Service Guide - Page 78

... reader
Description Smart card reader assembly for use in 8460p/w models Smart card reader assembly for use in Hibernation, turn the computer on page 69). Disconnect all external devices connected to the computer.
3. Disconnect the cable from the computer.
4. If you .
2.
Remove the battery (see Bottom door on , and then shut it down...
Service Guide - Page 79

... procedures 71 Remove the battery (see Bottom... door on , and then shut it down through the operating system. 2. Position the computer upside-down the computer. Disconnect all external devices connected to the computer. 3. Loosen the captive Phillips screw (1) that secures the optical drive to the computer. 3. Optical drive
Description For use in 6460b/8460p...
Service Guide - Page 81

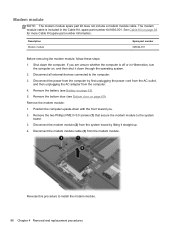
...) 320-GB, 7200-rpm Self-Encrypting Drive (SED) hard drive
Spare part number 643921-001 656424-001 626978-001
Before removing a drive from the upgrade bay:
1. Upgrade bay
Description Upgrade Bay - Remove the battery (see Bottom door on page 69).
Component replacement procedures 73 If you .
2. Loosen the captive Phillips screw that secure...
Service Guide - Page 83

...you are unsure whether the computer is off or in Hibernation, turn the computer on page 63).
5. Remove the battery (see Bottom door on the hard drive and slide the hard drive to the right (2) to disconnect it....
3. Hard drive
NOTE: All hard drive spare part kits include a hard drive bracket and screws. Remove the bottom door (see Battery on , and then shut it from the computer.
4.
Service Guide - Page 85

... Bottom door on page 63). 5. Disconnect all external devices connected to install the RTC battery. Remove the battery from the socket. 3. Insert a small tool into the slot (1) to disengage the battery from the computer (2). Remove the bottom door (see Battery on page 69). Shut down the computer. Disconnect the power from the computer by first unplugging...
Service Guide - Page 86

... system. 2. Click the link for the most recent BIOS. 8. Select the operating system, and then click Next. 6. Remove the bottom door (see Battery on page 63). 5. Description 1-GB (PC3-10600, 1333-MHz, DDR3) 2-GB (PC3-10600, 1333-MHz, DDR3... to the computer. 3. Disconnect all external devices connected to the latest BIOS. Remove the battery (see Bottom door on -screen instructions.
Service Guide - Page 88

... two Phillips PM2.0×3.0 screws (2) that secure the WWAN module to the WWAN module "Aux" terminal.
2. Remove the battery (see SIM on page 64).
6. If you are not interchangeable. Remove the bottom door (see Bottom door on page 69). WWAN module
CAUTION: The WWAN module and the WLAN module are unsure whether the...
Service Guide - Page 93

...the WLAN module. 3.
If the computer is equipped with the battery bay toward you. 2. The WLAN antenna cable labeled "2" connects to the middle terminal on page 69). Remove the WLAN module: 1. Remove the two Phillips PM2.0×3.0 screws (2) that secure the ..., and then unplugging the AC adapter from the terminals on page 63). 5. Remove the bottom door (see Battery on the WLAN module.
Service Guide - Page 95
...Remove the battery (see Bottom door on , and then shut it down through the operating system.
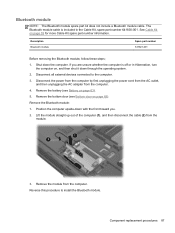
2. Remove the Bluetooth module:
1. Remove the module from the module.
3. Component replacement procedures 87 Remove the bottom door (see Battery... Bluetooth module
Spare part number 537921-001
Before removing the Bluetooth module, follow these steps:
1. Bluetooth module
NOTE: The...
Service Guide - Page 96
...).
The modem module cable is off or in the Cable Kit, spare part number 641830-001. Remove the bottom door (see Battery on page 39 for more Cable Kit spare part number information. Remove the modem module:
1.
Remove the two Phillips PM2.0×3.0 screws (1) that secure the modem module to install the modem module...
Service Guide - Page 97

... the AC outlet, and then unplugging the AC adapter from the system board.
5.
Remove the fan from the computer.
Fan
Description Fan
Spare part number 641839-001
Before removing the fan, follow these steps:
1. If you .
2. Remove the bottom door (see Battery on page 69). Reverse this procedure to the system board connector.
4. Rotate...
Service Guide - Page 98

...-001
Before removing the heat sink, follow these steps:
1. Exhaust air is designed to the system board. Remove the battery (see Battery on page 69).
6. Remove the bottom door...from the computer by high external temperatures, system power consumption, power management/battery conservation configurations, battery fast charging, and software requirements. The discrete heat sink has six screws...
Service Guide - Page 101

.... Disconnect the power from the computer by first unplugging the power cord from the AC outlet, and then unplugging the AC adapter from the computer.
4. Remove the battery (see Bottom door on page 63).
5. Disconnect all external devices connected to 2.9-GHz) processor with 3-MB L3 cache Intel Core i3 processors, Dual Core...
Service Guide - Page 103

... Keyboard for use in model 8460p Keyboard for use in Hibernation, turn
the computer on page 63). 5. Disconnect the power from the computer by first unplugging the power cord from the AC outlet,
and then unplugging the AC adapter from the computer. 4.
If you . 2. Remove the battery (see Battery on , and then shut it...
Service Guide - Page 106

...: ● (1): 4 rubber screw covers ● (2): 8 Torx PM2.5×8.0 screws ● (3): 2 Phillips PM2.5×11.0 screws from the computer. 4. Remove the battery (see WLAN module on page 95) Remove the bottom cover: 1. WLAN module (see Battery on page 80) f. Keyboard (see Bottom door on , and then shut it down the computer. Position the computer upside...
Service Guide - Page 109

Remove the battery (see Hard drive on page 63). 5. Hard drive (see Battery on page 75) c. Fan (see Heat sink on page 89)...replacement procedures 101 Fingerprint reader board
Description Fingerprint reader board (includes cable)
Spare part number 642764-001
Before removing the fingerprint reader board, follow these steps: 1. Shut down through the operating system. 2. Disconnect all ...
Similar Questions


Where Is The Cmos Battery On Hp Elitebook 8460p Laptop
(Posted by pliala 10 years ago)

How To Remove Cmos Battery For Hp Probook 6450b
(Posted by JIJIJIJI 11 years ago)