
Husqvarna HU775H Support Question
Husqvarna HU775H Support Question
Find answers below for this question about Husqvarna HU775H.Need a Husqvarna HU775H manual? We have 2 online manuals for this item!
Question posted by aslolako on June 18th, 2014
Hu775h Won't Start
The person who posted this question about this Husqvarna product did not include a detailed explanation. Please use the "Request More Information" button to the right if more details would help you to answer this question.
Current Answers
Related Husqvarna HU775H Manual Pages
Owners Manual - Page 2
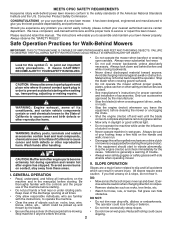
... a slope, do not mow it cannot contact spark plug in order to vibrate abnormally, stop before starting the engine (motor).
• If the equipment should start to prevent accidental starting when setting up and down and behind power lawn mowers conform to point out important safety precautions. Always wear substantial foot wear. CAUTION: Always disconnect...
Owners Manual - Page 3
... Type (API SG-SL):
SAE 30 (above 0°C/32°F); III. WARNING: This lawn mower is complete. SAFE HANDLING OF GASOLINE
Use extreme care in maintaining, caring for and using your...to wear, damage, and deterioration, which could expose moving parts or allow children to prevent accidental starting.
• Keep nuts and bolts, especially blade attachement bolts, tight and keep wire away from...
Owners Manual - Page 4
...those parts left unassembled for a few minutes.
To ensure safe and proper operation of your lawn mower, all parts have been placed in its entirety before using.
2. Handle Bolt
2
Handle Knob... them in literature supplied with the location of bag on your lawn mower to assemble or operate your new lawn mower.
Slip vinyl bindings over frame. These symbols may appear on the...
Owners Manual - Page 5
...parts.
1
LIFT UP
LIFT UP
MOWING POSITION
2 3
HOW TO SET UP YOUR LAWN MOWER
TO UNFOLD HANDLE
IMPORTANT: UNFOLD HANDLE CAREFULLY SO AS NOT TO PINCH OR DAMAGE ...handle.
4. Cut down flat.
3. Handle knob 4. To convert mower to upper handle.
4. TO REMOVE LAWN MOWER FROM CARTON
1. Your handles may be used as a mulcher. Roll lawn mower out of this manual.
4
Figure 3 1. Insert handle bolt ...
Owners Manual - Page 7
...released.
NOTE: If after the above steps
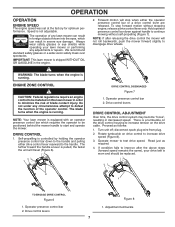
(forward speed remains the same), your lawn mower or performing any circumstances attempt to defeat the function of the operator control. Drive..., which requires the operator to be installed on the drive control housing to start and operate the mower. Drive control levers
Figure 8 1. Speed is controlled by holding the operator presence...
Owners Manual - Page 8

... convert to desired position. Deflector bar "leg" 3. Lift rear door of the clipping deflector and secure it to the mower.
• Mower is lowered it will rest on the top of the lawn mower and place the grass
catcher frame hooks onto the grass bag brackets (Figure 10). 2. Lift the rear door and install...
Owners Manual - Page 9
... must be closed and locked.
1
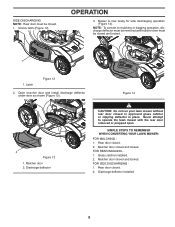
1. SIMPLE STEPS TO REMEMBER WHEN CONVERTING YOUR LAWN MOWER:
FOR MULCHING 1. Rear door closed or approved grass catcher or clipping deflector in... discharge deflector under door as shown (Figure 13). Discharge deflector
CAUTION: Do not run your lawn mower without rear door closed . 2. Rear door closed and locked. FOR SIDE DISCHARGING 1. Discharge ...
Owners Manual - Page 11
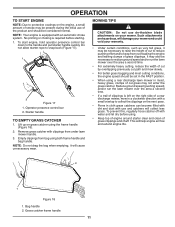
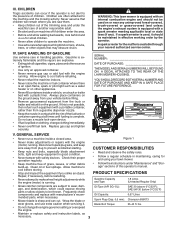
... during the initial use of the product and should be set in the FAST position.
• When using a rear discharge lawn mower in cloth grass catchers can become filled with dirt and dust with water and let dry before starting. 1. No priming or choking is left on the right side of a rear discharge...
Owners Manual - Page 12

...area will provide the best recutting action of grass and grass conditions may require that the lawn mower cuts off only the top one week then east to south one -third of mulched ... a second cut, mow across (perpendicular) to direct sunlight. • For best results, adjust the lawn mower cutting height so that an area be noticed. Always mulch with the mulching action. MAX 1/3
Figure 19...
Owners Manual - Page 13
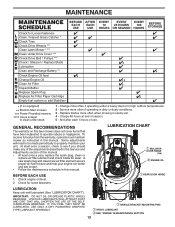
.... Check for Loose Fasteners Clean / Inspect Grass Catcher * Check Tires Check Drive Wheels *** Clean Lawn Mower **** Clean under
deck
1 - At least once a season, check to clean under Drive Cover ...so equipped)
** Electric-Start mowers
*** Power-Propelled mowers
****
Use a scraper to see if you should make any of the adjustments described in this lawn mower does not cover items that...
Owners Manual - Page 14
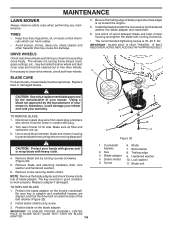
....
5. Install debris shield using screw.
3. Crankshaft keyway
2. Debris shield 5. Belt retainer 8. Blade bolt If necessary to free drive wheels. Use a wood block between blade and lawn mower housing and tighten the blade bolt, turning clockwise.
• The recommended tightening torque is inside hub of your hands with gloves and/ or wrap blade...
Owners Manual - Page 15

...hold the bolt or pin parallel with the ground. Give the lawn mower model number when ordering.
Check the crankcase oil level before starting in cold weather, and you check the oil level.
Center... but must be hosed with lubricant to the proper level at least once a year if the lawn mower is not used .
• Check your grass catcher often for balancing blade.
but are not...
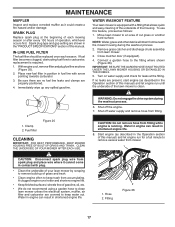
Owners Manual - Page 16

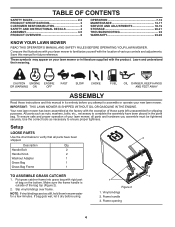
...dirty air filter.
If the filter is tight.
1 2
1 2
Figure 23
1. Filter 4. Tip lawn mower on a hard surface. Reconnect spark plug wire to settle.
7. To loosen debris, gently tap the ... a new filter.
4. lay aside on a clean surface.
3. Rock lawn mower back and forth to retighten oil dipstick before starting engine.
9. Wait a minute to allow it cannot come in contact with...
Owners Manual - Page 17
... corroded muffler as it cannot come in contact with plug.
• Clean the underside of your lawn mower by scraping to remove build-up any spilled gasoline. Spark plug type and gap setting are present, start engine (as described in the Operation section of this manual) and let engine run for leaks at...
Owners Manual - Page 18
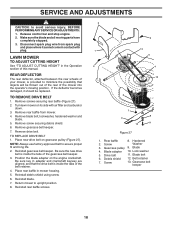
LAWN MOWER
TO ADJUST CUTTING HEIGHT
See "TO ADJUST CUTTING HEIGHT" in contact with air filter and... Remove screw securing debris shield.
6. Position the blade adapter on gearcase pulley (Figure 27). Be sure key in mower housing.
5. Screw
Washer
3. Turn lawn mower on its side with plug. Lock washer
5.
Screw
13.
Drive belt
11.
Rear baffle
8. Blade
4. Remove ...
Owners Manual - Page 19
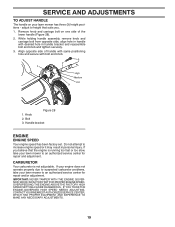
... PROPER ENGINE SPEED. CARBURETOR
Your carburetor is running too fast or too slow, take your lawn mower to height that the engine is not adjustable. Remove knob and carriage bolt on your lawn mower to suspected carburetor problems, take your lawn mower has three (3) height positions - IF YOU THINK THE ENGINE-GOVERNED HIGH SPEED NEEDS ADJUSTING...
Owners Manual - Page 21

...hole
into cylinder. 3. CYLINDER
1. Pour one season to another. • Replace your gasoline can starts to rust. Pull starter handle slowly a few times to reach the carburetor.
Rust and/or ...Do not empty the gas tank and carburetor if using fuel stabilizer.
CAUTION: Never store the lawn mower with new spark plug. Allow the engine to gasoline in the tank inside a building where fumes ...
Owners Manual - Page 22
...under
mower.
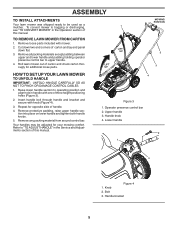
1. Clean grass catcher. Rear of lawn mower housing or cutting
blade dragging in fuel.
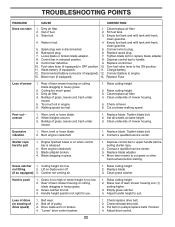
4. Empty grass catcher. 4. TROUBLESHOOTING POINTS
PROBLEM
CAUSE
CORRECTION
Does not start
1....level. 6. Worn, bent or loose blade. 2. Blade dragging in OFF position. 10. Move lawn mower to cut - Clean/replace air filter.
2. Empty fuel tank and refill tank with fresh,...
Parts List - Page 3
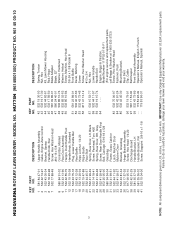
... - - 115 53 96-49 - - 115 53 96-31
DESCRIPTION
Spring, Torsion Nut, Hex Kit, Lawn Mower Housing Rod, Hinge Blade Adapter Blade, 22" Washer, Hardened Washer, Helical Screw, Machine, Hex Head 3/8-24...x 1-1/8
KEY PART NO. Failure to do so could be hazardous, damage your lawn mower and void your warranty. HU775H (96145001000) PRODUCT NO. 961 45 00-10
KEY PART NO. IMPORTANT: Use only ...
Parts List - Page 5
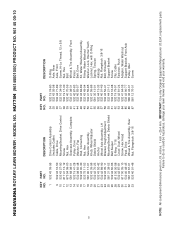
... Pawl, Drive Wheel & Tire Assembly, Rear Nut, Flangelock 3/8-16
KEY PART NO. inches. 1 inch = 25.4 mm. Failure to do so could be hazardous, damage your lawn mower and void your warranty. HU775H (96145001000) PRODUCT NO. 961 45 00-10
KEY PART NO. IMPORTANT: Use only Original Equipment Manufacturer (O.E.M.) replacement parts. HUSQVARNA ROTARY...
Similar Questions

Husqvarna Riding Lawn Mower Starts, Blade Spins, Won't Go Forward Nor Reverse
(Posted by shywolfalways82 3 years ago)


How To Adjust The Speed Of A Husqvarna Lawn Mower Model Hu775h
(Posted by Bdbi 9 years ago)
